The new iPhone 12 Pros come with a RAW photo format called ProRAW that gives you greater creative control while editing pictures. The feature has finally been released with the new iOS 14.3 update. Here’s a step-by-step guide on how you can enable ProRAW support on your iPhone 12 Pro or iPhone 12 Pro Max.
Also, read: How Apple Became Hypocrite With The iPhone 12 Launch
Enable Apple ProRAW on iPhone 12 Pro & iPhone 12 Pro Max
For starters, the Apple ProRAW format combines the information of standard RAW with iPhone image processing. As a result, you get more flexibility and control while editing the color, exposure, white balance, noise reduction, sharpening, etc., in your photo.
Moreover, shooting in ProRAW will give you an uncompressed image having the maximum information from the sensor. In all, you’re getting the benefits of RAW format alongside the perks of Apple’s computational photo processing.
Steps to Enable ProRAW Support on iPhone 12 Pro/ Pro Max
To capture images in ProRAW, all you need to do is enable the feature in the settings. But before we start, make sure that you have updated to the latest iOS 14.3. The format isn’t available on older iOS versions, including iOS 14.2 or earlier.
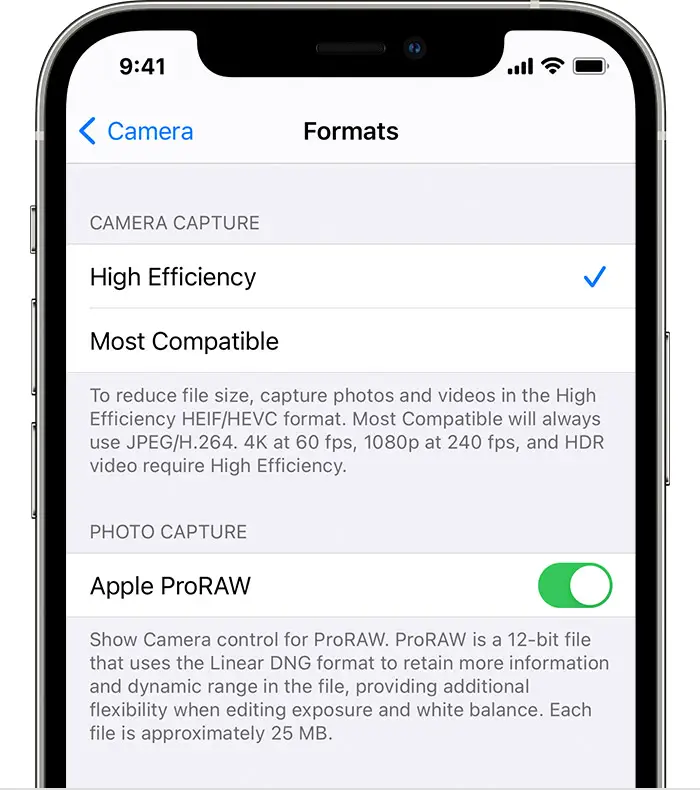
- Open the Settings app on your iPhone.
- Scroll down to Camera. Click on it.
- Here, click on Formats.
- On the next screen, turn on Apple ProRAW under Photo Capture.
That’s it; the ProRAW support has now been enabled on your iPhone. Note that photos will be captured in DNG format and weigh 10 to 12 times larger than HEIF or JPEG files. Usually, the file would measure about 25MB but can go as high as 40MB at times.
Steps to Click ProRAW Images on iPhone 12 Pro/ Pro Max
Follow the steps below to click pictures in the ProRAW format on your iPhone.
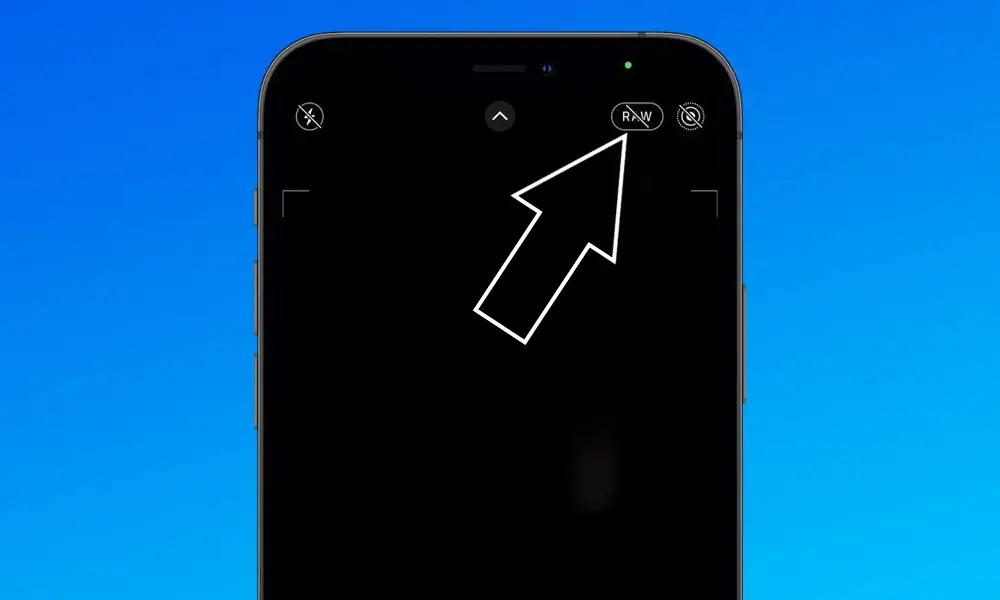
- Open the native Camera app on your iPhone.
- Tap the RAW icon in the top right corner.
- Capture the image using the shutter button as you’d normally do.
You can now open Adobe Lightroom or any photo editor of your choice, import the DNG file, and make desired edits. These pictures will appear with a RAW logo at the top left of the Photos app.
One can use ProRAW with Smart HDR, Deep Fusion, and Night modes. Plus, the images can be edited anywhere, be it the native Photos app or third-party apps on your phone or computer.
Wrapping Up
This was a quick guide on how you can enable ProRAW support on iPhone 12 Pro/ Pro Max and capture images in the ProRAW format. Note that the feature is only available on iPhone 12 Pro and Pro Max for now. If you have any doubts or queries, feel free to reach out via comments below.
Also, read- How to Get Shazam Music Recognition in Control Center on iOS 14