Some users who have recently upgraded to Windows 11 have reported the issue of slow startup time on their system. While this can occur due to a variety of underlying reasons, we have addressed and handpicked the top 5 ways to eradicate this problem and fix slow startup time on your Windows 11 machine. Meanwhile, you can learn to fix widgets not working on Windows 11.
Also, Read | 5 Best Ways to Speed Up Your Old PC without Re-installing Windows
Ways to Boost Startup Time in Windows 11
Ensure that Fast Startup is Enabled in Windows 11
Like prior Windows versions, Windows 11 offers the feature of fast startup to its users to ensure that the system boots up as quickly as possible. Follow these easy steps to ensure that this feature is enabled on your Windows machine.
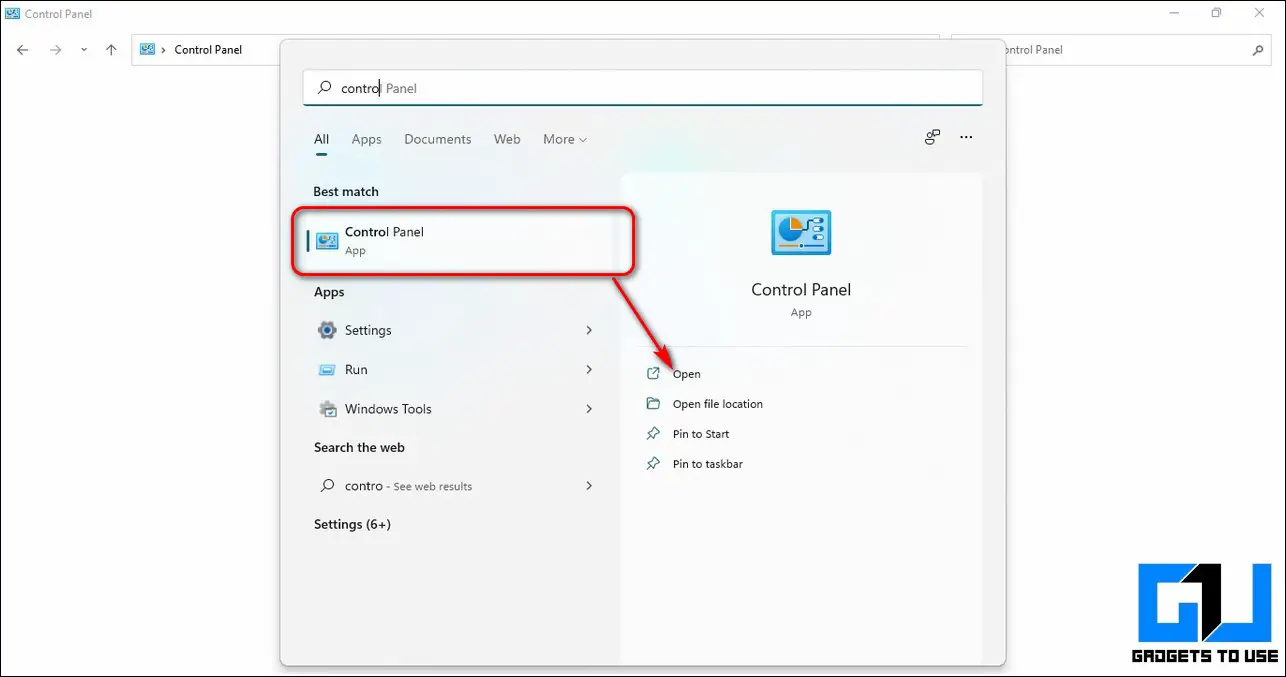
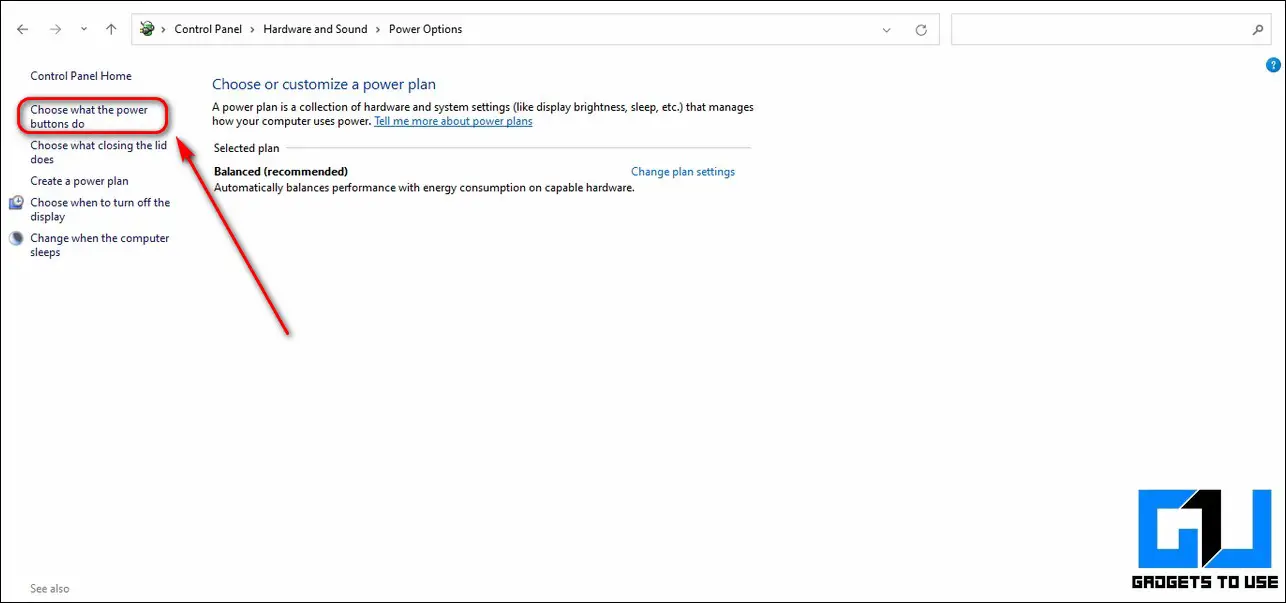
- Press the Windows key and search for the Control Panel app to open it.
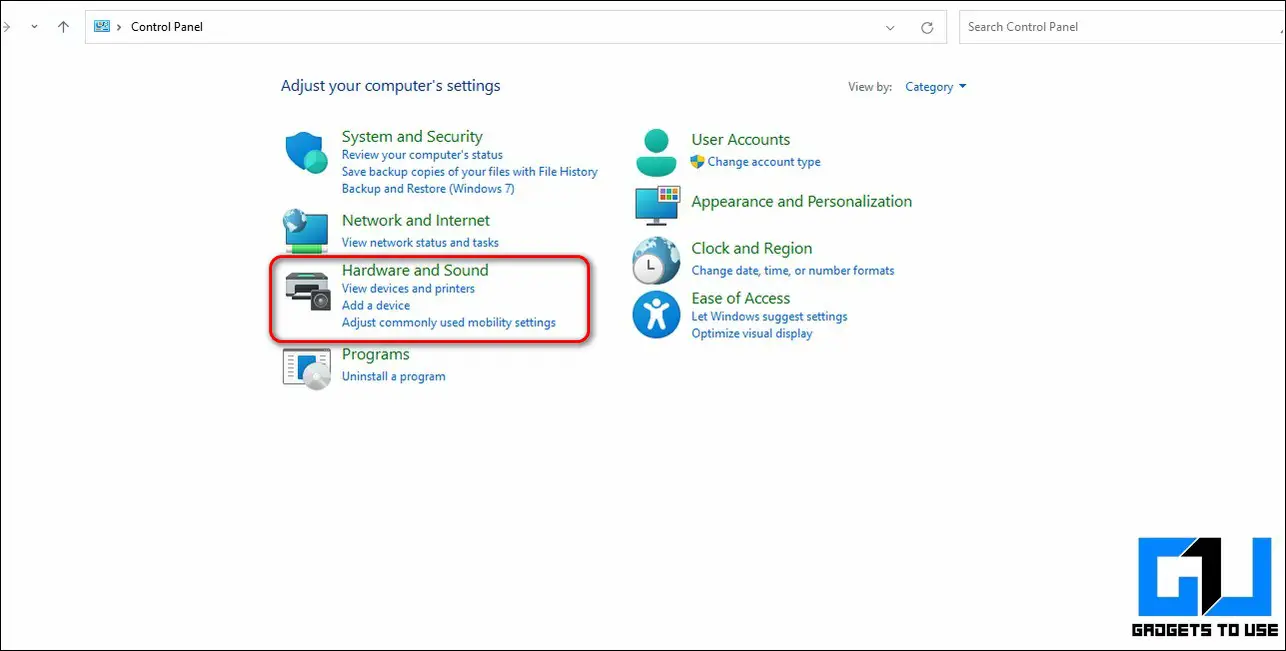
- Click on the Hardware and Sound Options.
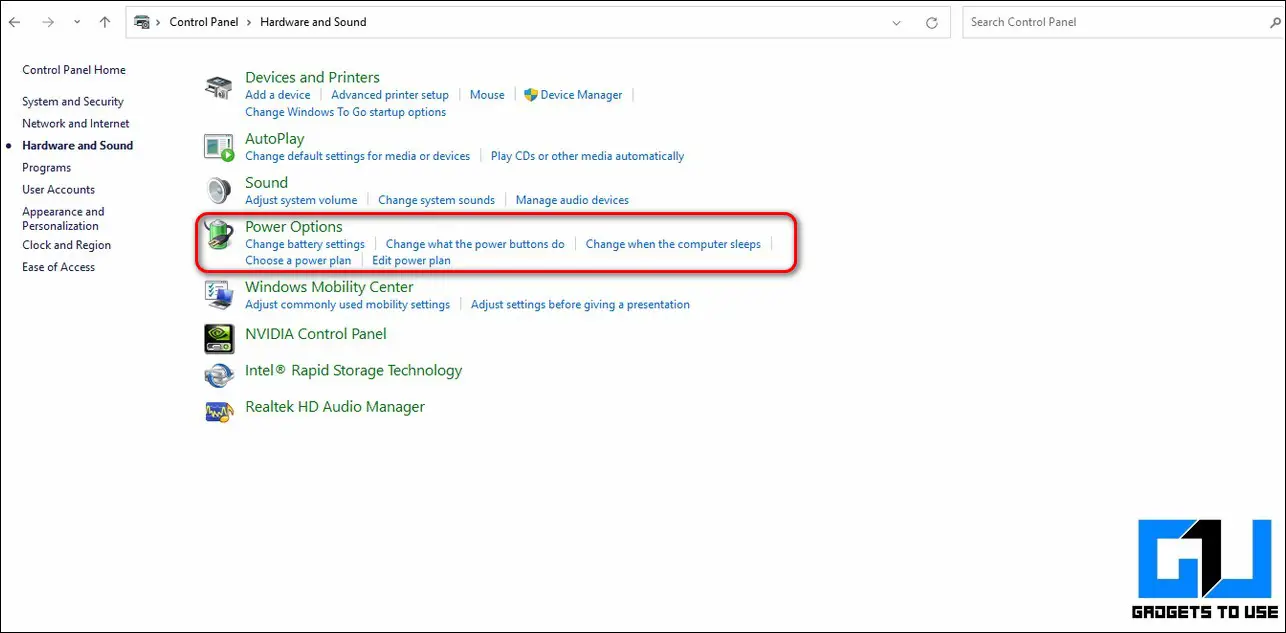
- Open the Power Options by clicking on it.
- In the left sidebar, click on Choose what the power buttons do.
- Ensure that the Turn on Fast Startup option is enabled. If it is disabled, you need to click on the Change Settings that are currently unavailable option and enable the Turn on Fast Startup option.
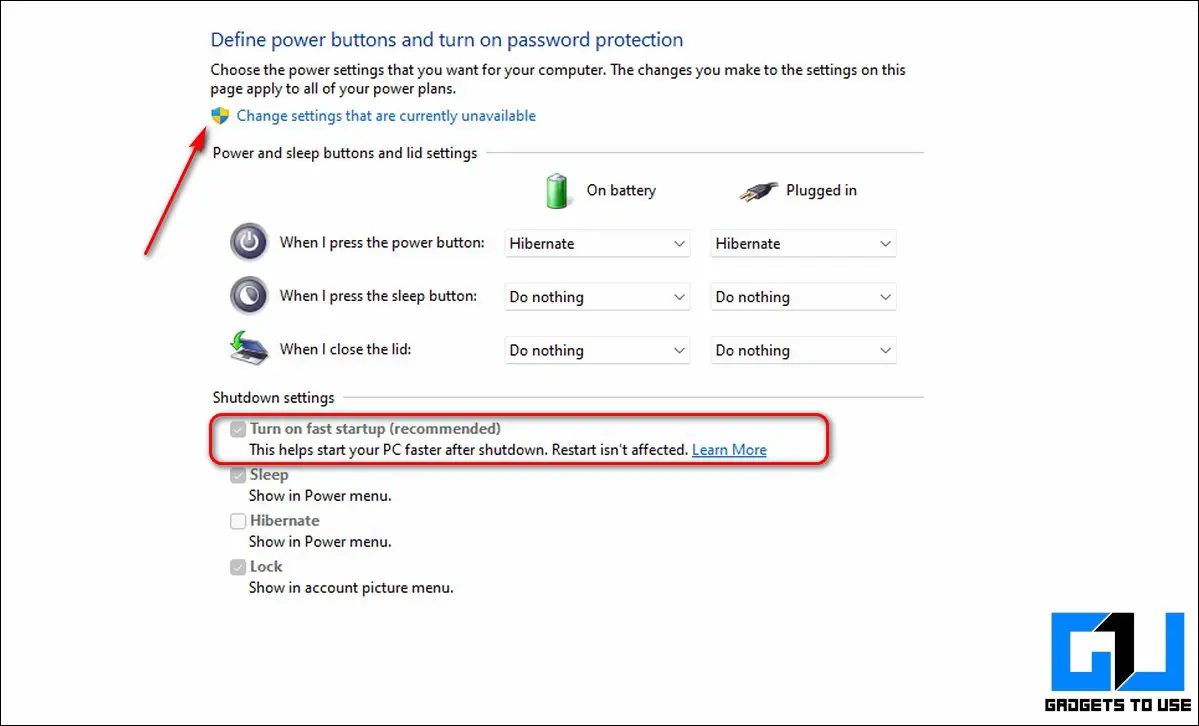
- That’s it. You’ve successfully enabled fast startup mode on your system.
Turn Off Unnecessary Startup Programs and Apps
To improve and significantly boost startup time in Windows 11, you should turn off unnecessary apps that consume system resources during startup. Follow these steps for an easy fix.
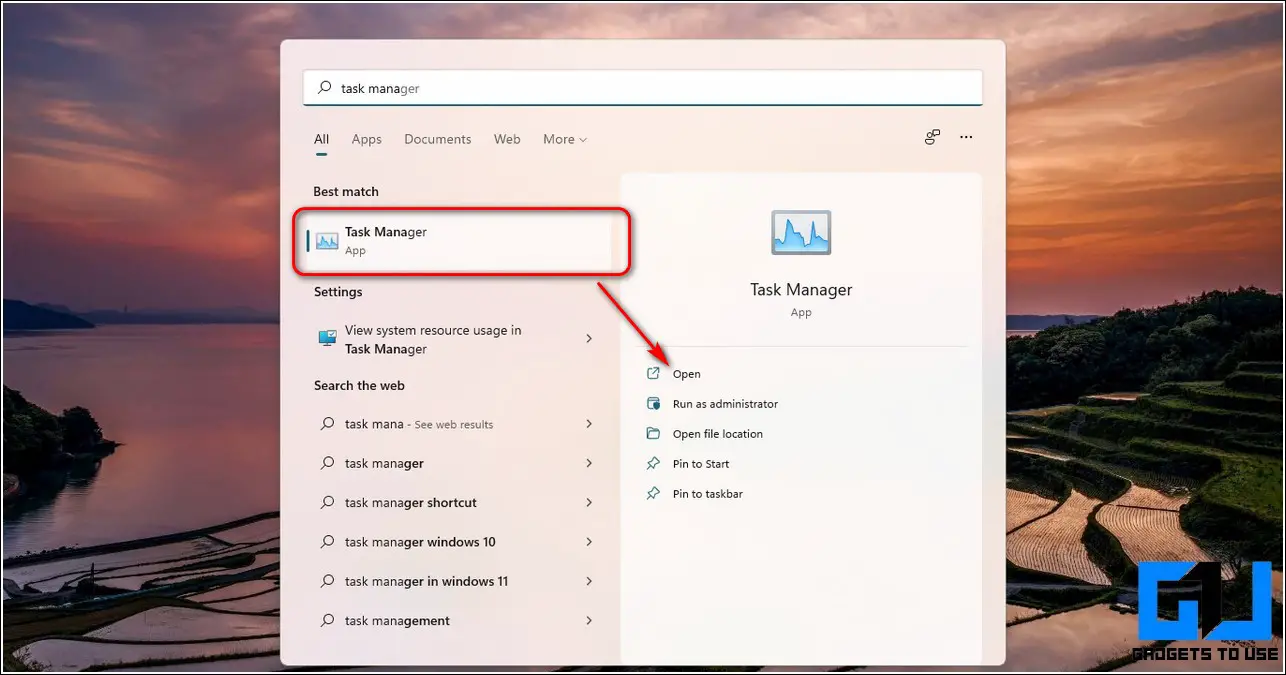
- Press the Windows key and search for the Task Manager app to open it. Alternatively, you can also press Ctrl + Alt + Del key simultaneously to launch the app.
- Navigate to the Startup Tab inside the Task Manager Window.
- Locate and identify the unnecessary apps that have medium or high startup impact.
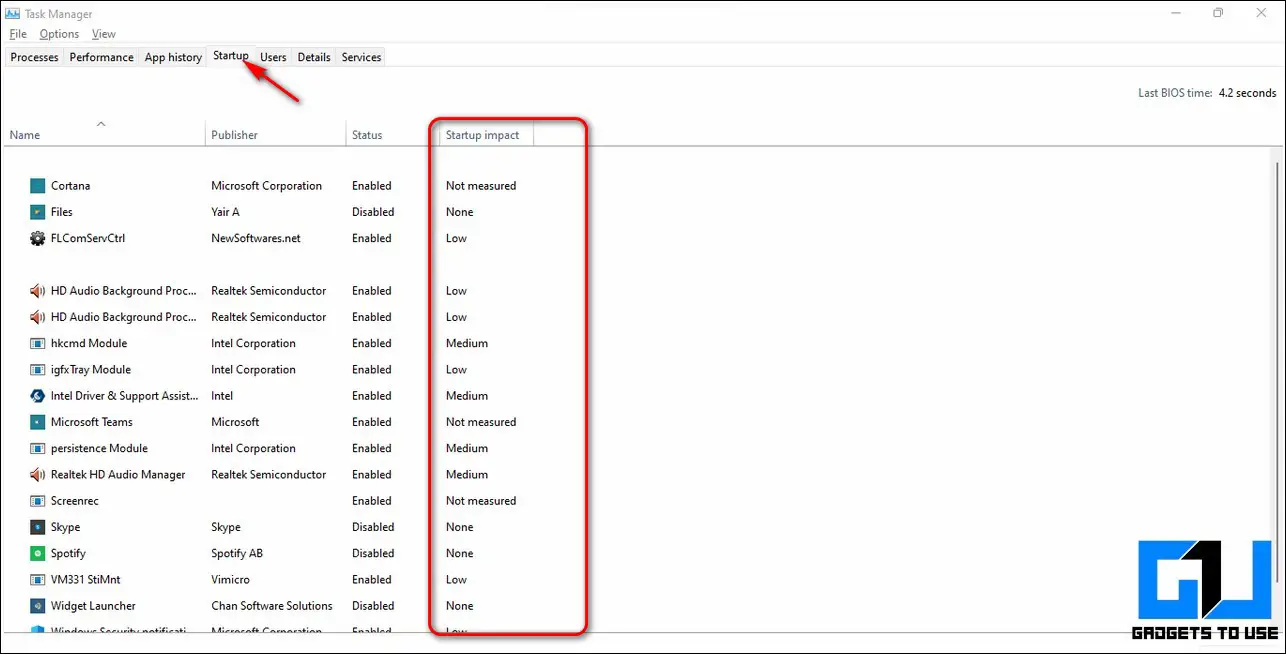
- To disable the app, right-click on it and choose Disable.
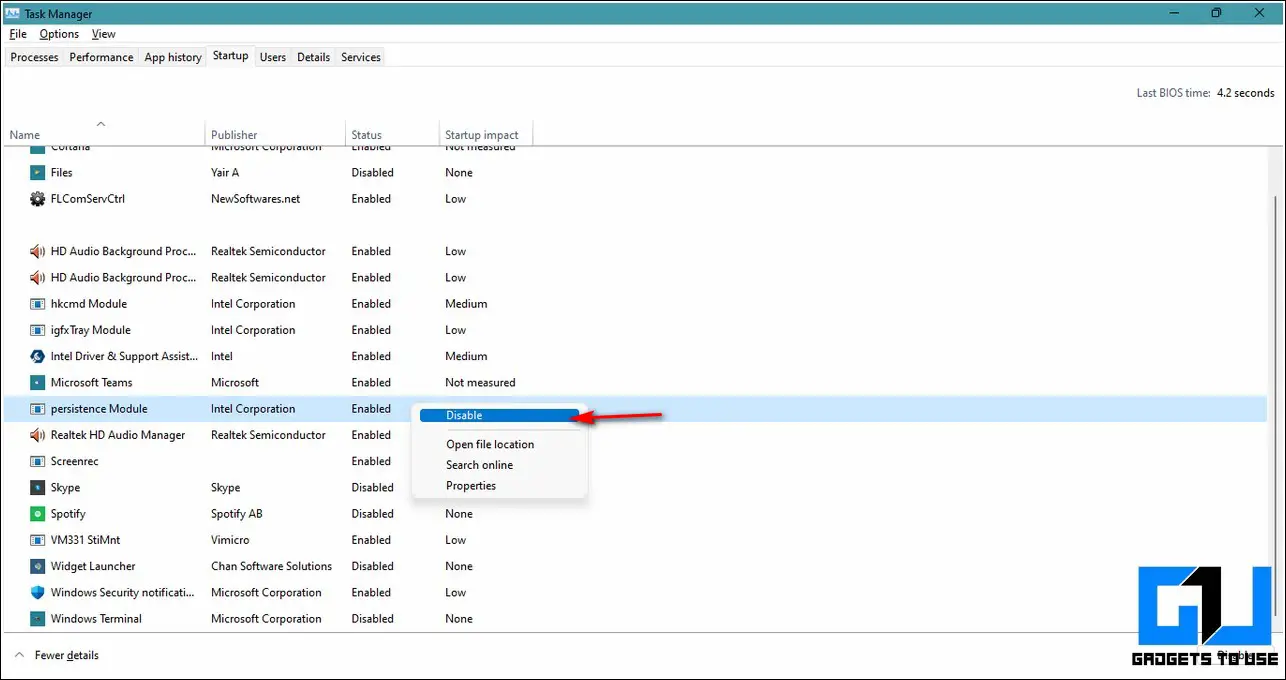
- That’s it. You’ve successfully disabled the app from starting at Windows startup.
Adjust Visual Effects for Best Performance
Windows 11 offers a good amount of visual effects to make the environment user-friendly. However, these visual effects consume a good amount of system resources. You can minimize and even disable these visual effects to improve the Windows 11 startup time. Follow these steps to achieve the same.
- Press the Windows key and search for the Advanced System Settings.
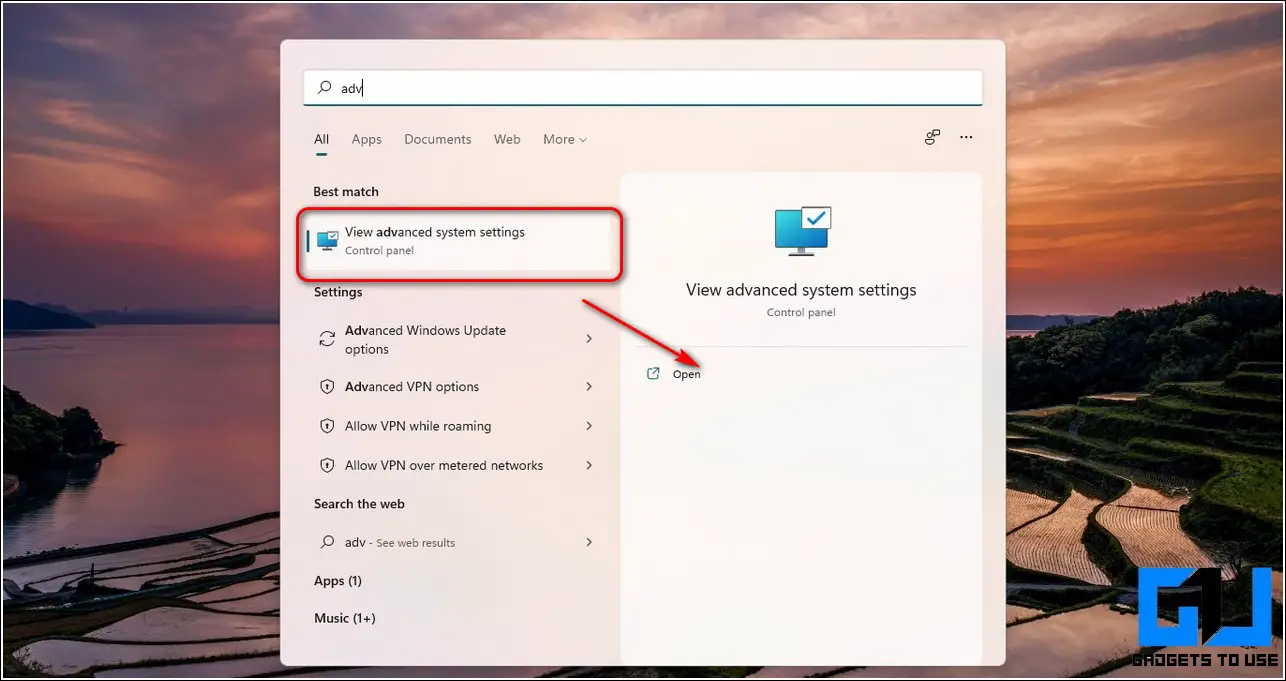
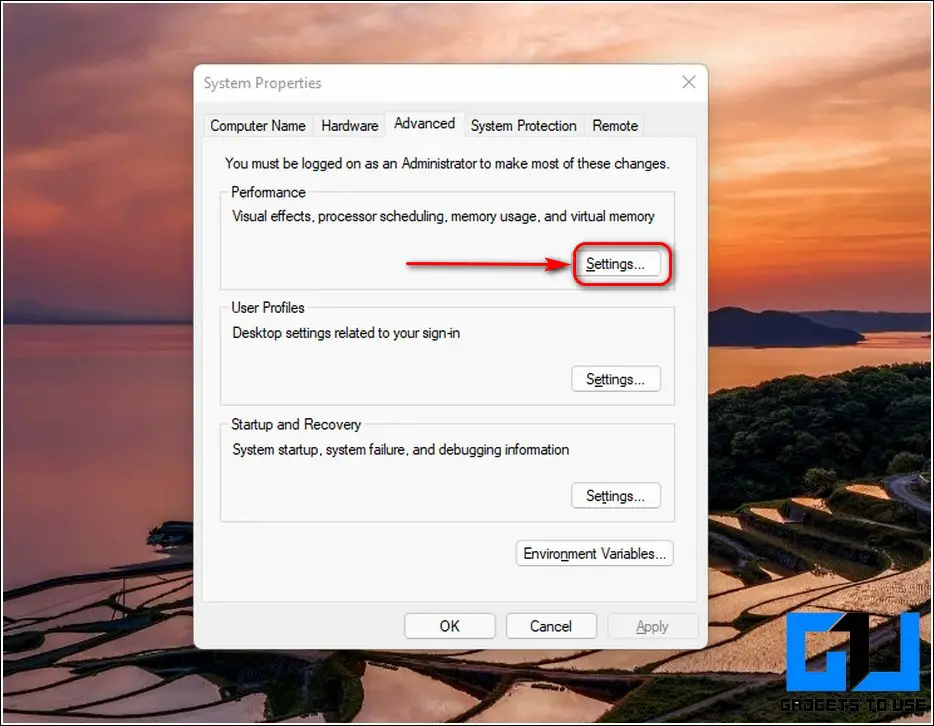
- Click on the Settings button under the Performance Section.
- Toggle on Adjust for Best Performace and uncheck all the listed items. Click on the Apply button to save changes.
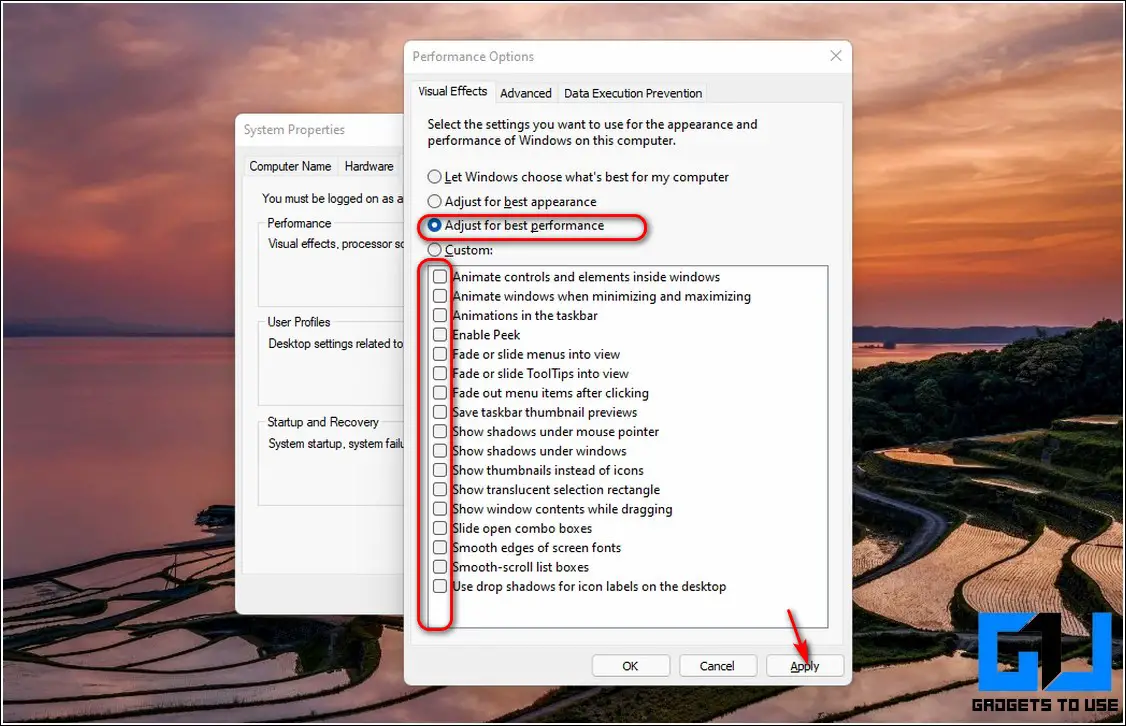
- That’s it. You’ve successfully disabled all visual effects on your Windows11 system.
- Reboot your system to observe the altered changes.
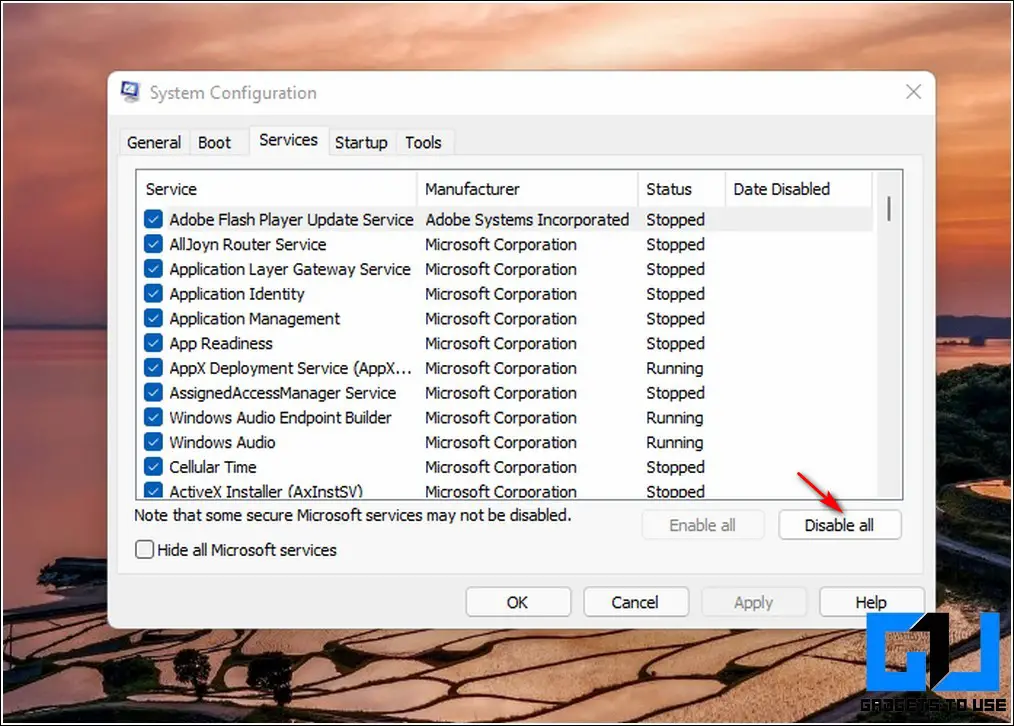
Disable all System Services and Reboot
One of the most effective methods to significantly improve your Windows 11 startup time is to disable all the Windows services and reboot the system to let Windows start only the required services. This process will help in eliminating all the unnecessary Windows services that are consuming the system’s resources. Follow these simple steps for an easy fix.
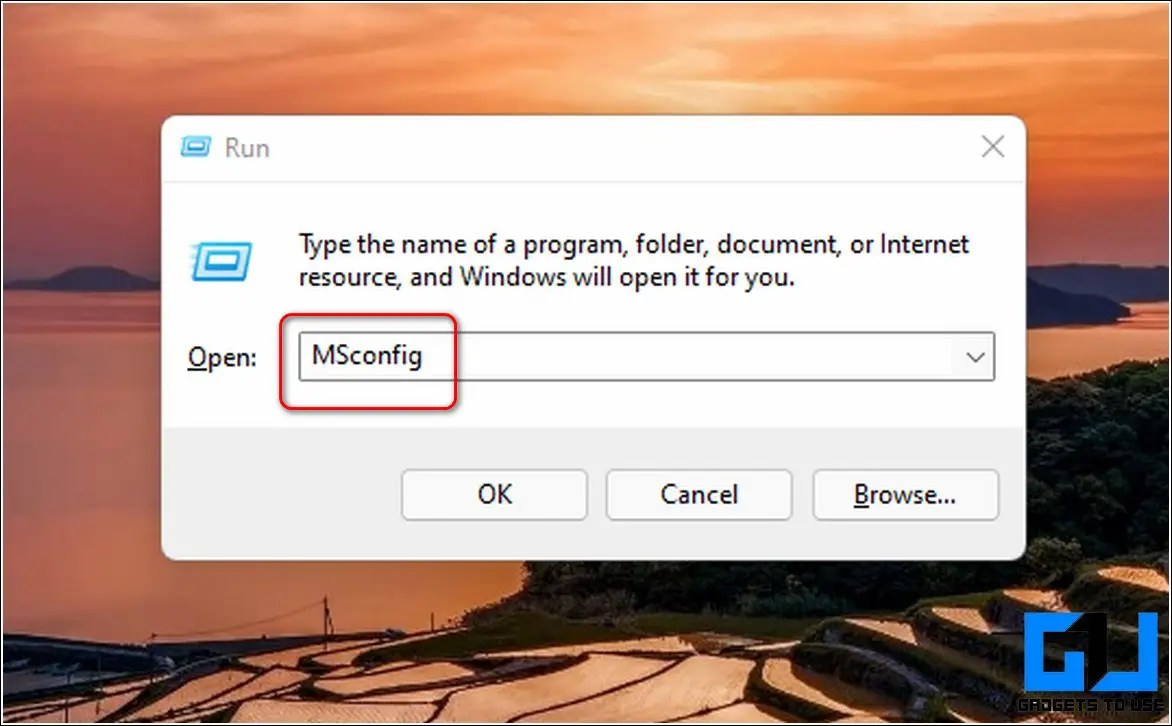
- Open the Run window by pressing Windows key + R simultaneously on your keyboard.
- Type MSConfig and hit the enter key.
- Navigate to the Services tab and click on Disable All button.
- Click on the OK button to save changes and restart your system.
Clean Junk Files on Your System and Turn on Storage Sense
To speed up the startup time of your Windows 11 system, you need to clear all the junk and temporary files present in your system. In addition to this, Windows 11 also offers the feature of Storage Sense that automatically detects and clears temporary files from time to time to speed up the performance of the system. Follow this effective 2-minute read to clear junk files on Windows 11 and turn on the storage sense feature.
Bonus: Defragment your Hard Disk Drive or Upgrade to an SSD
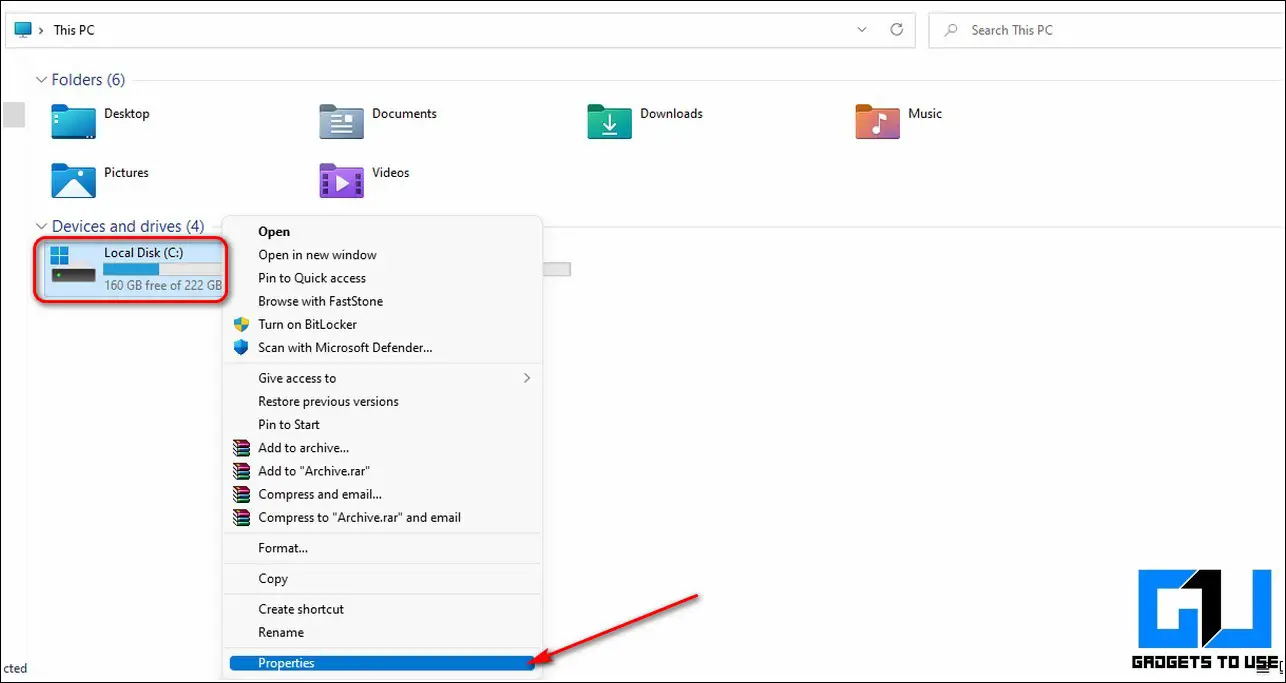
If you’ve installed Windows 11 on your old system having a hard disk and are experiencing slow startup time, it is probably because of your old and fragmented hard disk drive. Fragmented drives significantly reduce the performance of the operating system and you need to optimize it manually to reduce any performance lags. Alternatively, you can replace the hard disk with SSD to get a massive boost in Windows 11 performance. Follow these easy steps to defragment your hard disk to optimize its performance.
- Open your computer and right-click on the disk drive that has Windows 11 installed in it.
- Click on the Properties option to open the disk drive properties.
- Navigate to the Tools tab and click on the Optimize button under the Defragment drive section.
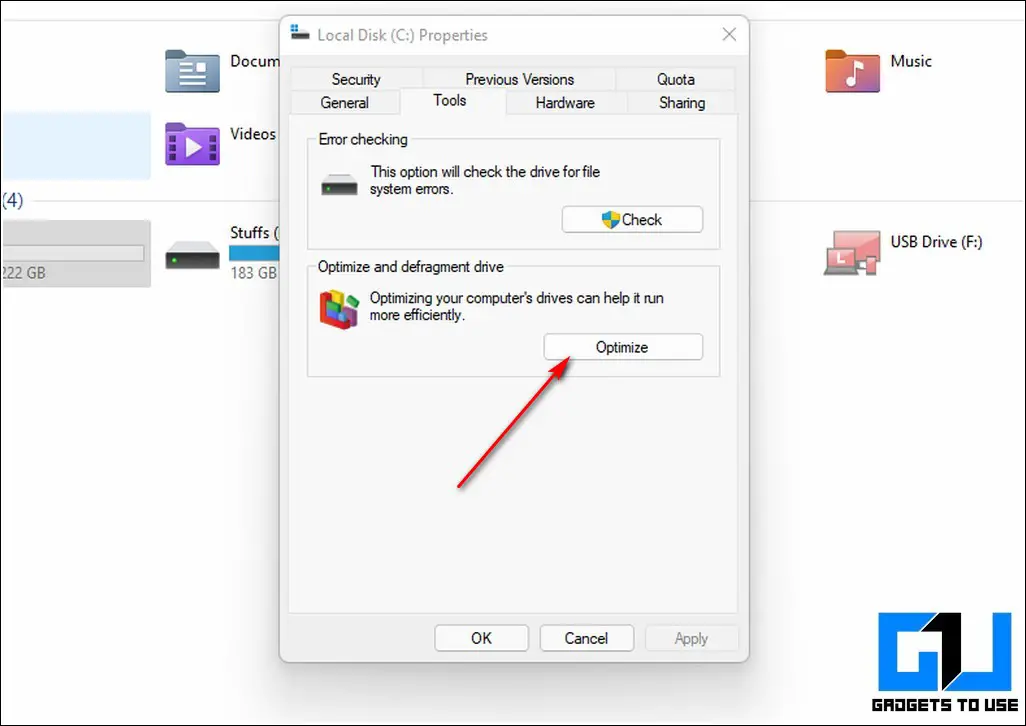
- Wait for a few minutes to allow Windows to optimize the drive performance and restart the system after the process finishes up.
Wrapping Up: Reducing Startup Time
We hope that you’ve now fixed and improved your system’s startup time using the above-listed methods. If this article has assisted you in fixing and improving the Windows 11 experience on your system then, hit the Like button and share this among your friends to help them troubleshoot such issues. Stay tuned for more Windows troubleshooting guides.
You can also follow us for instant tech news at Google News or for tips and tricks, smartphones & gadgets reviews, join GadgetsToUse Telegram Group, or for the latest review videos subscribe GadgetsToUse Youtube Channel.