Released with Windows Vista, the Mobility Center was designed to help users control their system quickly with a central panel. However, users often get pestered by its random pop-up on the screen. Plus, it also consumes resources, causing lags and stutters. Today, we will discuss some easy methods to disable Windows Mobility Center in Windows 11. Furthermore, you can learn to disable OneDrive in Windows 11 or 10.
Disable Mobility Center Pop-up in Windows 11 or 10
The Windows Mobility Center tool offers a central location to control system parameters such as brightness, volume, power, display, sync, and presentation settings. However, users have often reported lags and stutters in Windows 11.
Fortunately, you can disable Windows Mobility Center on your Windows 11 machine by following the easy methods given below.
Method 1- Disable Windows Mobility Center Via Group Policy Editor
The Local Group Policy Editor in Windows is a management tool that helps to control group policy objects. This tool comes pre-installed on Windows 11 Professional and Enterprise editions. However, it remains absent on Home editions.
Worry not; let’s look at how you can access this tool to disable the Mobility Center in Windows 11:
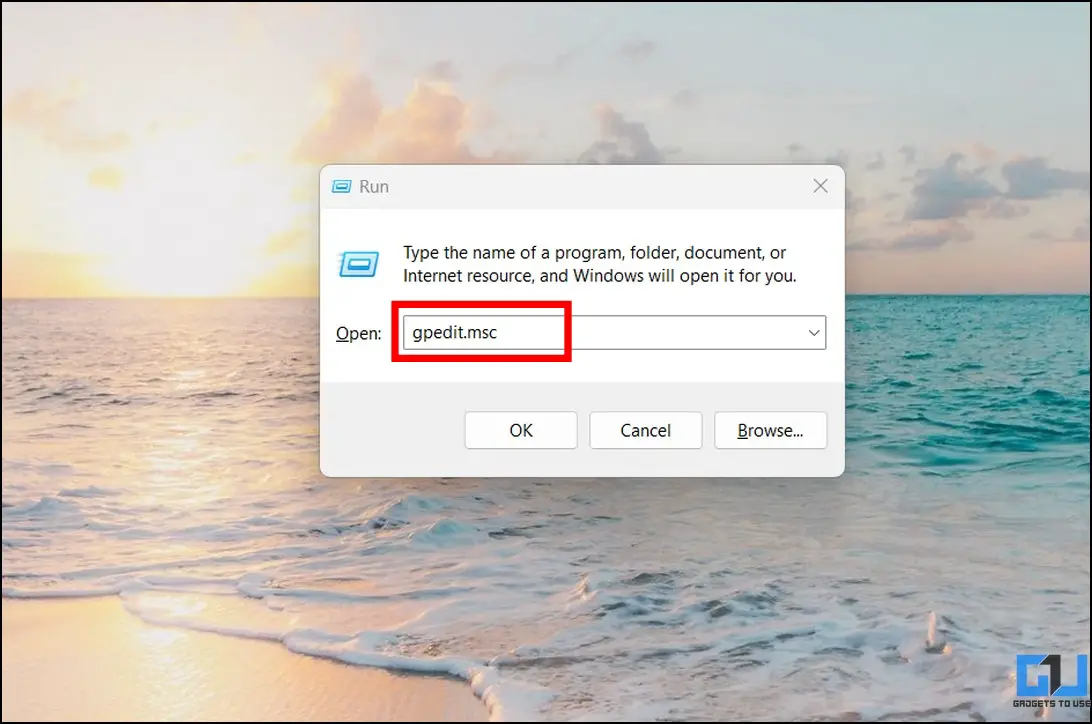
1. Open the Run Window by pressing the Windows key + R simultaneously and type gpedit.msc to open it.
Note: If you are running Windows 11 Home Edition, you need to enable the Local Group Policy Editor tool by running this batch file.
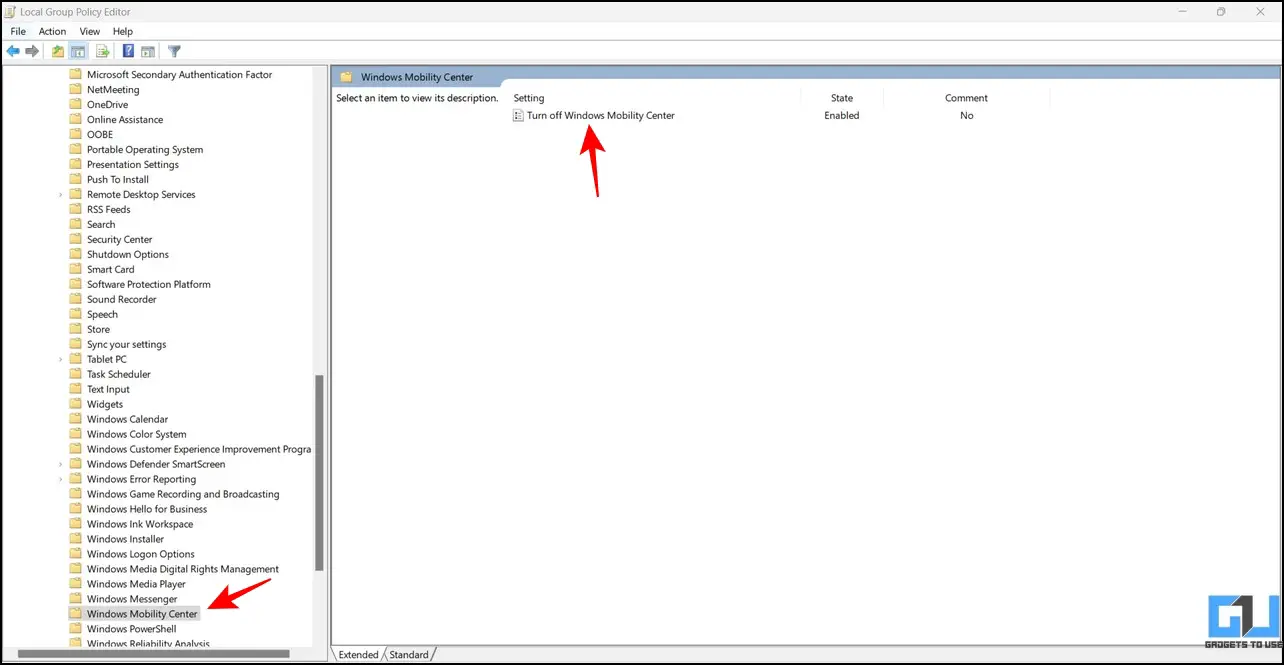
2. Next, navigate to the following directory:
Computer Configuration> Administrative Templates> Windows Components> Windows Mobility Center
3. Double-click the ‘Turn Off Mobility Center‘ setting on the right sidebar to configure it.
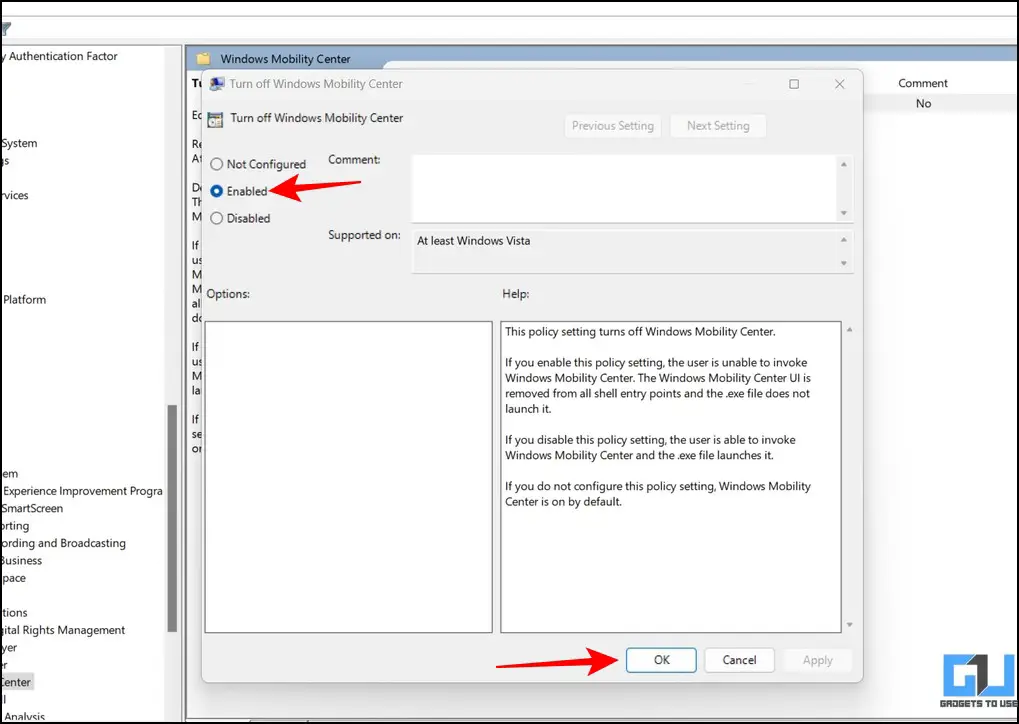
4. Finally, adjust the Setting to Enabled and press the OK button to save changes.
5. Finally, estart your computer.
Method 2- Use Registry Editor to Turn Off Windows Mobility Center
Besides the local group policy editor, you can also use the Registry Editor administrative tool to disable the Windows Mobility Center. Here’s how:
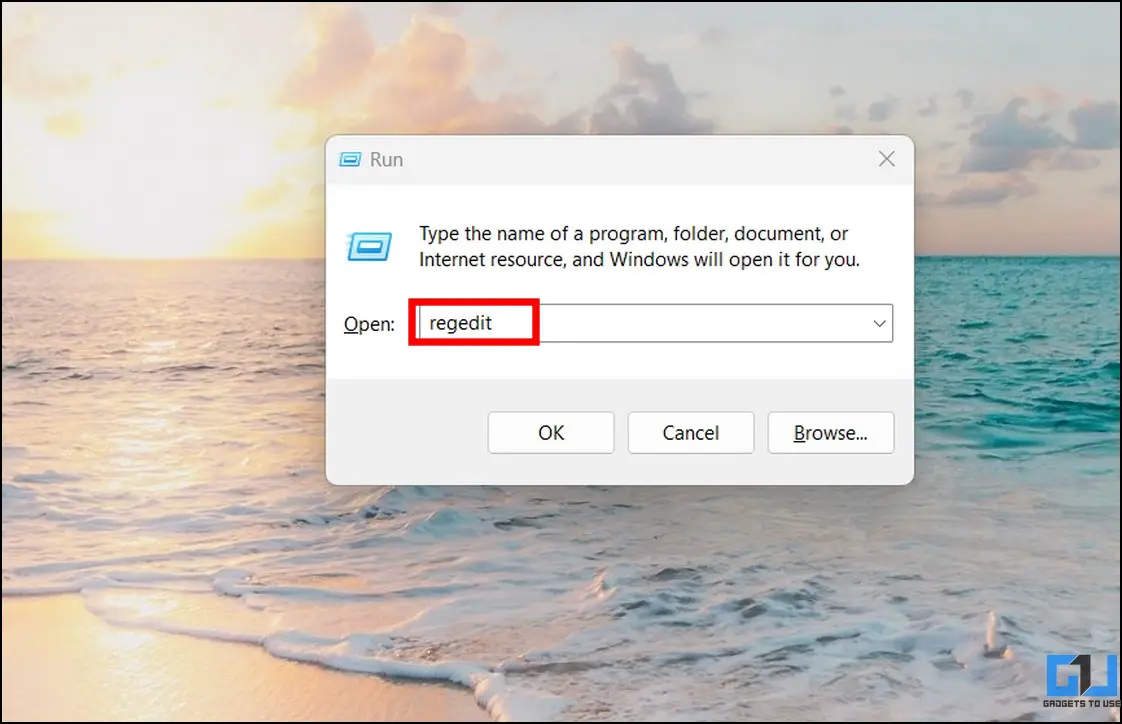
1. Type regedit in the Run window by pressing the Windows + R key simultaneously.
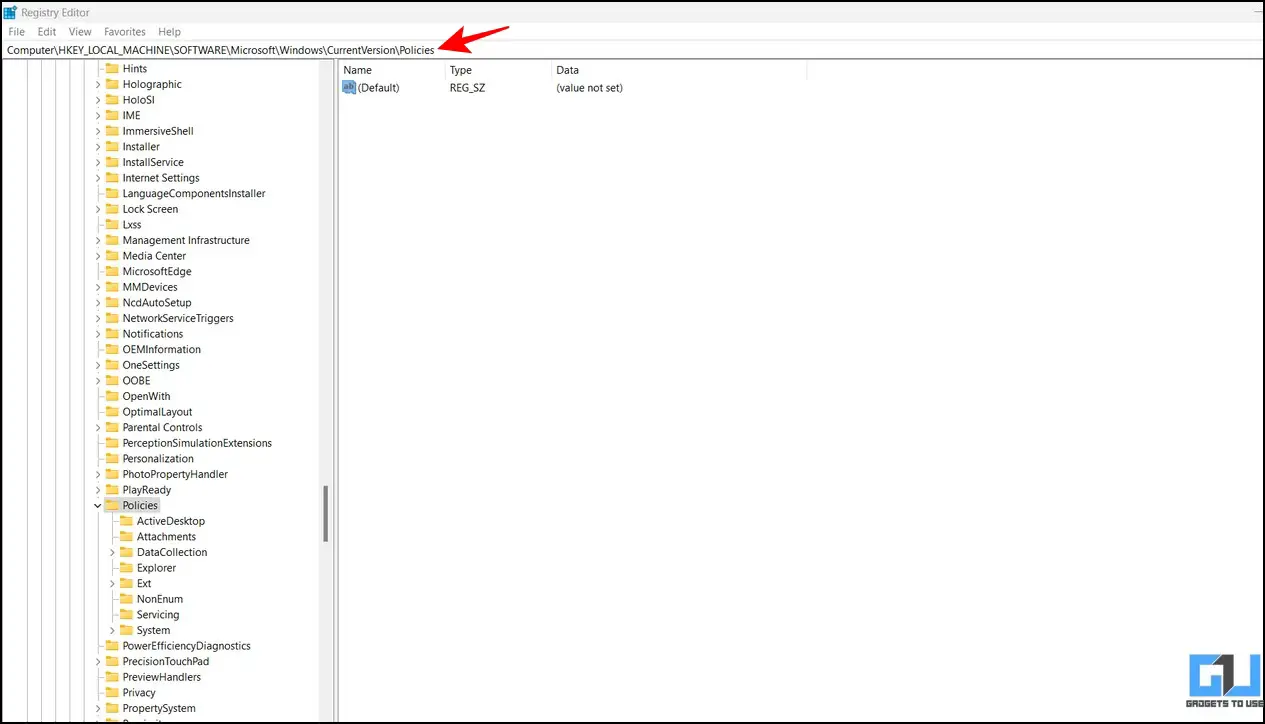
2. Next, copy and paste the following path into the Registry Editor URL:
HKEY_LOCAL_MACHINE\SOFTWARE\Microsoft\Windows\CurrentVersion\Policies
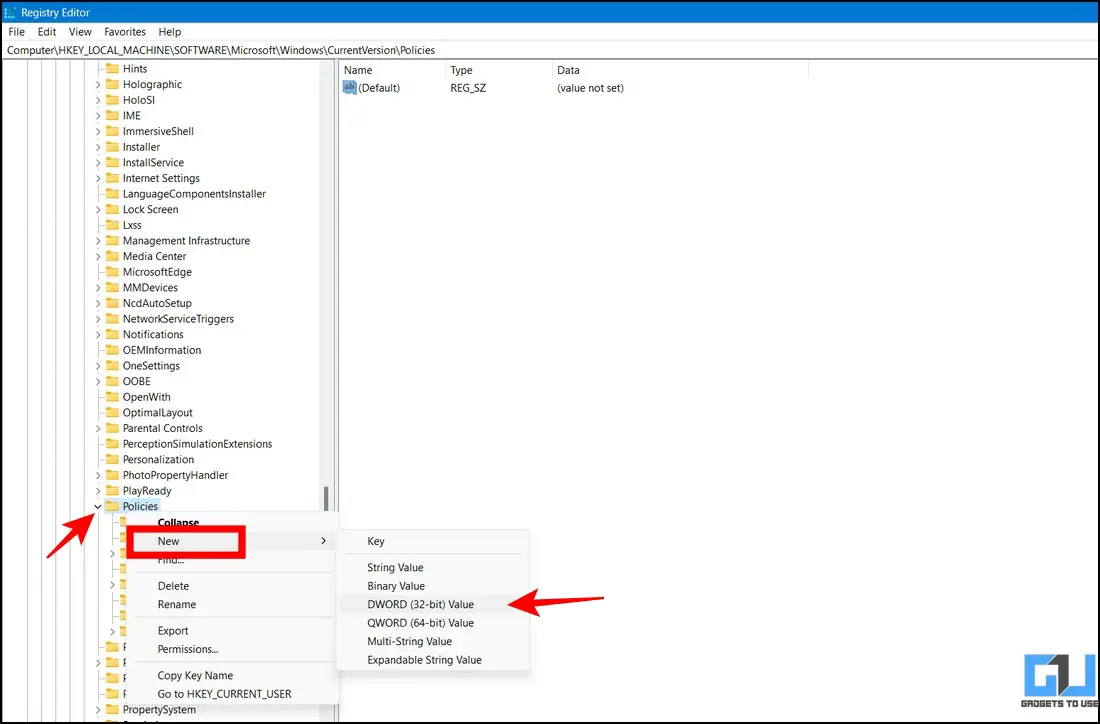
3. Right-click on Policies and create a New DWORD (32-BIT) Value.
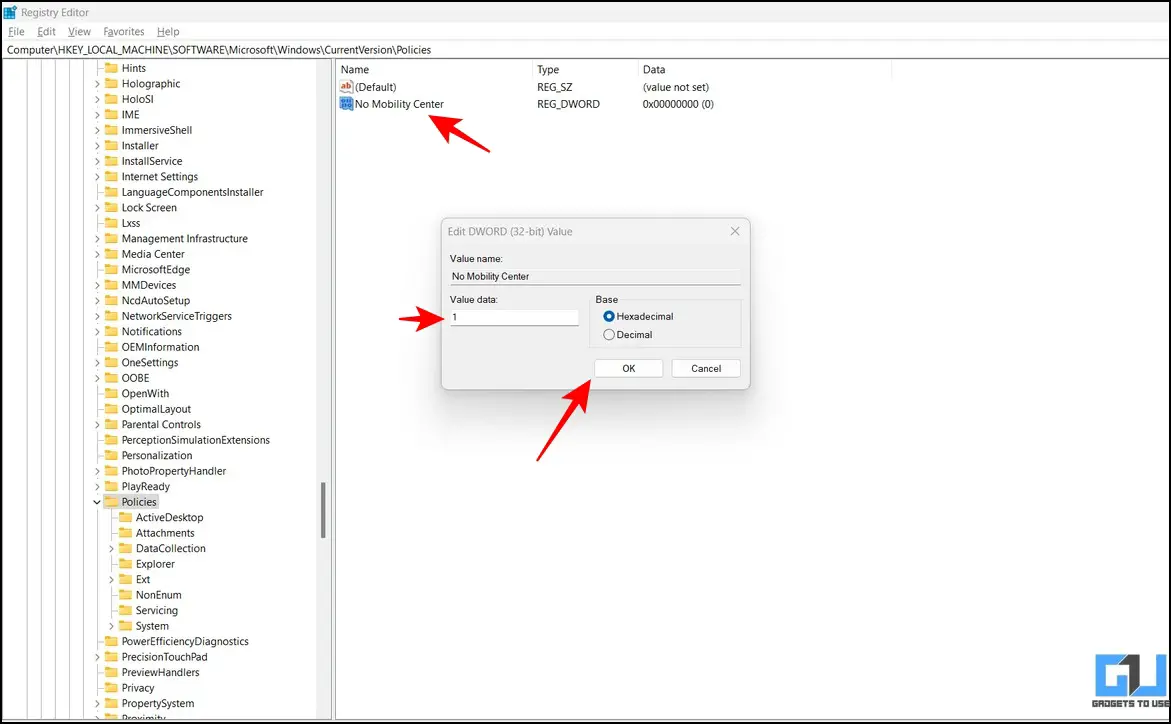
4. Name the value to ‘No Mobility Center‘ and set its value to 1. Click on the OK button to save changes.
5. Restart your system to apply changes.
Method 3- Use Quick Registry Files to Disable Mobility Center
If you don’t wish to edit your registry files manually, you can download and execute our quick registry file to disable the Mobility Center in Windows 11. Here’s what you need to follow:
1. Download the Registry File from our Google Drive Link.
2. Double-click the RemoveMobilityCenter.reg file to install it.
3. Finally, click the Yes button to add the required values to your Windows registry.
4. Restart the system to see the applied changes.
Bonus: Disable All Background Apps in Windows 11
If your Windows 11 machine frequently lags and stutters, it might be due to multiple apps consuming precious system resources in the background. Don’t worry; we have crafted a comprehensive guide for you to disable all background apps in Windows 11.
Wrapping Up: No More Annoying Mobility Center Popups!
This article taught you several ways to eliminate the Mobility Center in Windows 11 and 10. If you find it helpful, share this read with your friends and check the below links for more Windows 11 troubleshooting walkthroughs.
You might be interested in the following:
- 3 Ways to Adjust Windows 11 Taskbar Size without Software
- 9 Ways to Fix Unable to Install Apps or Software on Windows 11
- 3 Ways to Use Focus Assist on Windows 11 to Block Apps and Sites
- Top 12 Ways to Clear Cache Files in Windows 11
You can also follow us for instant tech news at Google News or for tips and tricks, smartphones & gadgets reviews, join GadgetsToUse Telegram Group, or for the latest review videos subscribe GadgetsToUse Youtube Channel.

