SSDs have turned out to be revolutionary in terms of storage and performance, when you install an SSD on your system, it results in increased speed, as SSDs can operate up to 20 times faster than traditional disk drives. However, Windows users have often reported their internal SSD disappearing suddenly or not showing up. Today, we will address this issue and look and help you troubleshoot the problem in this explainer. Additionally, you can learn to boost up your Windows machine with Microsoft PC Manager.
Reasons Behind the Issue
Several factors can contribute to the Internal SSD not showing up on your Windows 11/10 PC. Some of the most notable ones are as follows:
- The SSD drive letter is conflicting with existing system drives.
- The internal SSD is not initialized or formatted correctly.
- The File System of the SSD is Corrupted (Showing the RAW File System).
- Obsolete SSD Drivers.
- Loose internal Connections.
- BIOS does not detect the drive.
- SSD is likely Faulty.
How to Fix Internal SSD Not Showing Up in Windows 11/10
It does not matter whether the SSD is internal or external; the discoverability issue can arise at any time. Nonetheless, after experiencing the same, we have researched effective methods to get rid of the problem. Let’s get started.
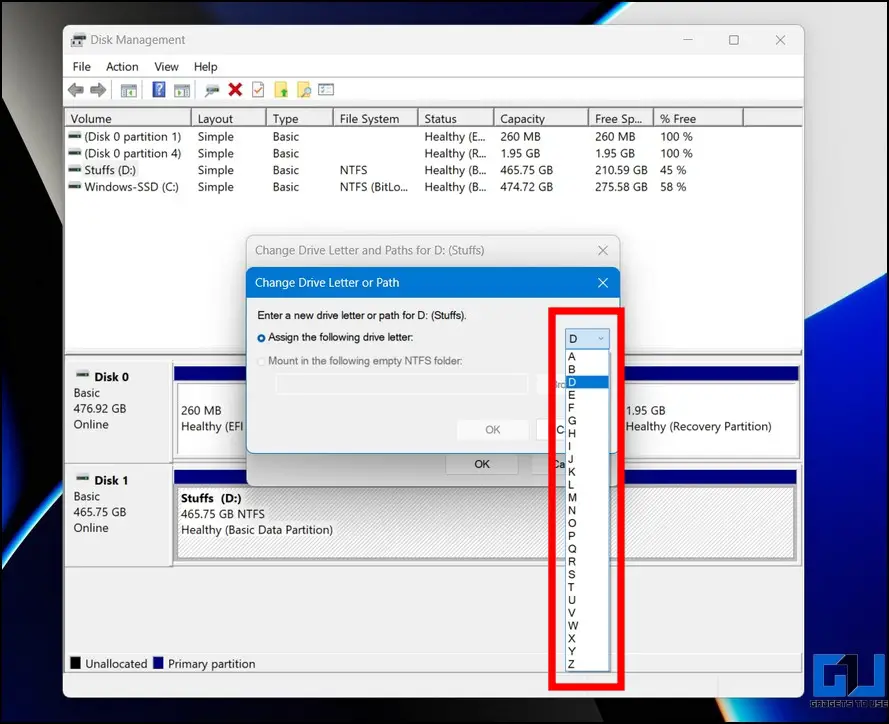
Change Drive Letter
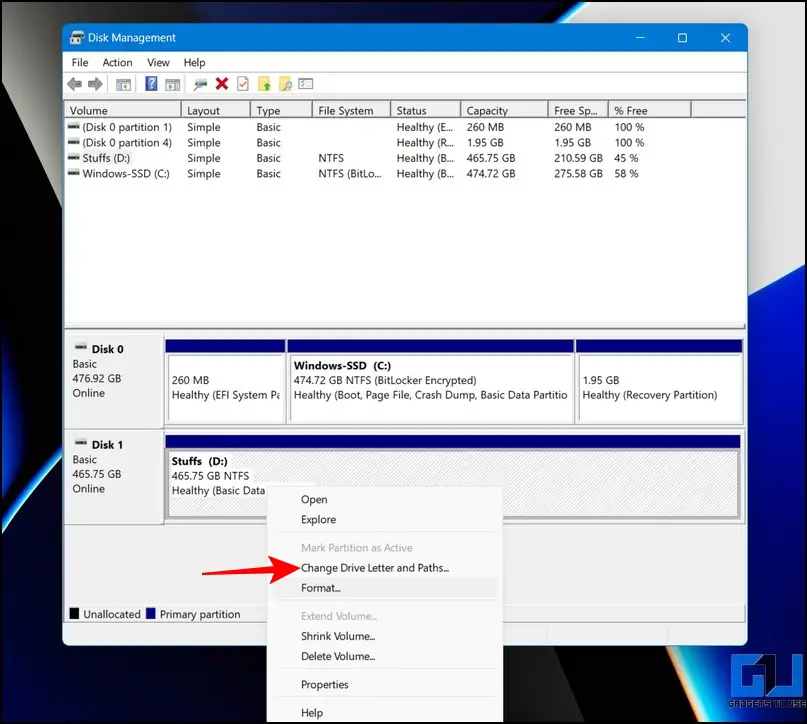
Drive Letter conflict is one of the most common reasons behind the ‘Internal SSD not showing up’ issue on Windows 11/10. If the drive letter of your internal SSD conflicts with an existing drive, you will not be able to discover or access it on your operating system. Fortunately, you can change it using these easy steps.
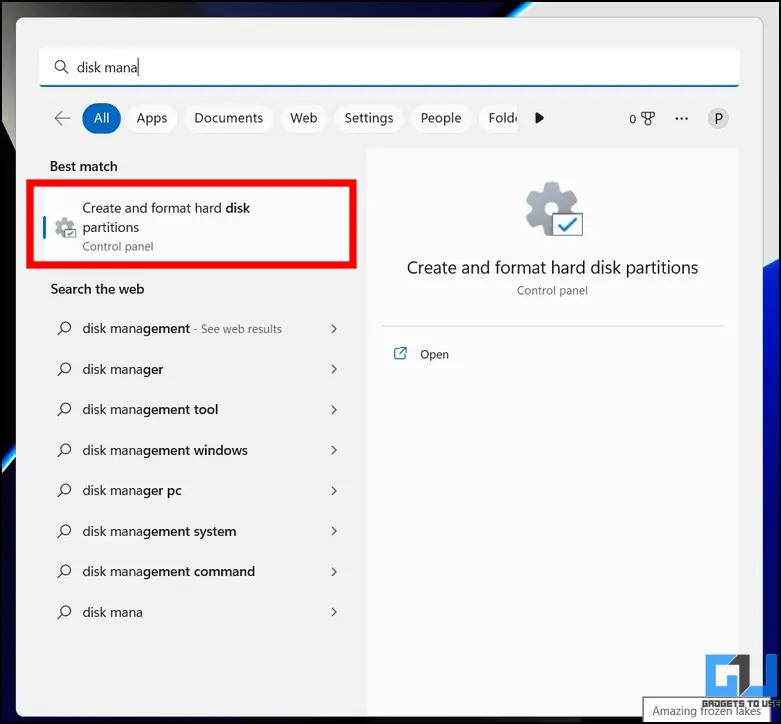
1. Press the Windows key and launch the Disk Management tool.

2. Next, right-click on the internal SSD disk and click the ‘Change Drive Letter and Paths…‘ option.
3. Further, click the Change button to change the drive letter.
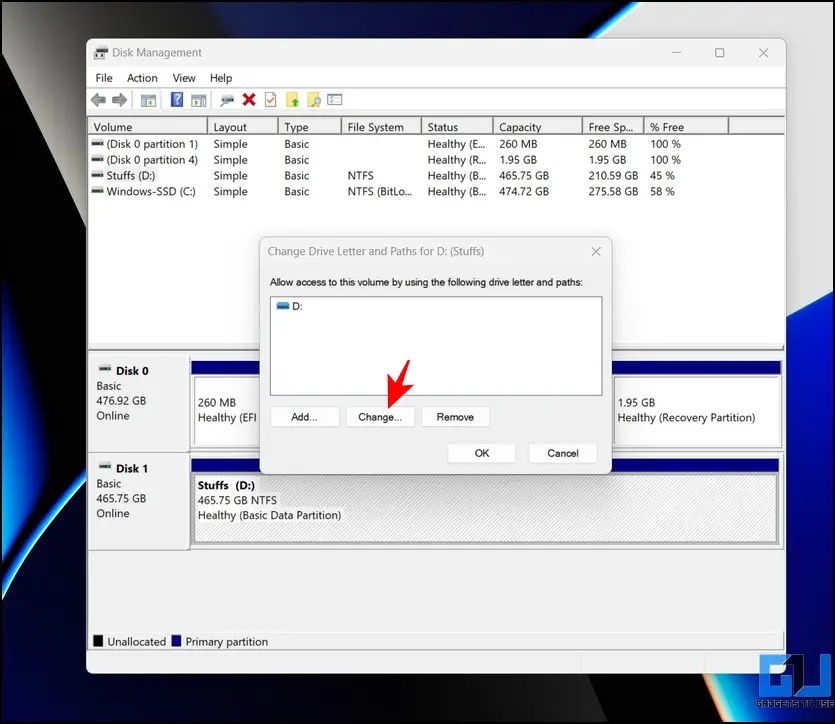
4. Finally, pick a drive letter that is not assigned to any existing system drives and then click on OK to apply changes.
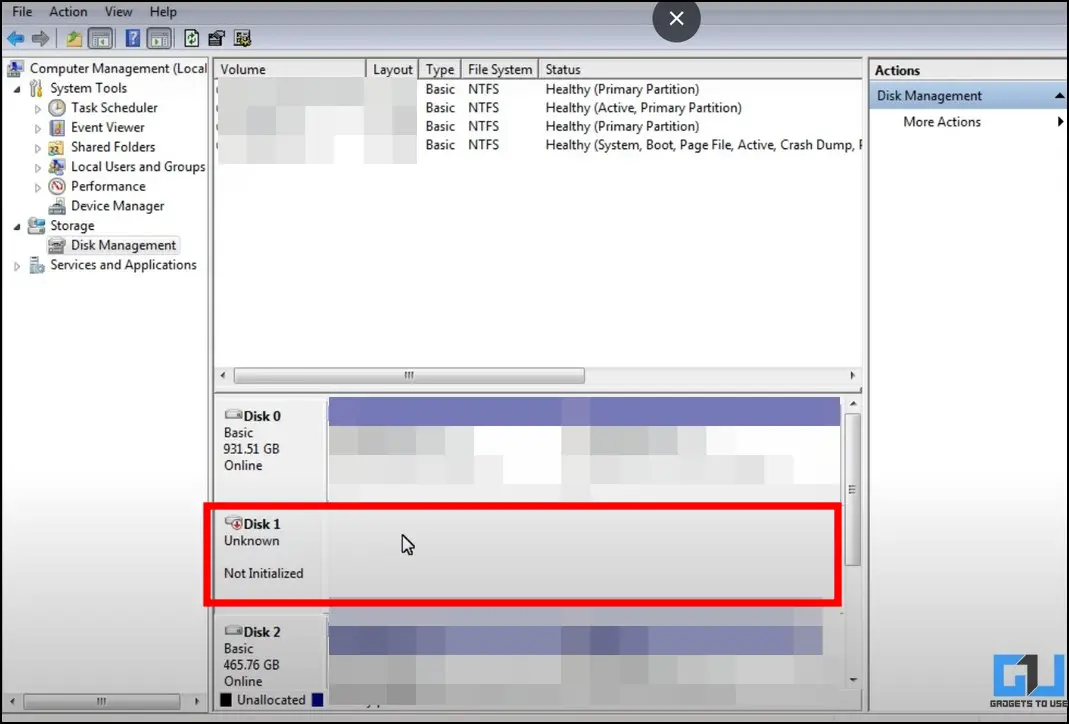
Initialize New SSD to fix Internal SSD not Showing Up
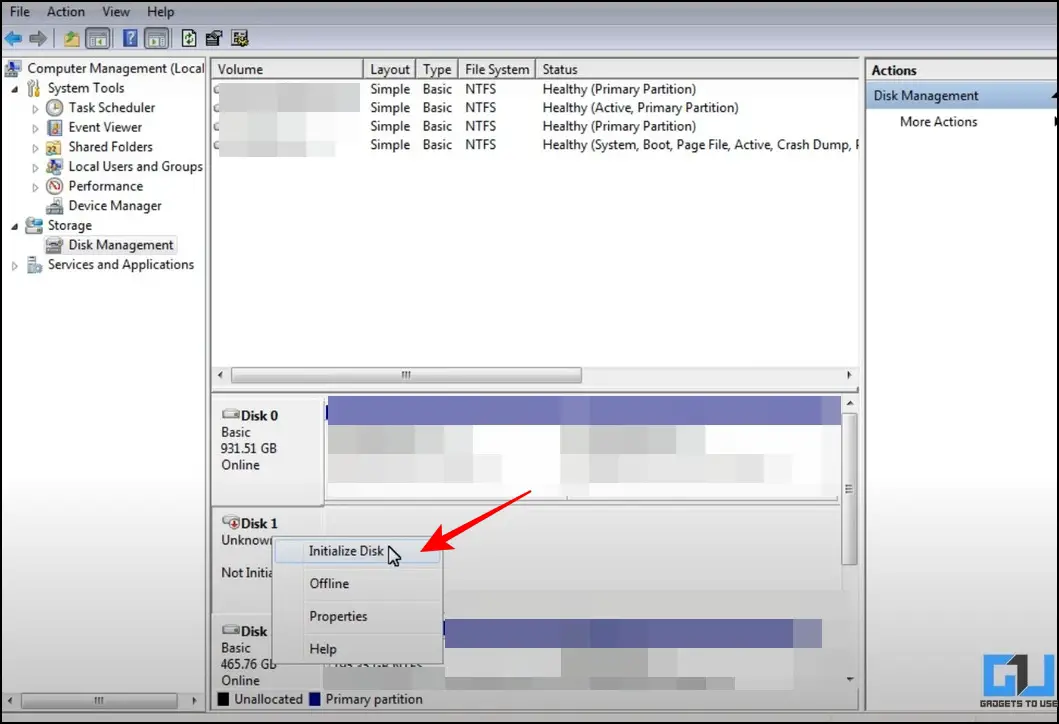
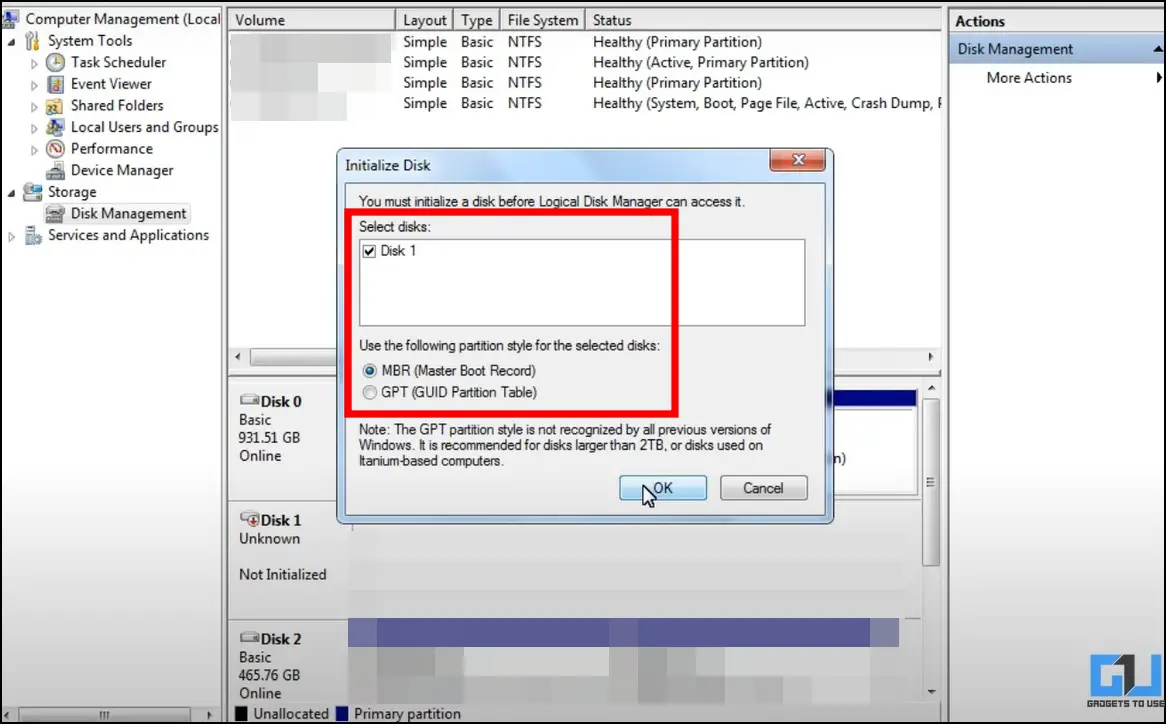
When you install a new SSD on your machine, it needs to be initialized. This initialization erases everything on the disk and prepares it to use on the Windows system. Follow these steps to initialize a new SSD on your Windows machine.
Note: If you picked an old SSD with pre-existing data, do not initialize it, as the process will erase everything on the disk. Make sure to recover your data from it before you decide to initialize the same.
1. Open the Disk Management tool on your Windows system to find the uninitialized disk.
2. Next, right-click the selected disk and press the Initialize Disk button.
3. Pick your desired partition style and press the OK button to finish disk initialization.
4. If you’ve recently installed a new internal SSD to your machine, this disk initialization window will pop up automatically.
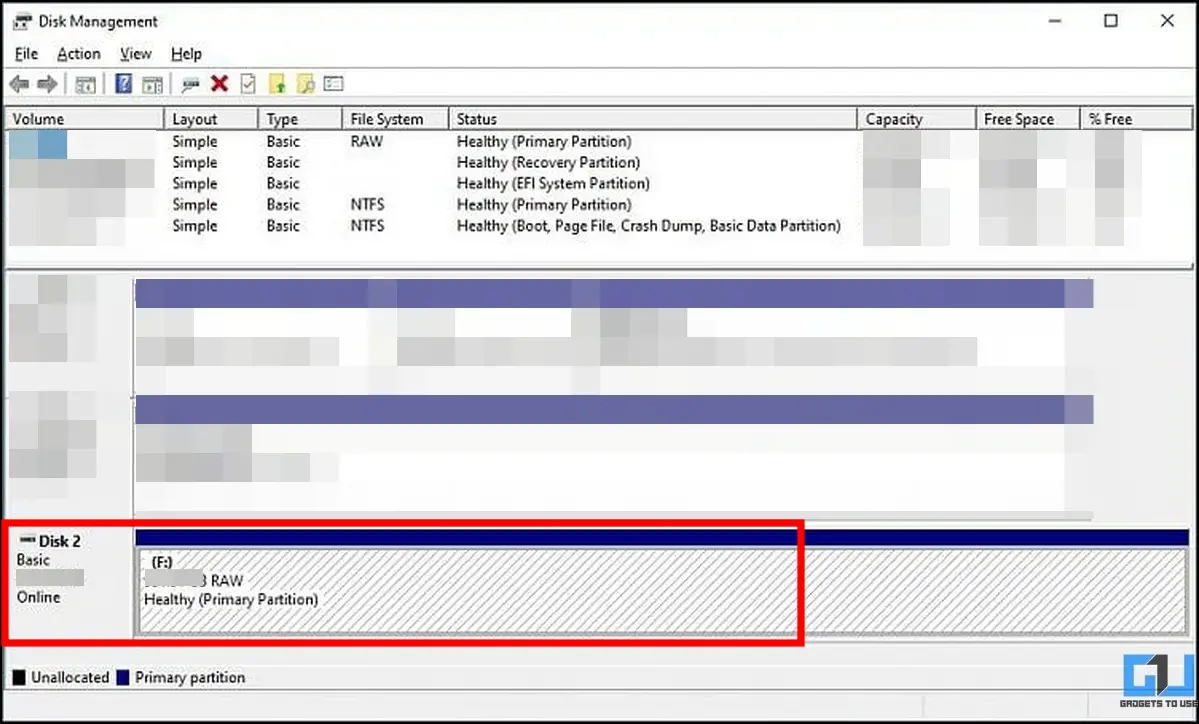
Format SSD to fix RAW File System Error
The RAW file system is another common reason behind the ‘Internal SSD not showing up’ issue. This usually happens when the existing file system of your SSD gets corrupted, making it unrecognizable to Windows. To fix the same, you need to re-format the internal SSD in NTFS format by following these steps.
1. Go to the Disk Management tool form the Start Menu.
2. Next, locate the disk marked with the RAW file system. A RAW file system indicates that your connected disk has an unidentified or empty file system.
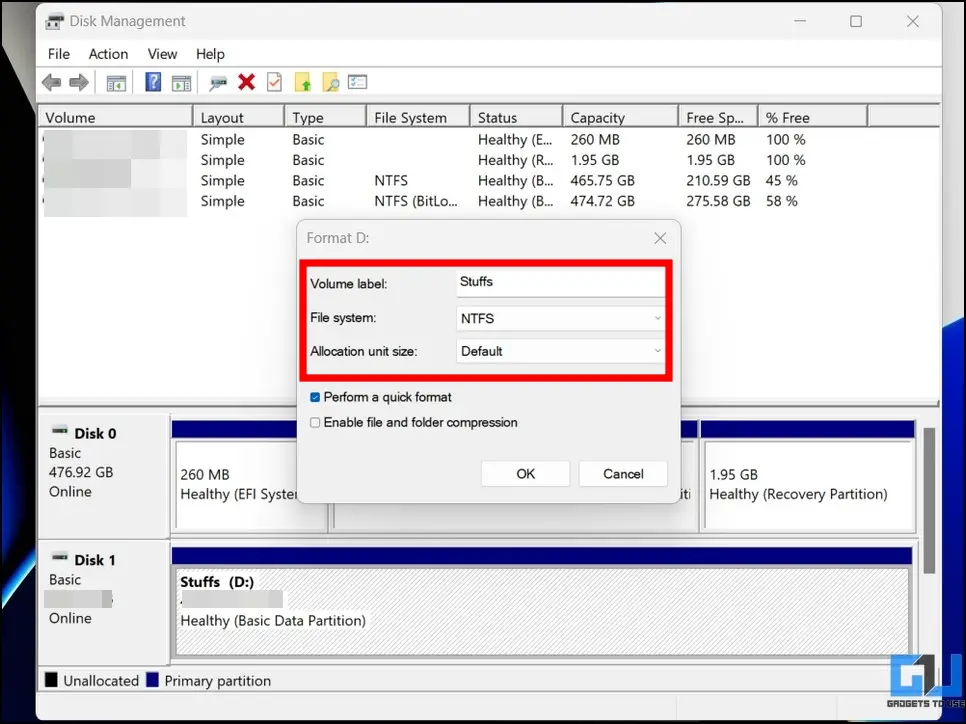
3. Right-click on the RAW file system SSD and press the Format button.
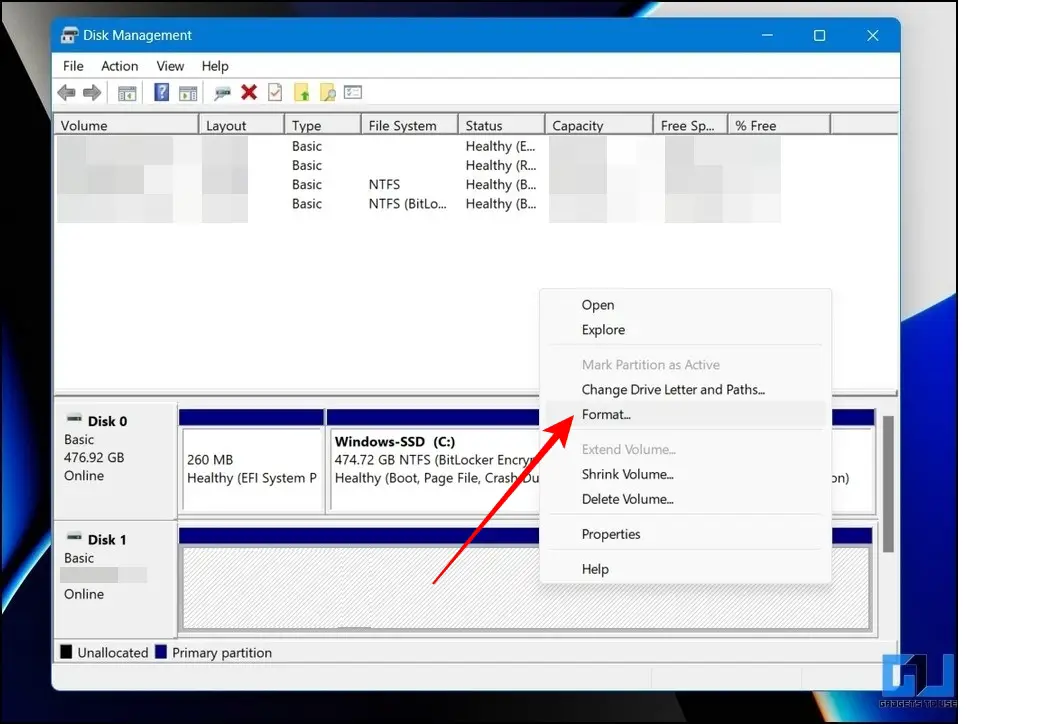
4. Finally, pick the NTFS file system and label your drive to identify it. Click the OK button to format your connected SSD.
Update Drivers to Fix Internal SSD Not Showing Issue
Obsolete SSD drivers on Windows 11/10 machines can also create discoverability issues. You need to manually update your SSD drivers to fix the issue. Here’s what you need to follow.
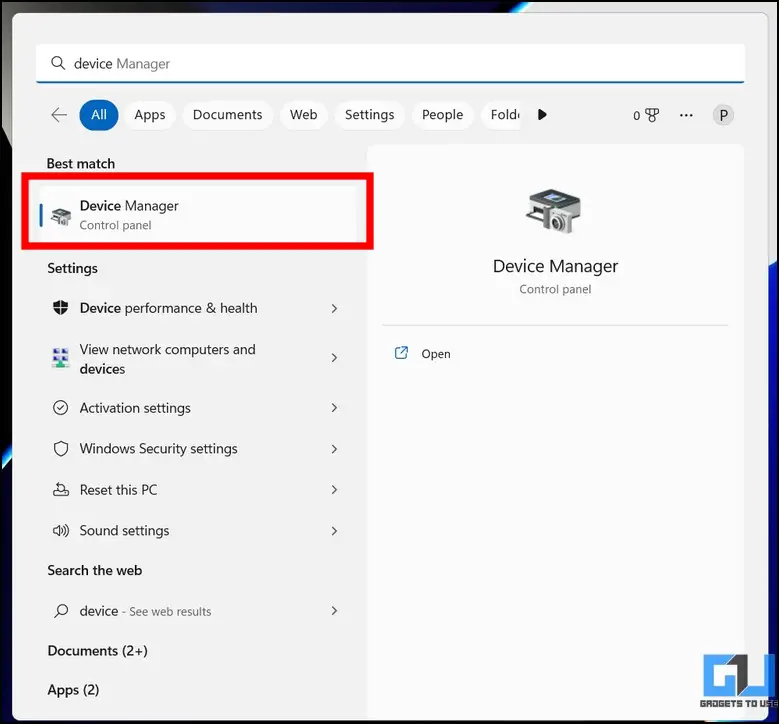
1. Press the Windows key and launch the Device Manager tool.
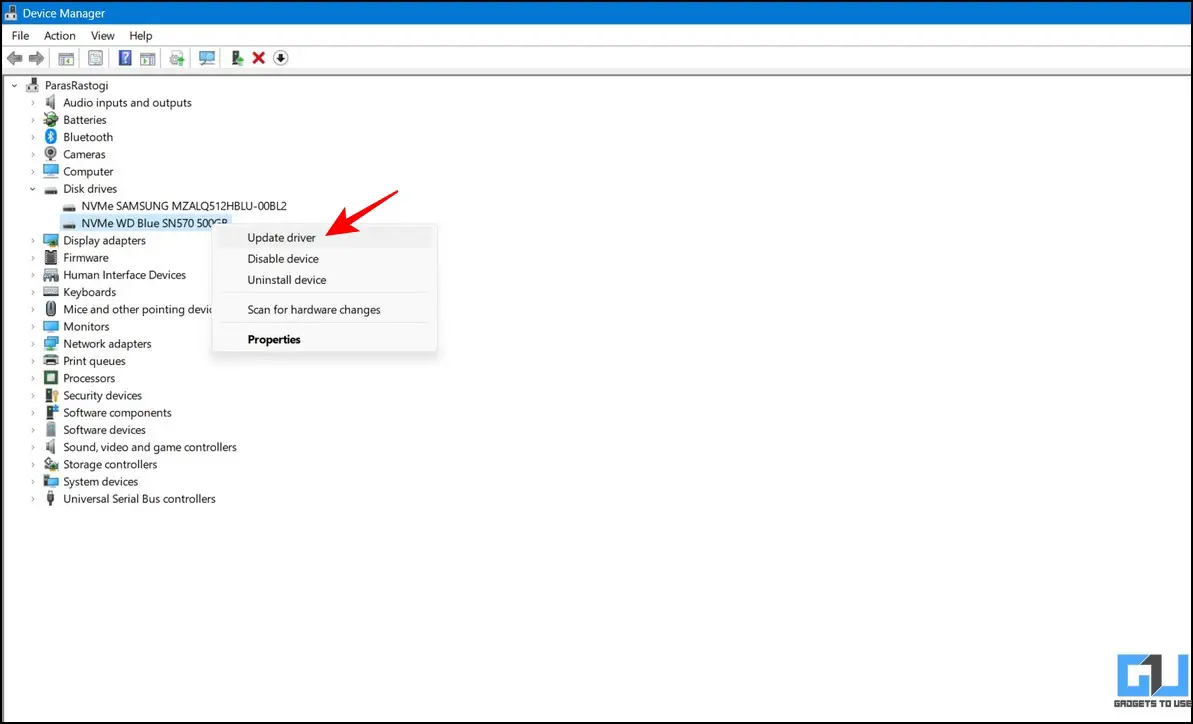
2. Next, expand Disk Drives in the list and right-click on the problematic SSD name to update its drivers.
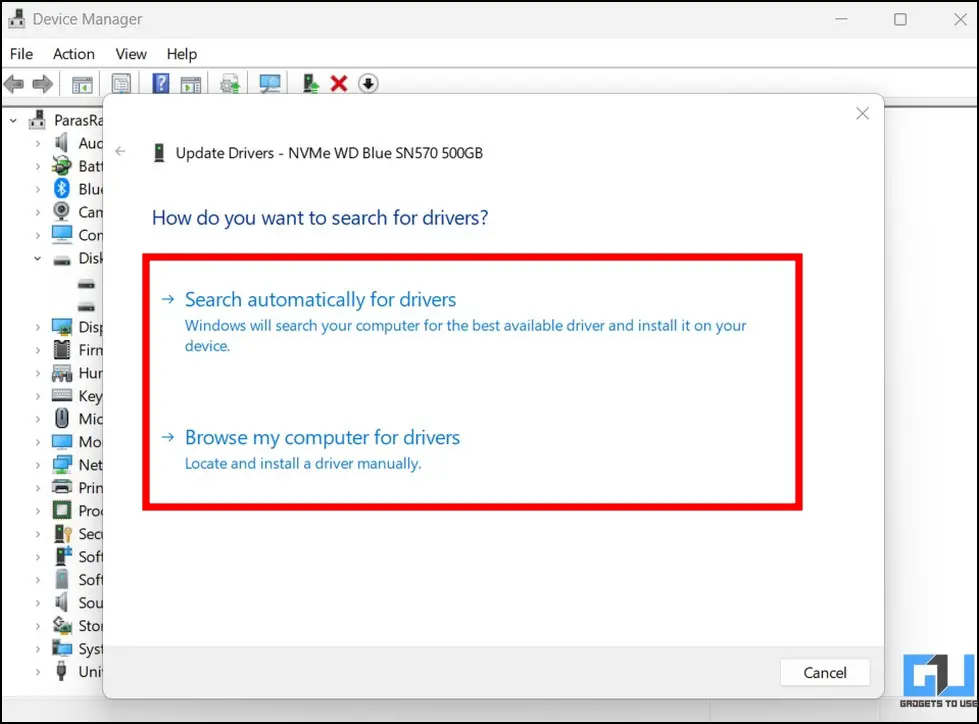
3. Finally, click on the Search automatically for Drivers option to allow your system to automatically find and install the latest suitable driver for the SSD.
4. Now, Reboot your system once the update completes.
Configure System Power Settings
The default power plan on Windows 11/10 system shuts down the storage disks automatically after being in an idle state for a certain amount of time to conserve battery on Windows. This idle shutdown of internal disk drives can sometimes lead to the ‘internal SSD not showing up’ issue. To resolve the same, you can edit the existing power plan settings to prevent it from shutting down. Here’s how it can be done.
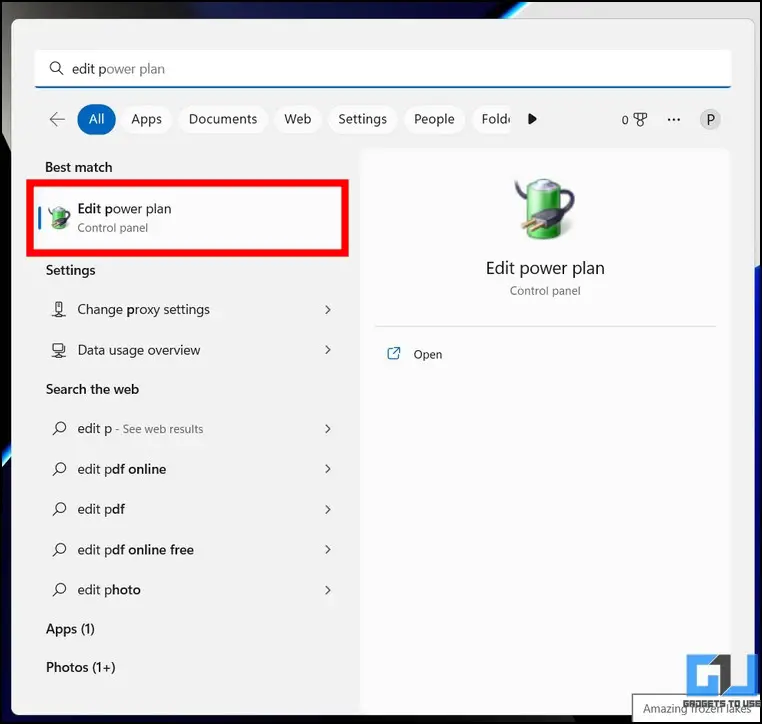
1. Press the Windows key and search for the ‘Edit Power Plan‘ keyword to open your current system power plan settings.
2. Next, click on the Change Advanced Power Settings option.
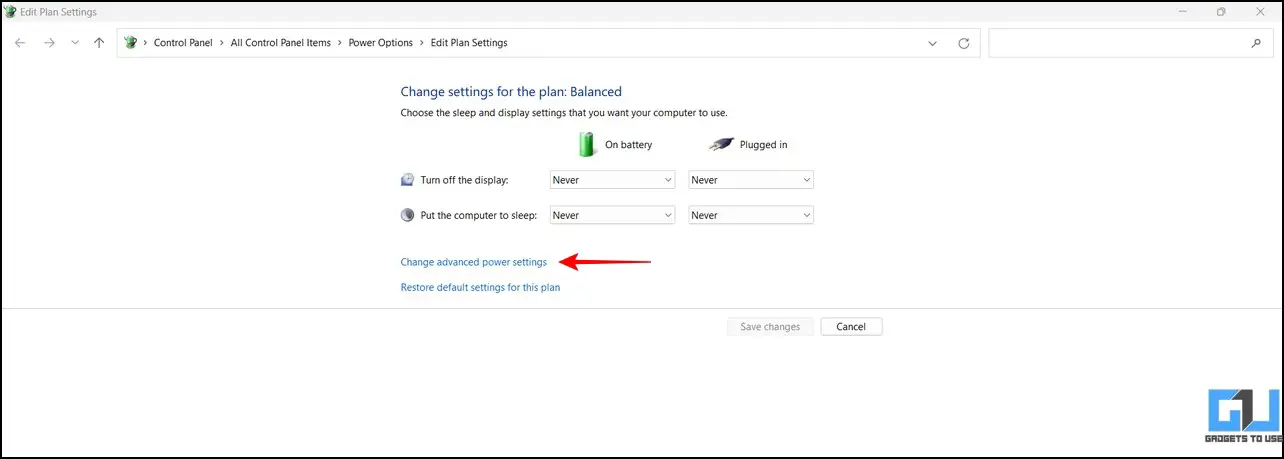
3. Expand the Hard Disk tab and set the ‘Turn off Hard Disk After‘ time to Zero minutes for the ‘On Battery’ and ‘Plugged-in’ options, respectively. Click the Apply button to save changes.

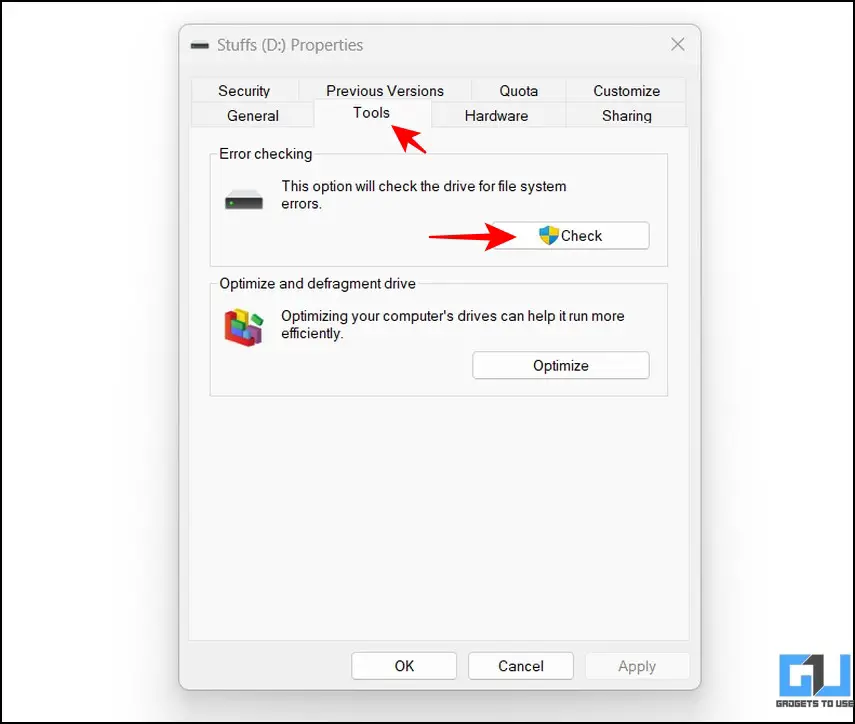
Scan and Fix Errors on the Drive
Microsoft Windows natively provides the feature to help you troubleshoot any existing issues with your disk drive, which is stashed inside the disk properties. You can access it to solve your SSD’s discoverability issue on Windows 11/10. Here’s how it can be done.
1. Right-click your internal SSD drive to access Disk Properties.
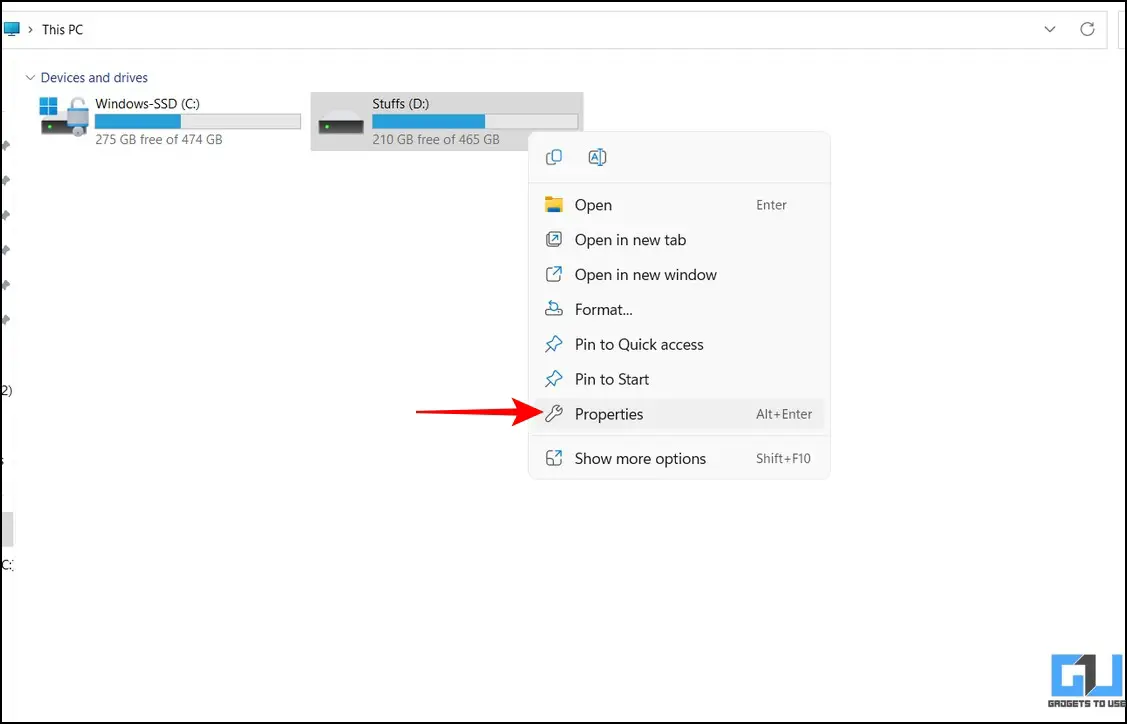
2. Next, click the Tools tab to access the Error Checking section and press the Check button.
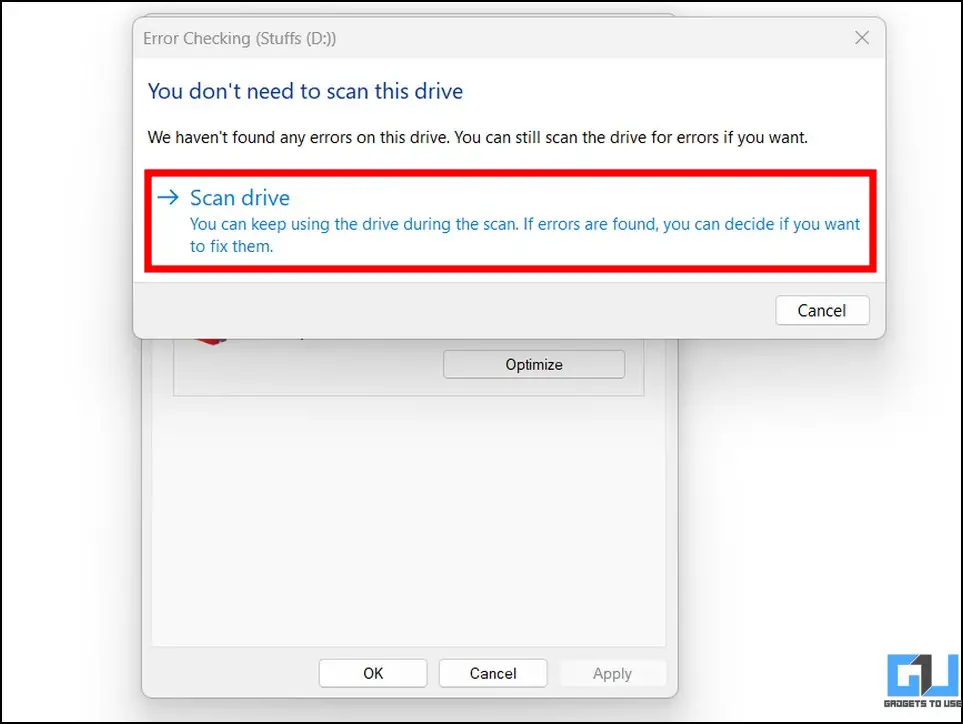
3. Finally, press the Scan Drive button and follow the on-screen instructions to resolve errors with the connected SSD.
Verify that SSD is detected in BIOS
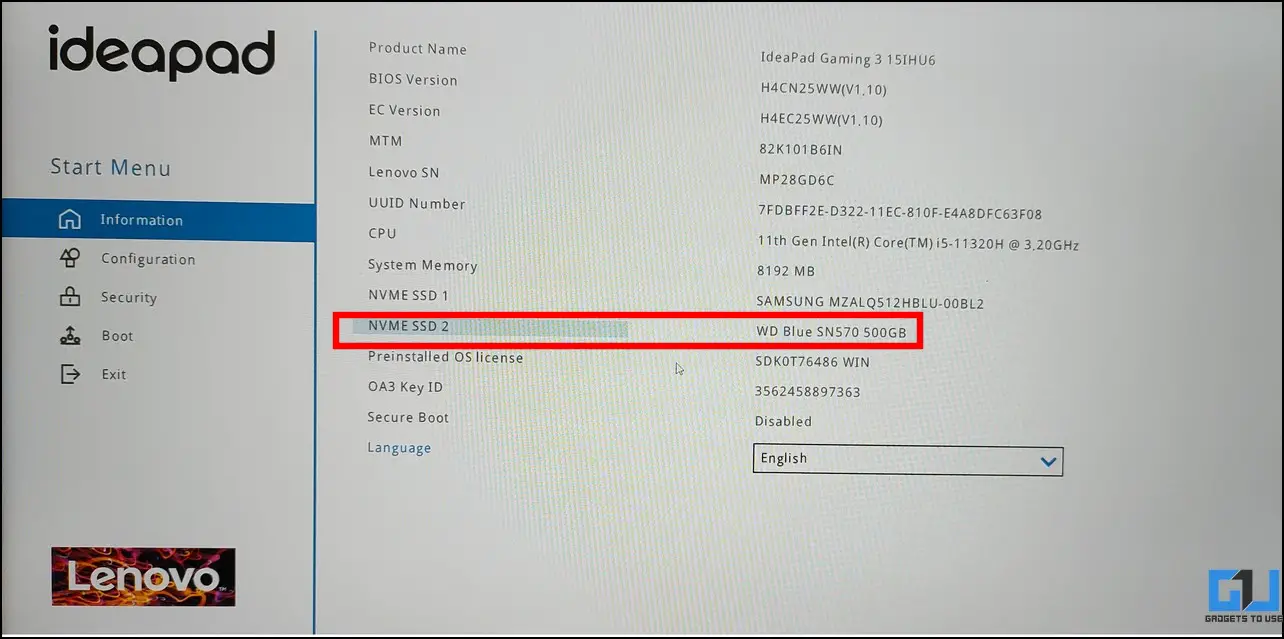
The Basic Input/Output System, BIOS, is a program that your computer’s microprocessor use to start the system. If the SSD you’re looking for isn’t detected at boot, there’s a high chance that it might be faulty. Follow these simple steps to learn to detect your internal SSD in BIOS.
1. Boot into your system’s BIOS and switch to the Information tab.
Tip: To know the exact keys to boot into the BIOS of your motherboard, refer to your manufacturer’s guide or Google your system’s model number to access the BIOS settings.
2. Verify whether the connected internal SSD name is showing up under the Information menu. If the SSD is undetected here, then you have a loose connection or a faulty SSD.
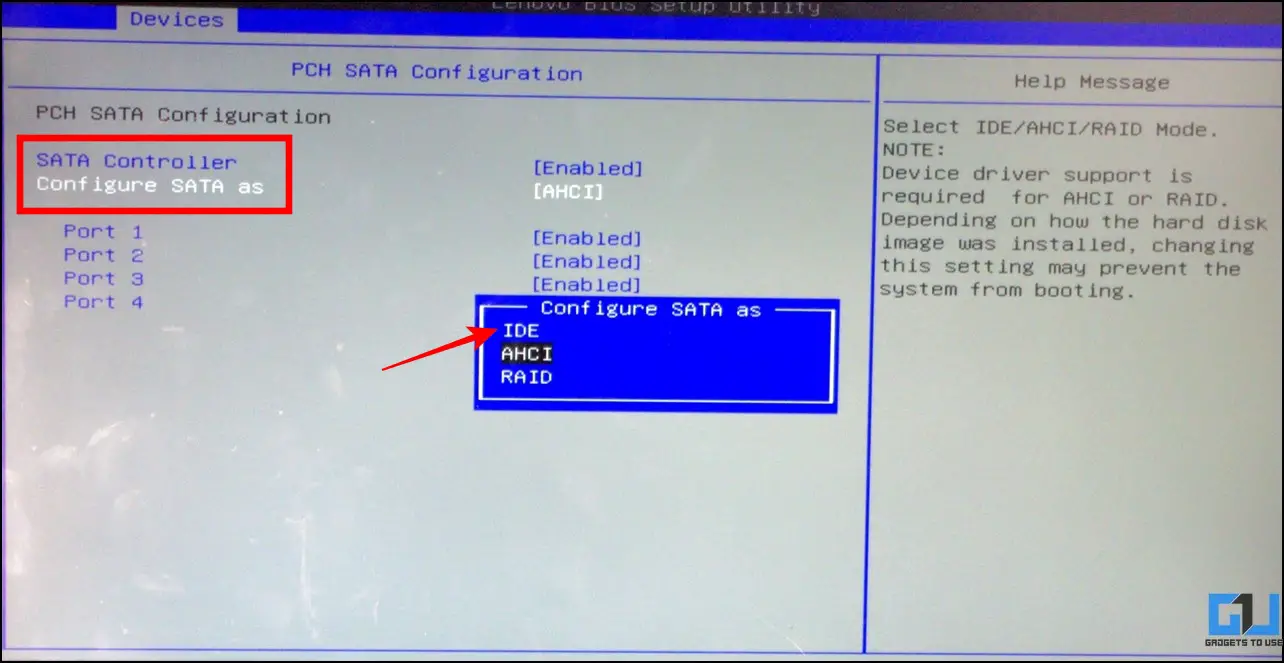
Configure BIOS to fix Internal SSD Not Showing Up
Suppose your connected internal SSD is detected in BIOS but fails to show up in Windows after boot. In that case, the discoverability issue might be due to an existing misconfiguration of the SATA controller as it manages data flow and communication between the hard drives and the computer. Follow these steps to configure the same.
1. Boot into your system’s BIOS mode to locate the Devices tab.
2. Next, ensure that the SATA controller is enabled and set it to IDE mode. Integrated Drive Electronics (IDE) is the interface standard responsible for making connections between motherboard and disk storage devices.
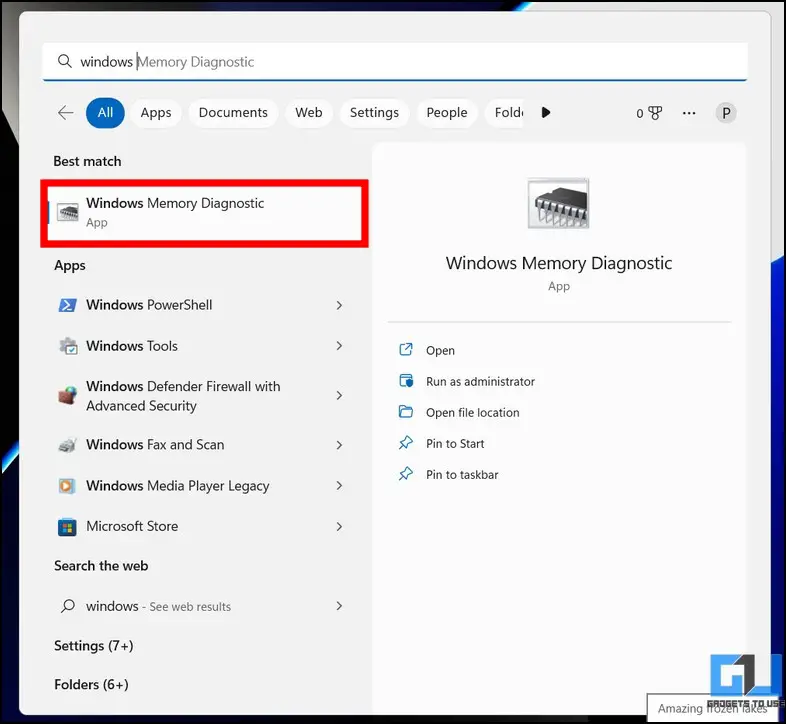
Utilize Windows Memory Diagnostic Tool
Besides other manual troubleshooting methods, Microsoft Windows also offers a Windows Memory Diagnostic tool to help users detect issues with onboard storage devices and system memory. Here’s how you can use this tool to your advantage.
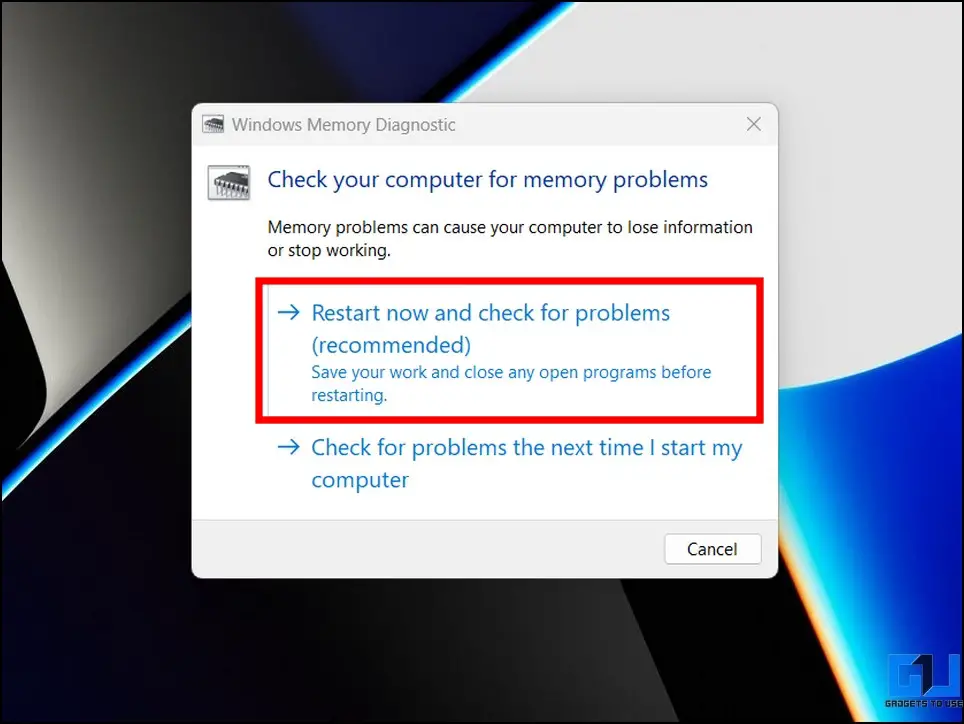
1. Press the Windows key and search for the Windows Memory Diagnostic tool to launch it.
2. Next, click the Restart Now button to restart your system and allow it to check and fix any memory/storage-related errors.
Remove and Replug the SSD Manually
If the installed internal SSD has loose connections with the board, you will likely face the ‘SSD not showing up’ issue on your Windows machine. To resolve the same, you must unplug and reconnect it to the board. If you’re unsure about the process, you can always visit your manufacturer’s service center to get it done.
Check SSD Compatibility with your System
SSDs are broadly available in two types, SATA and PCIe NVMe. The former is more affordable and found on most budget systems, while the latter is mostly used in performance-oriented systems, as NVMe works three to ten times faster than the SATA type. If the installed SSD keeps disappearing and reappearing on its own, it might not be compatible with your system’s hardware. To solve the issue, you can install NVMe SSD on your system as it is directly plugged into the slot instead of attaching it to a connecting SATA cable. Additionally, you can download the manufacturer’s software to check the installed SATA compatibility with your Windows machine.
Pro-Tip: While increasing your Windows 11/10 machine storage, with an existing NVMe SSD, pick only NVMe (same type) instead of going for SATA, as you might encounter compatibility issues when two different SSDs are used on the same board.
Bonus: Troubleshoot SSD Issues with Third-Party Tools
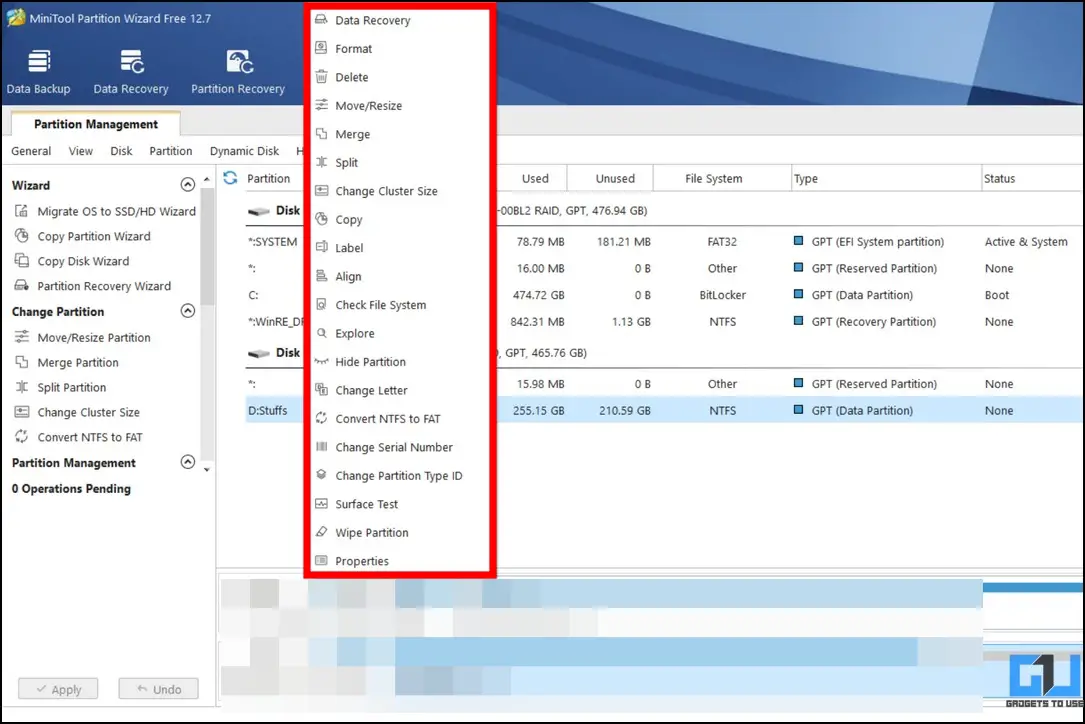
Besides native tools, you can always take the help of effective free third-party tools such as MiniTool Partition Wizard to assist you in fixing issues with your internal SSD. Here’s how you can utilize the most out of this tool.
1. Visit the MiniTool Partition Wizard website and download its free version to your system.

2. Next, right-click on the internal SSD that keeps disappearing.
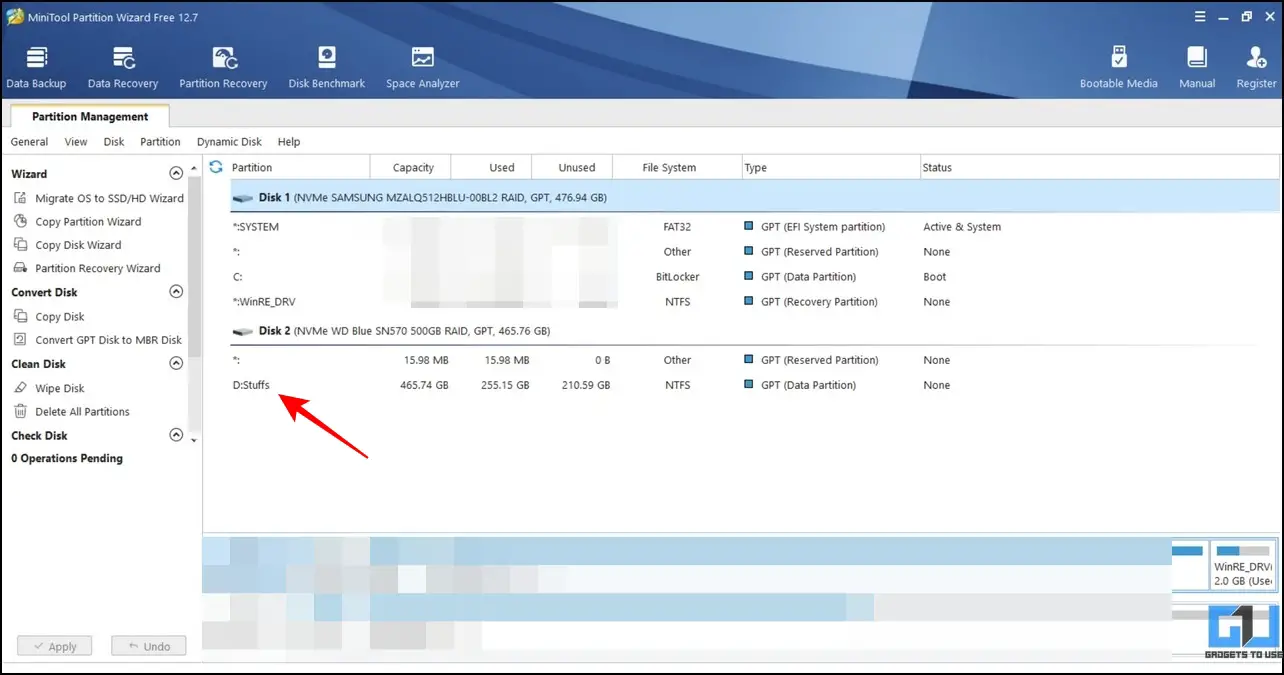
3. The free version of MiniTool Partition Wizard allows you to perform many operations to fix faulty SSDs, such as formatting, splitting, surface testing, wiping file-system, and much more. You can pick your desired action using this tool to fix the internal SSD disk in a jiffy.
FAQs
Q: My SSD is not showing up in BIOS. How do I fix it?
A: You need to set SATA to IDE Compatibility mode inside your BIOS to fix the problem. Check the easy steps listed above for more details.
Q: How to fix SATA/M.2 SSD not showing up in Windows 11?
A: Follow the nifty methods listed in this explainer to fix the problem.
Q: My Internal SSD keeps disconnecting and reappearing in the System. How to fix it?
A: This usually happens when the connected SSD has some missing drivers or is incompatible with your machine. Try unplugging the drive and reconnecting it to resolve the issue.
Q: The SSD File system is showing RAW. How do I fix it?
A: This commonly happens when the file system on your SSD becomes corrupt. You need to reformat the drive with the NTFS file system to restore its working.
Wrapping Up: No More SSD Issues!
We hope you’ve resolved your internal SSD issues by following this troubleshooting guide. If you find it useful, share it with your colleagues who might be scratching their heads looking for a solution to this problem. Stay subscribed to GadgetsToUse and visit the below links for other helpful troubleshooters.
Also, Read:
- Top 7 Ways to Fix Windows 11 Black Screen With Cursor Issue
- 5 Ways to Fix Windows 11 Slow Startup Time
- 9 Ways to Fix Windows 11 Bluetooth not working, Audio Lag, or Connection Issues
- 7 Ways to Fix Voice Typing Not Working on Windows 11 or Earlier
You can also follow us for instant tech news at Google News or for tips and tricks, smartphones & gadgets reviews, join GadgetsToUse Telegram Group or for the latest review videos subscribe GadgetsToUse Youtube Channel.