Quick Answer
- If you have a Windows laptop, you may want to check its battery health to know whether it needs to be replaced.
- The hidden Battery Report tool is the easiest way to check battery health on any Windows machine.
- These values will refresh when you use the ‘powercfg’ command in the Powershell window to check battery health.
Batteries used in laptops or notebooks are bound to degrade with time. They lose their maximum charge-holding capacity after going through multiple charge and discharge cycles. If you have a Windows laptop, you may want to check its battery health to know whether it needs to be replaced. Here’s how to check the battery health of any laptop running Windows 11.
How to Check Battery Health on Windows 11
For starters, battery health is the cell’s current charge-holding capacity (after all the wear and tear) against what it was designed originally for. Modern laptops use lithium-ion batteries, which have a limited lifespan. And if you have one, you might have already noticed that the battery efficiency has reduced over time.
Like Windows 10, Windows 11 offers a built-in way to generate a detailed battery report. Plus, you can also use certain third-party tools to check the laptop’s battery health. Read the methods in detail below.
Method 1- Generate Battery Health Report via PowerShell
The hidden Battery Report tool is the easiest way to check battery health on any Windows machine. It works via Command Prompt/ PowerShell as follows:
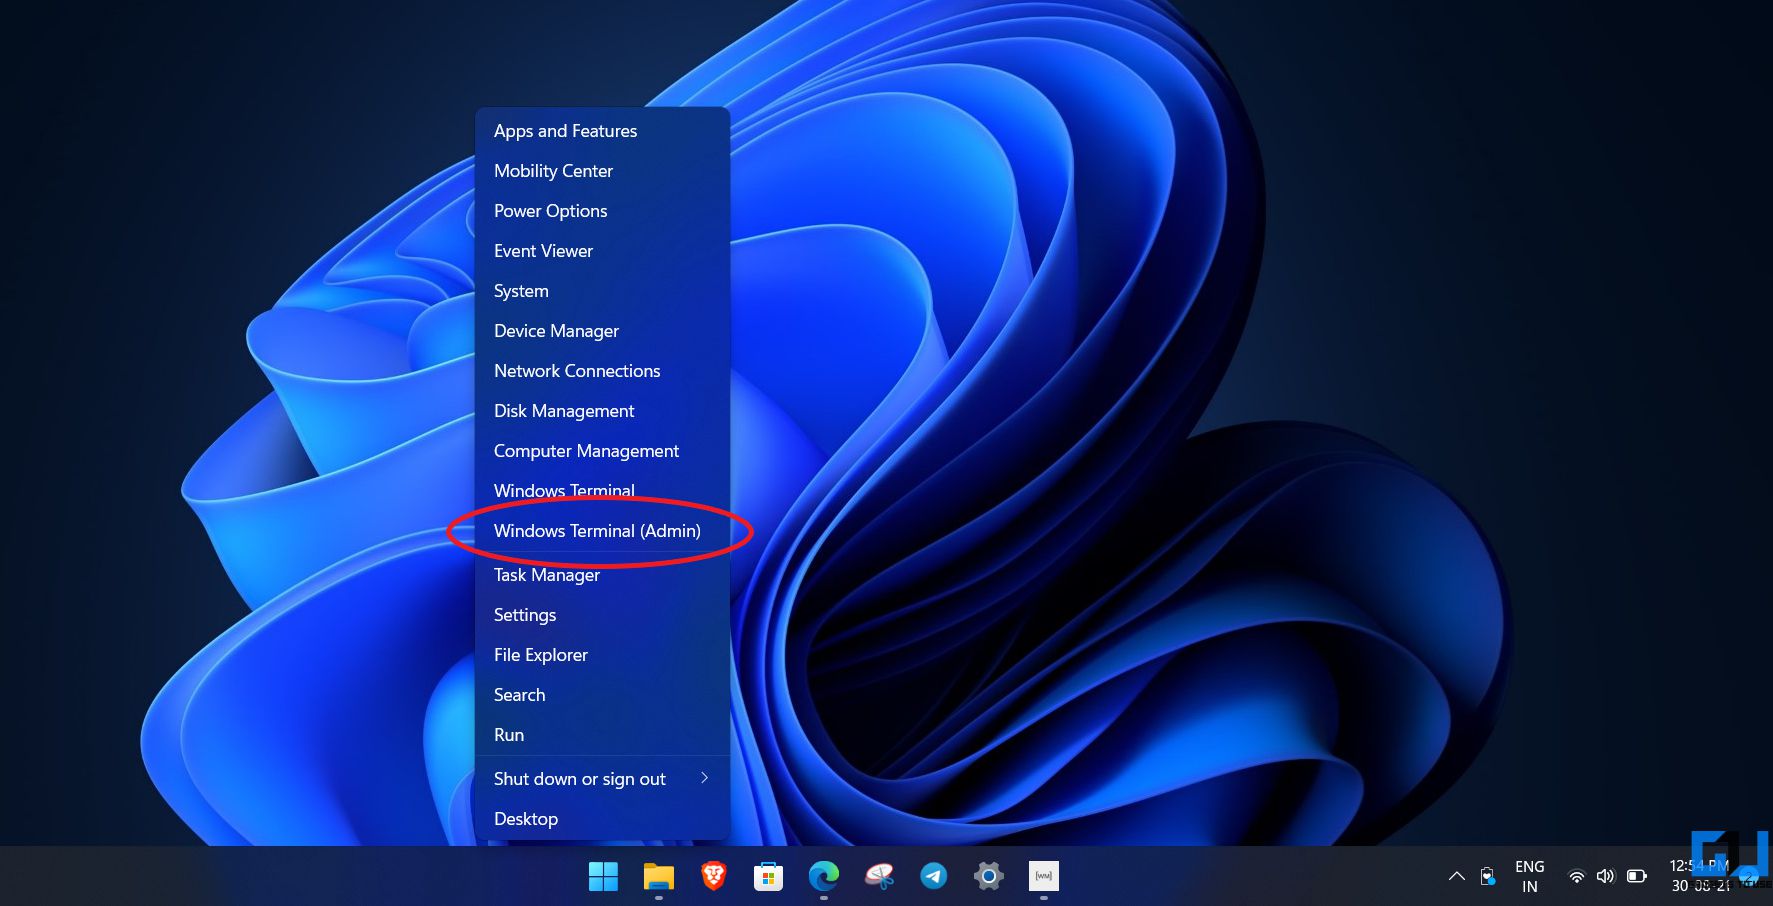
1. Press Win + X on your keyboard OR right-click the Start button.
2. Select Windows Terminal (Admin) to open the PowerShell window. Alternatively, you can search for Windows PowerShell in the Start menu and open it as administrator.
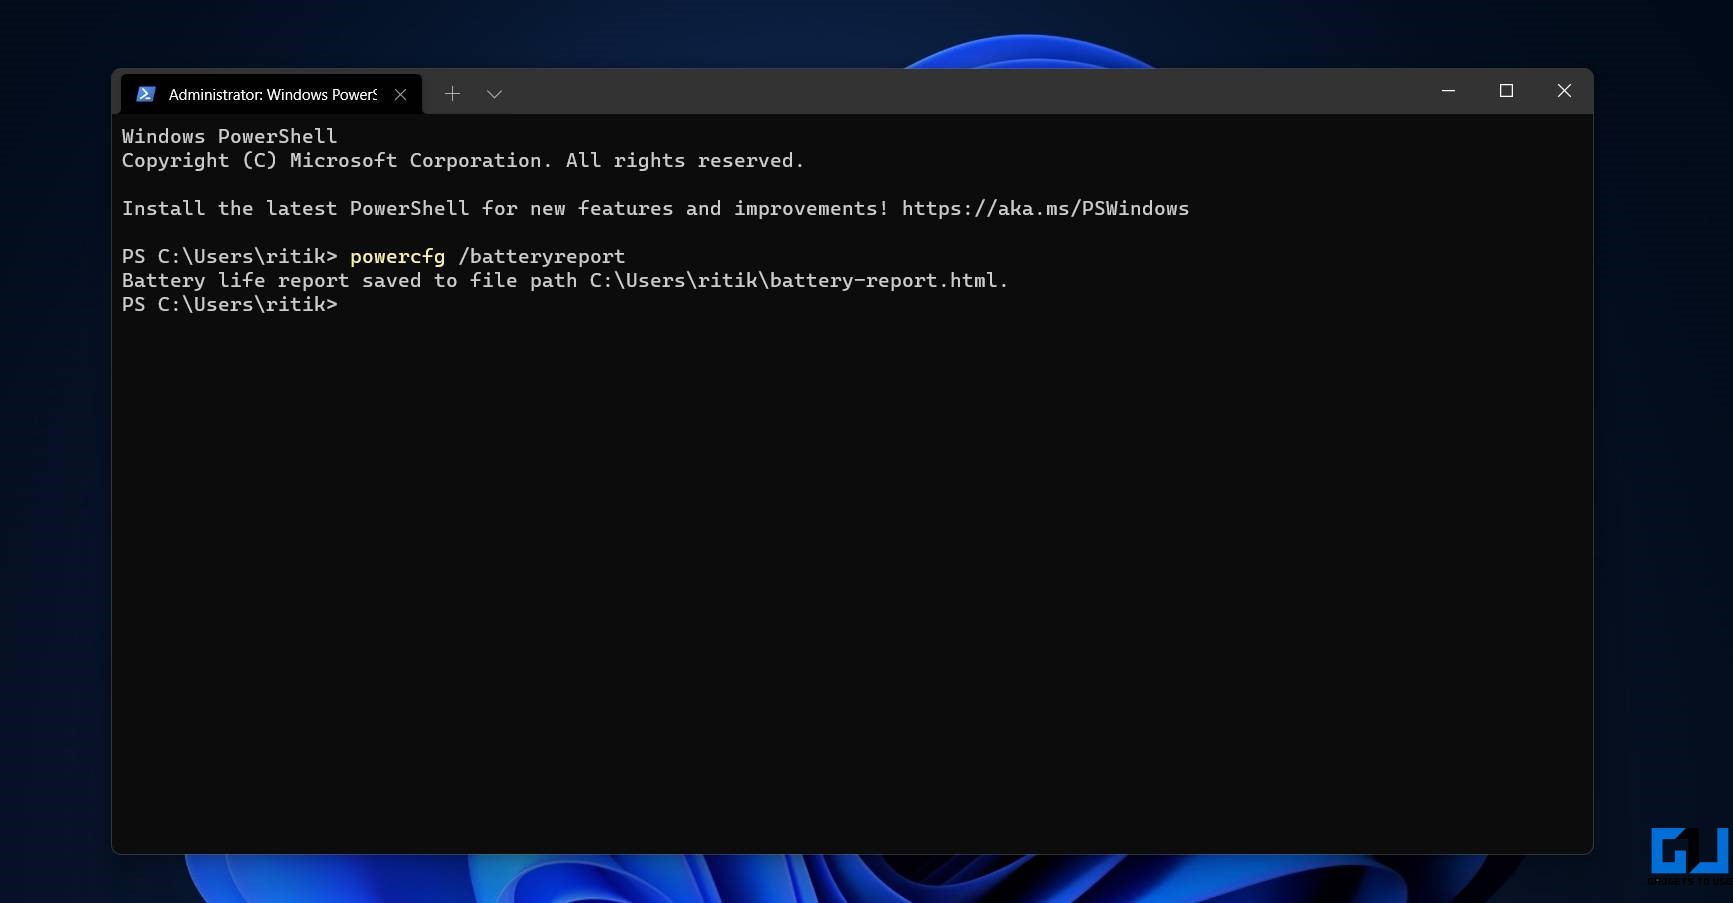
3. Once the PowerShell window opens, type powercfg /batteryreport and enter.
4. It’ll create and save a battery health report to C:\Users\name\battery-report.html.
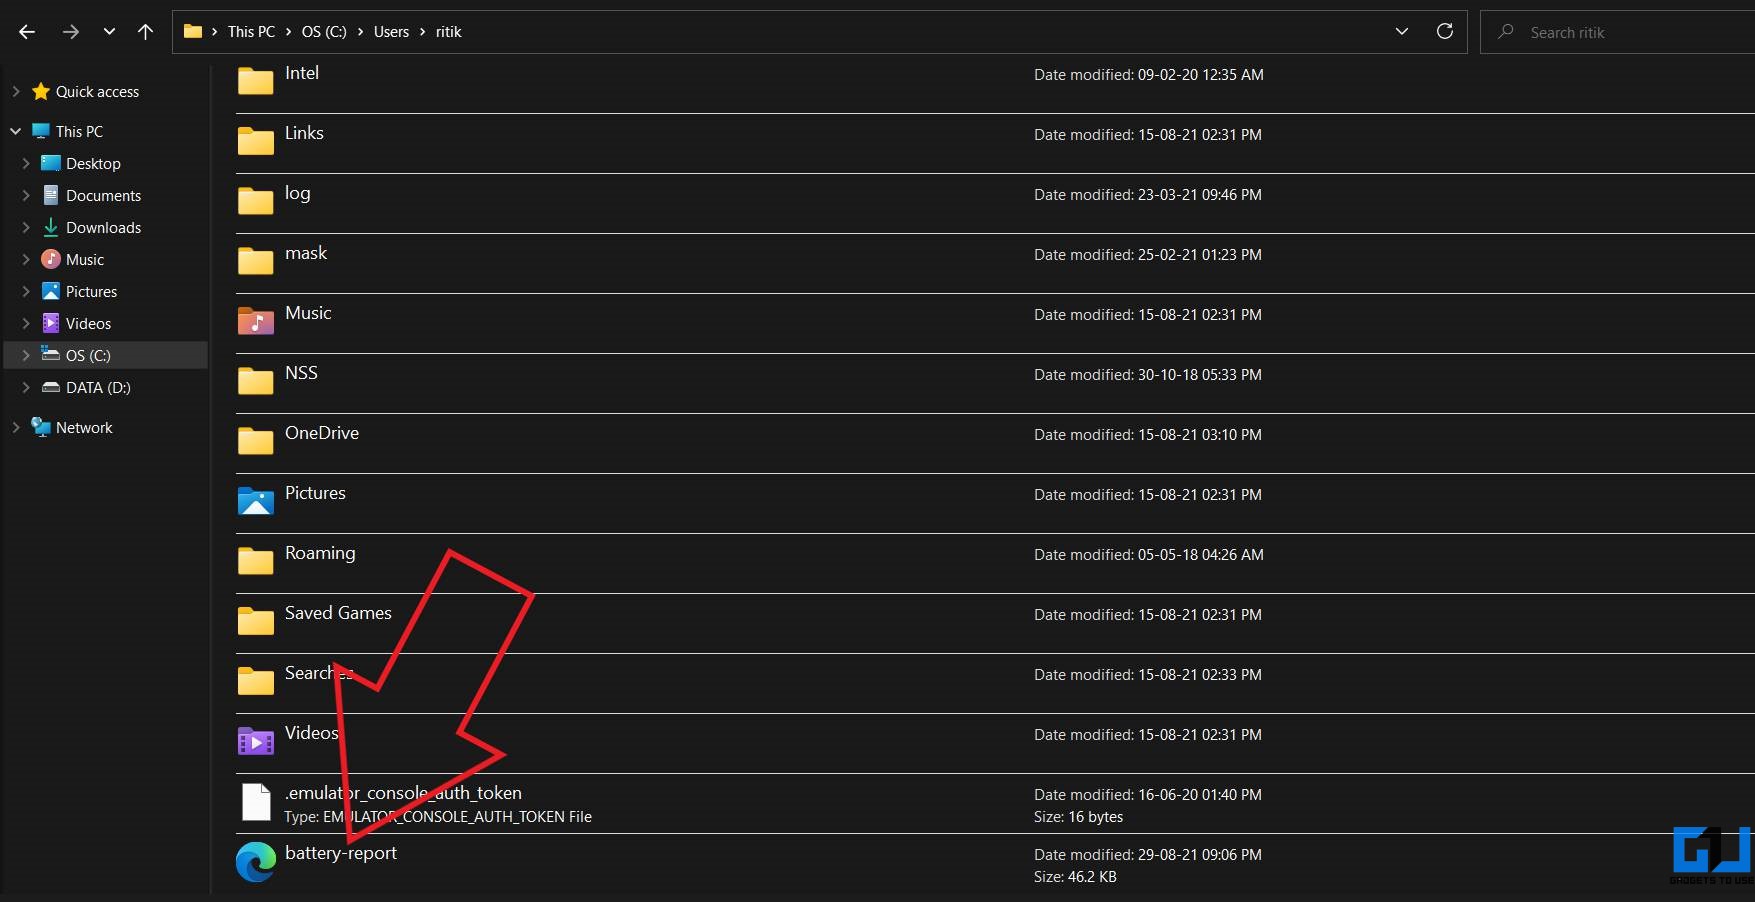
5. Visit the directory. Click the battery health report HTML file.
Correctly Reading the Battery Health Report
Upon tapping, the battery health report will open in your browser. It will show the battery specifications and capacity alongside the battery capacity history, life estimates, and recent usage stats.
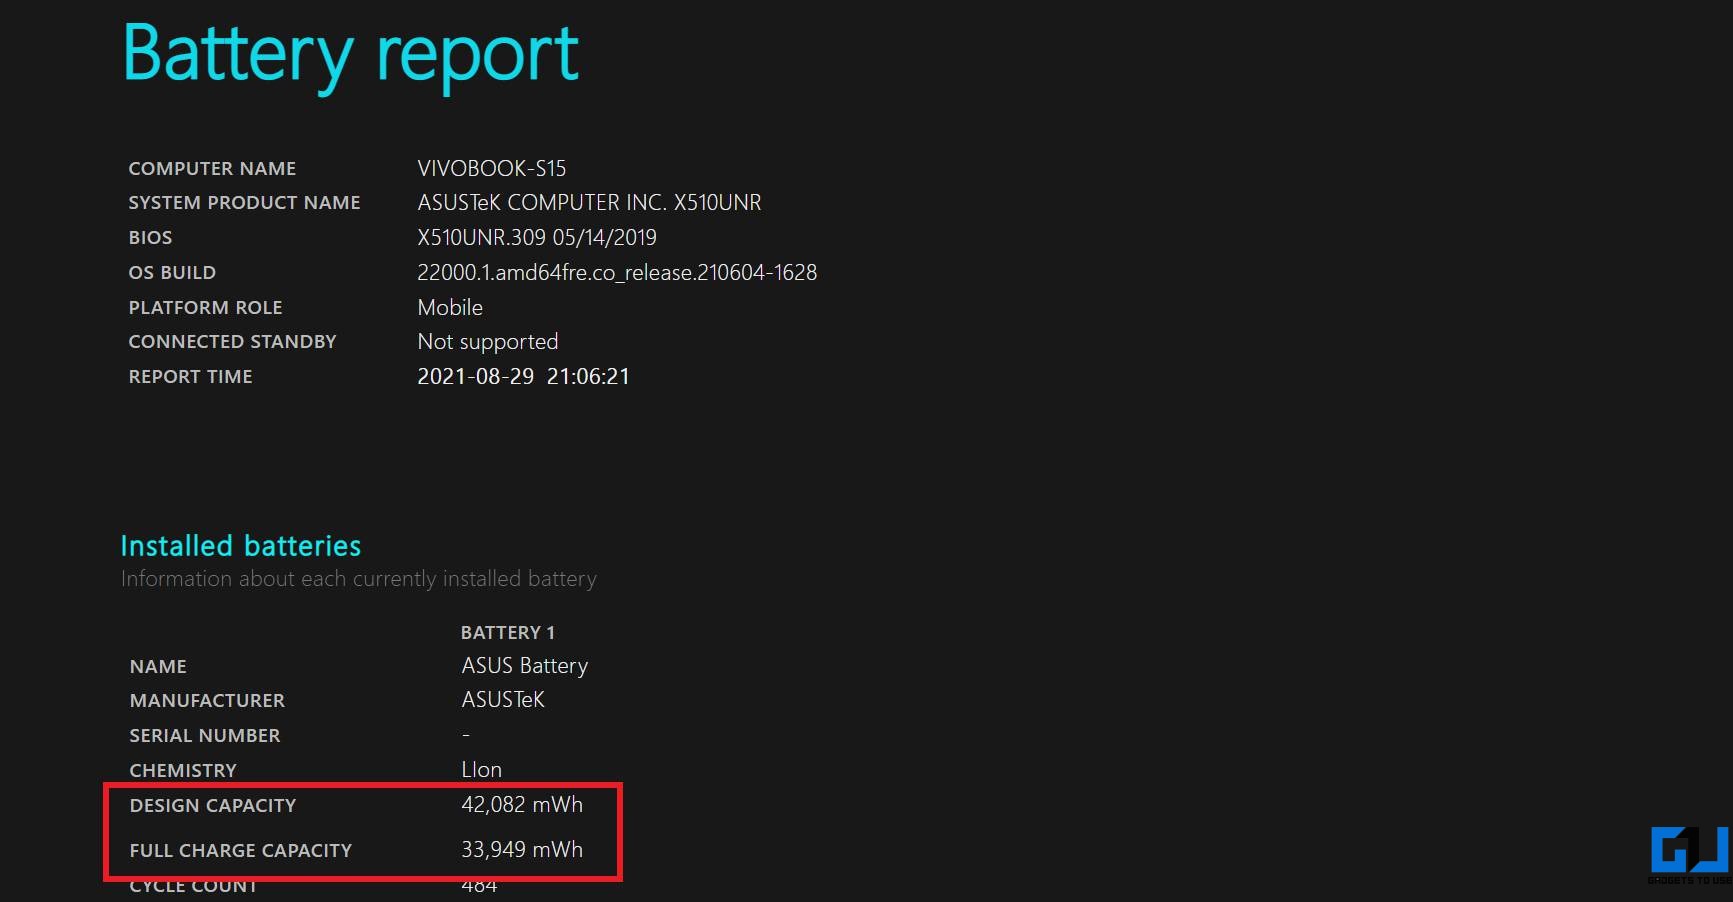
Here, you can see that the design capacity of my device’s battery is 42,082 mWh. Meanwhile, the full charge capacity is 33,949 mWh, which means it has lost some of its holding capacity over time. If you calculate it, the current health is about 80% of the original design capacity.
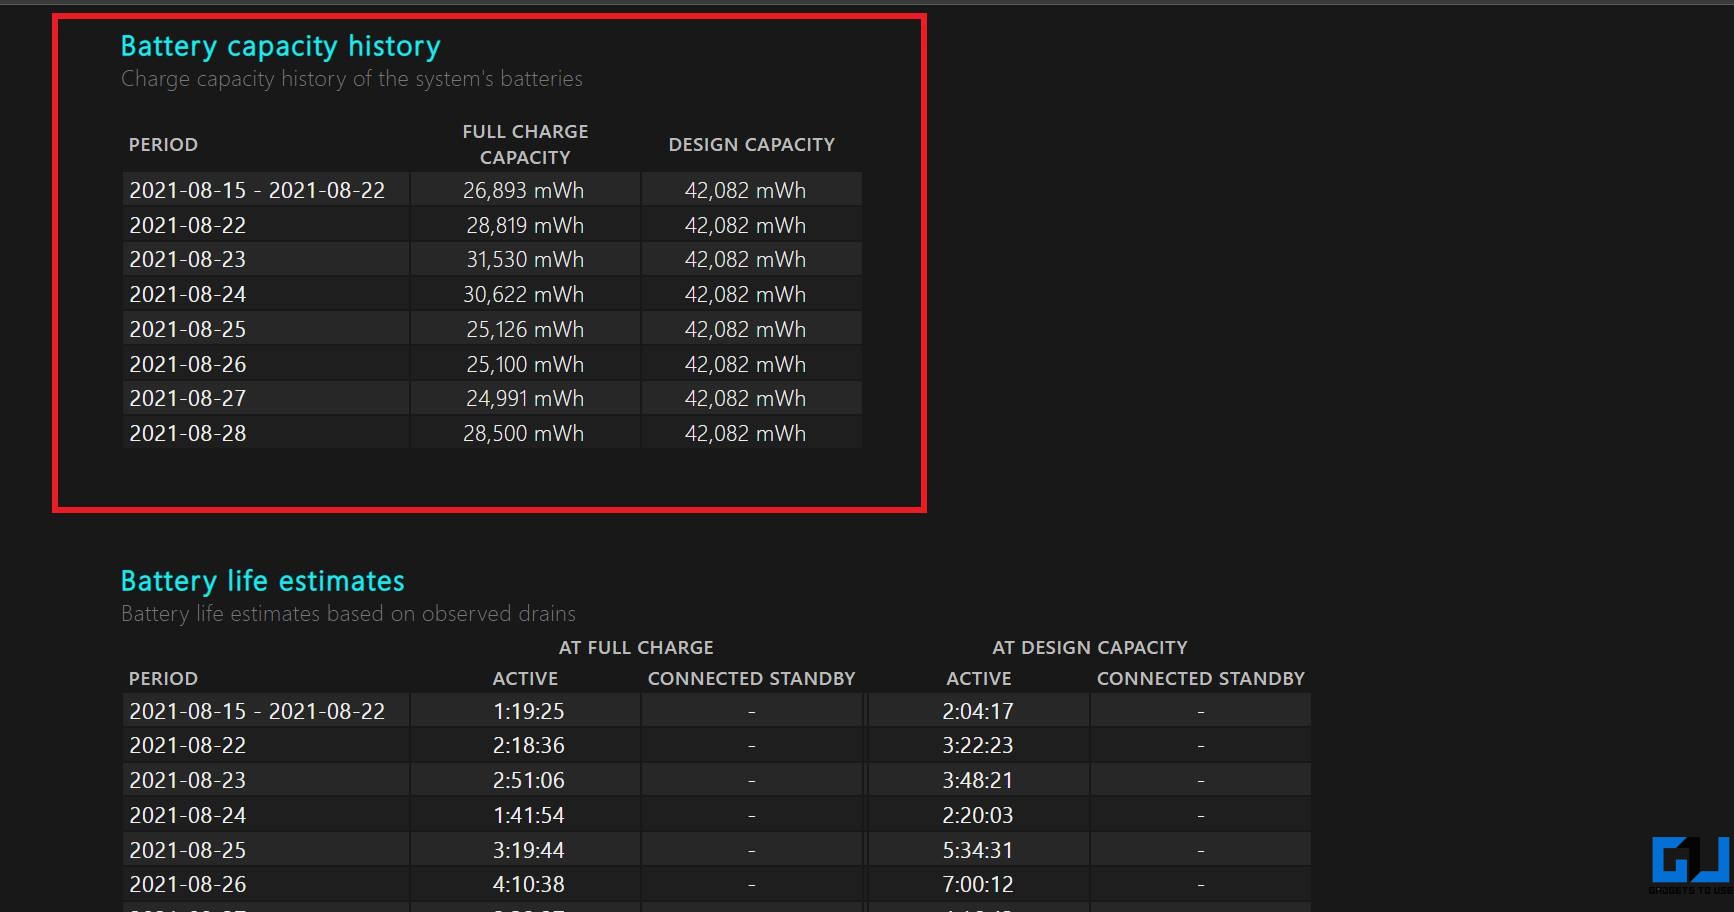
Under Battery capacity history, you can see how your battery’s full charging capacity has faired against the actual design capacity over time. It’ll reduce gradually as the battery is charged, used, and discharged.
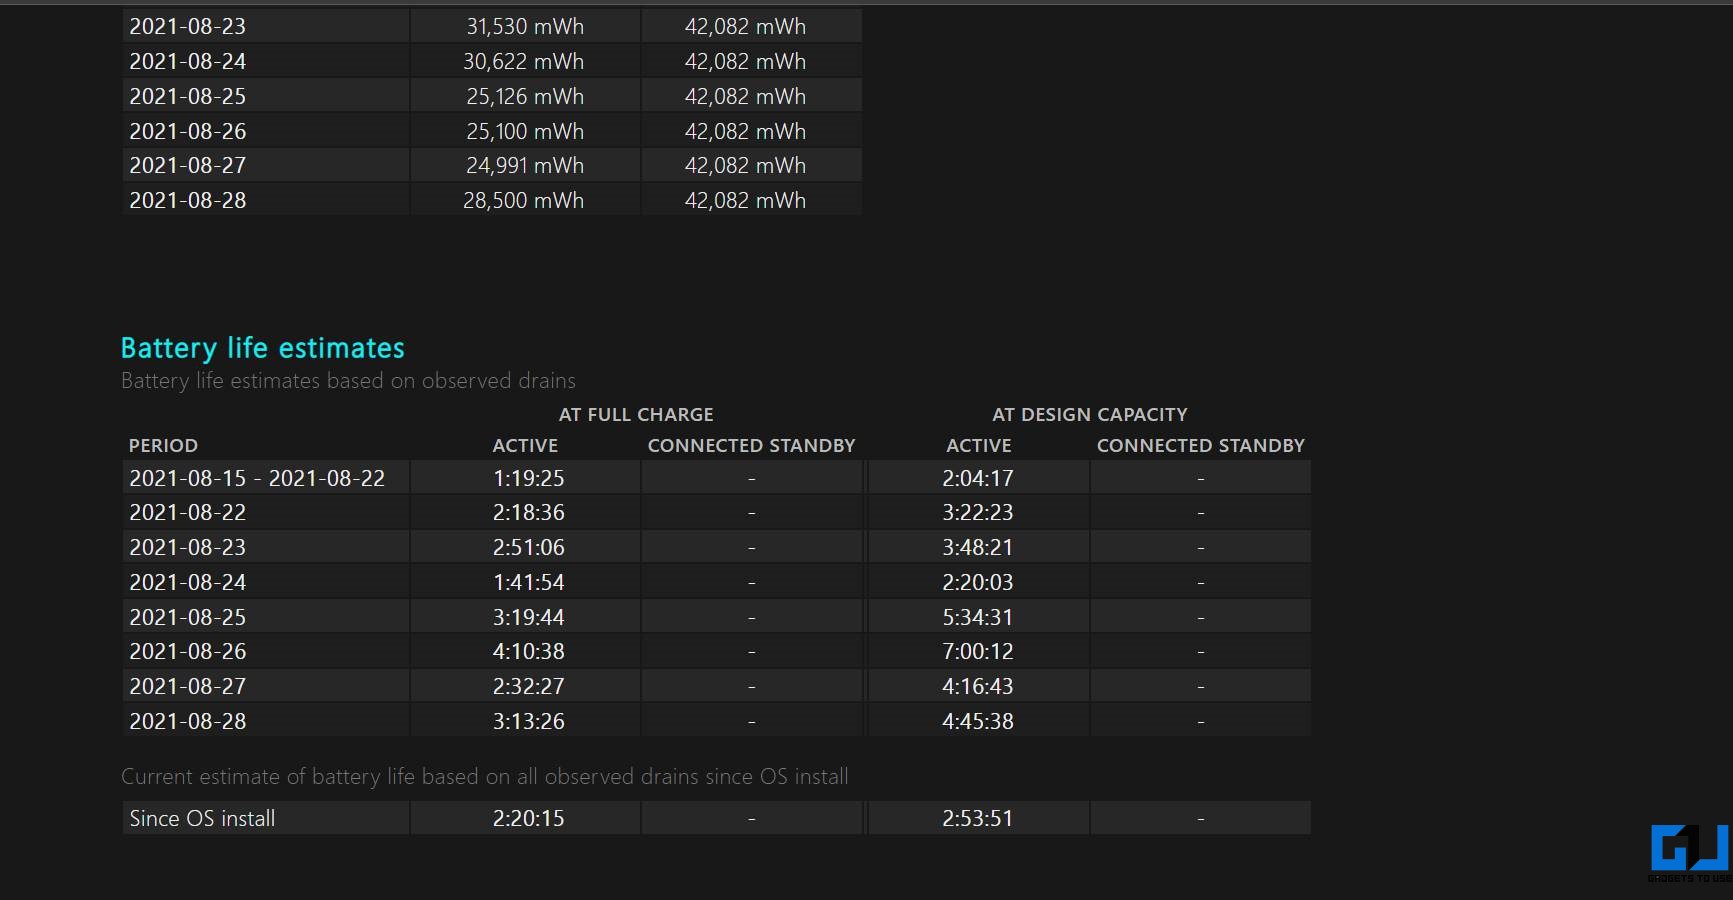
Furthermore, the Battery life estimates section will show how long your laptop should last based on its design and current capacities. Consider it as battery life estimates for today (current capacity) pitted against battery life estimates for the day you unboxed the laptop (design capacity).
These values will refresh when you use the ‘powercfg’ command in the Powershell window to check battery health. Each time, the existing battery report will be replaced with the new report.
Method 2- Check Battery Health Using BatteryCat
Several third-party tools let you check battery health on Windows 11. BatteryCat is one such tool you can use to monitor battery health, charge cycles, and charge and discharge times, as follows:
1. Download BatteryCat from SourceForge. Choose one of the portable versions.
2. Extract the downloaded zip file. Open start_batterycat.
3. Once the tool opens, you can see your laptop’s current battery capacity.
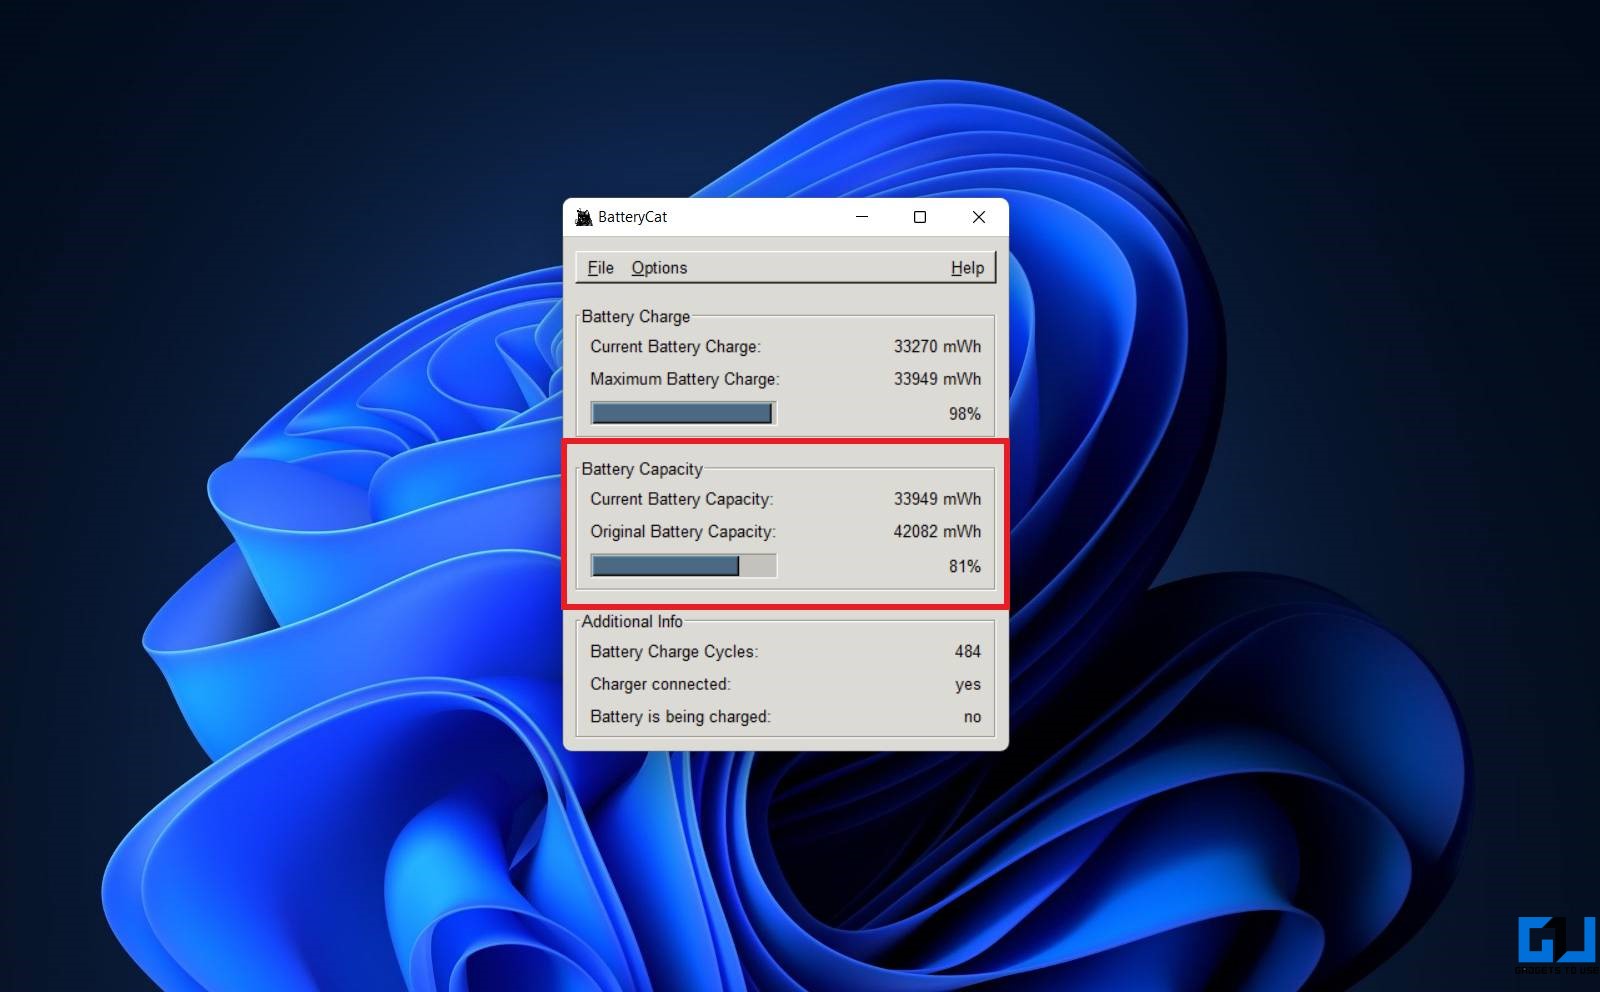
Here, you can see my laptop’s current battery capacity is 81% of the original capacity. You can also see the battery charge cycles, i.e., my machine has been charged and discharged to its full capacity 484 times.
Method 3- Check Battery Health Using HWiNFO
Alternatively, you can use the HWInfo app, which allows you to monitor the battery alongside other hardware components. Here’s how to use it:
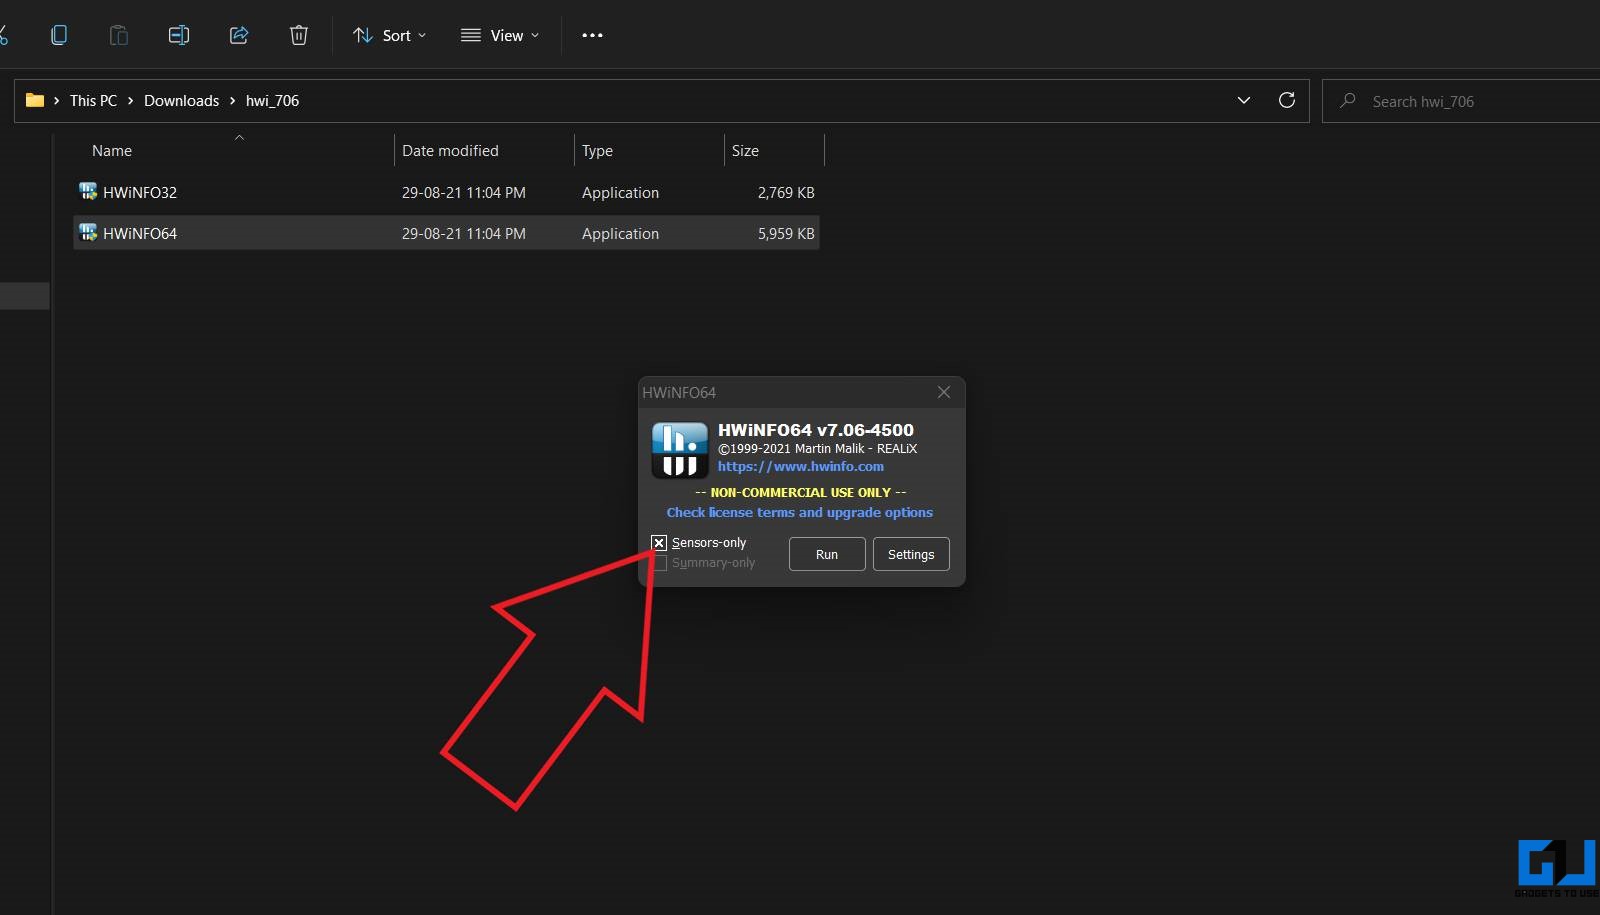
1. Download HWiNFO on your Windows 11 laptop. Select the portable version, which doesn’t require installation.
2. Extract the downloaded zip file—open HWiNFO.
3. Select “Sensors-only” and click on Run.
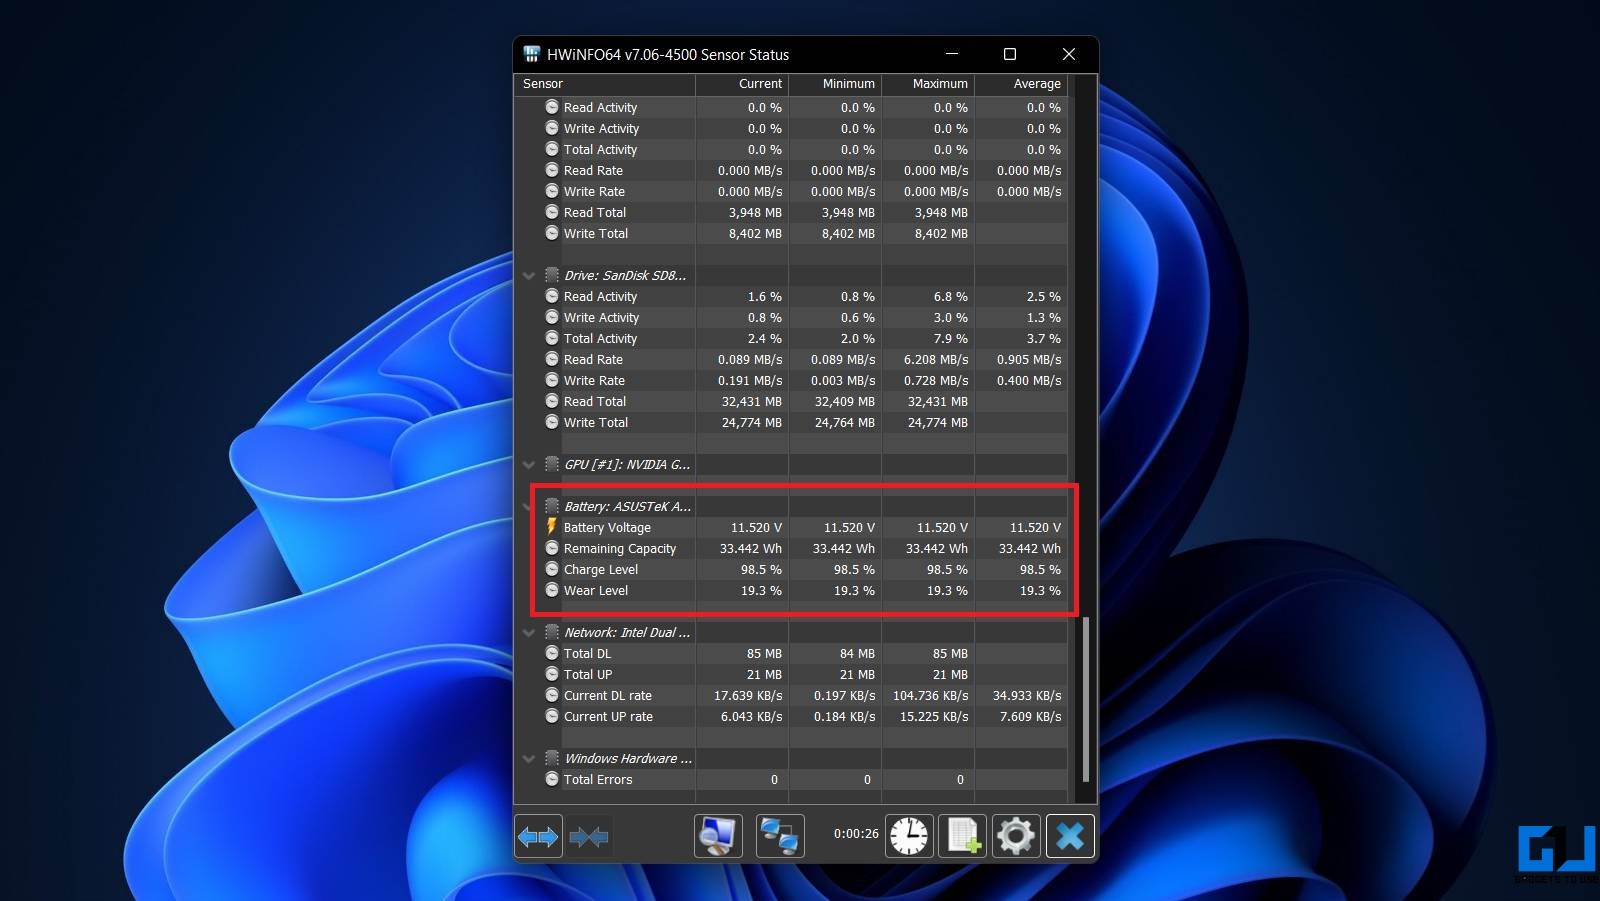
4. Now, scroll down to the Battery section.
5. Check the Wear level to see how much the battery has degraded.
Here, you can see that the battery on my device has lost almost 20% of its original capacity. Or you can say that it can hold only 80% of the charge it was originally designed for.
How to Prolong Battery Life on Windows 11 Laptop
Battery degradation is inevitable. However, you can slow down the process and make it last longer by following the simple tips below.
- Avoid draining the battery to 0 percent.
- Do not charge or keep the battery at 100 percent all the time.
- Try to keep in the ideal range of 40 to 80 percent.
- Some manufacturers provide the feature to maintain 80 or 60 percent charge capacity while plugged in. Use it to prolong the overall battery lifespan. Alternatively, you can use limit charging using third-party software.
- Ensure the battery does not heat up, and use it in a well-ventilated place.
- Use only the original charger to charge your laptop.
Wrapping Up
This is how you can check your laptop battery health in Windows 11. As you can see, both the built-in battery report and third-party apps show accurate data. You can use either of the ways to gauge the current battery capacity. And if your battery has started malfunctioning and the laptop is still under warranty, get it checked at an authorized service center. Anyways, what’s the battery health on your device? Let me know in the comments below.
You might be interested in:
- 6 Ways to Disable Copilot on Windows 11
- 5 Ways to Disable the Xbox Game Bar on Windows 11/10
- How to Install Android Apps Using Windows 11 Subsystem
- 6 Best Ways to Connect Your iPhone to Windows 11 PC
You can also follow us for instant tech news at Google News or for tips and tricks, smartphones & gadgets reviews, join GadgetsToUse Telegram Group or for the latest review videos subscribe GadgetsToUse Youtube Channel.
