Quick Answer
- Wake up screen- If you do not want turn on the double tap to wake gesture from the off-screen gestures, you can simply use the fingerprint sensor to tap and wake up the screen.
- One of the main issues faced while switching from old phone to a new smartphone is the transfer of data from your old device to the new one.
- Android stacks a great feature touted as the Smartlock in the privacy settings, you’ll be able to have your smartphone mechanically unlock the lockscreen display once you enter house, or your car.
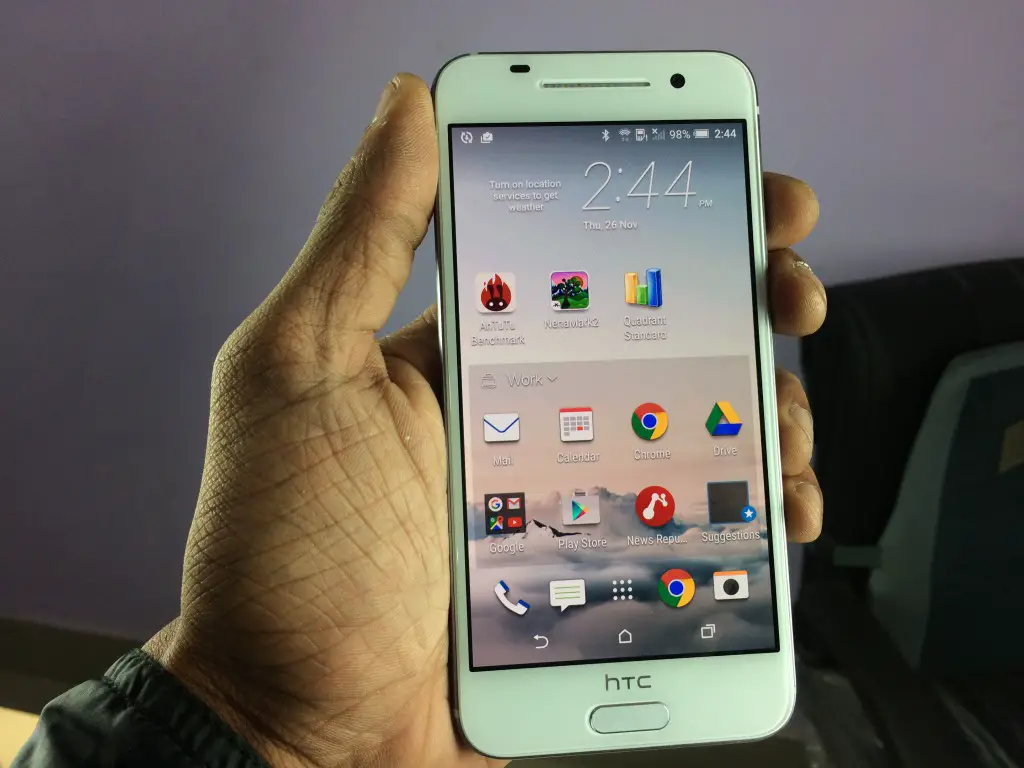
After almost two month of the launch of HTC’s latest flagship HTC One A9, we have come up with a few interesting and useful tips for the users. Even though the One A9 isn’t as mighty as phones like iPhone 6s or Nexus 6P, it is still not a bad deal for its price. HTC has packed in a premium design, great display, fair configurations and almost everything that makes it a good package overall. We’ll let you make the most out of the One A9 these guidelines and tips we have come up with.
USE FINGERPRINT SENSOR SHORTCUTS
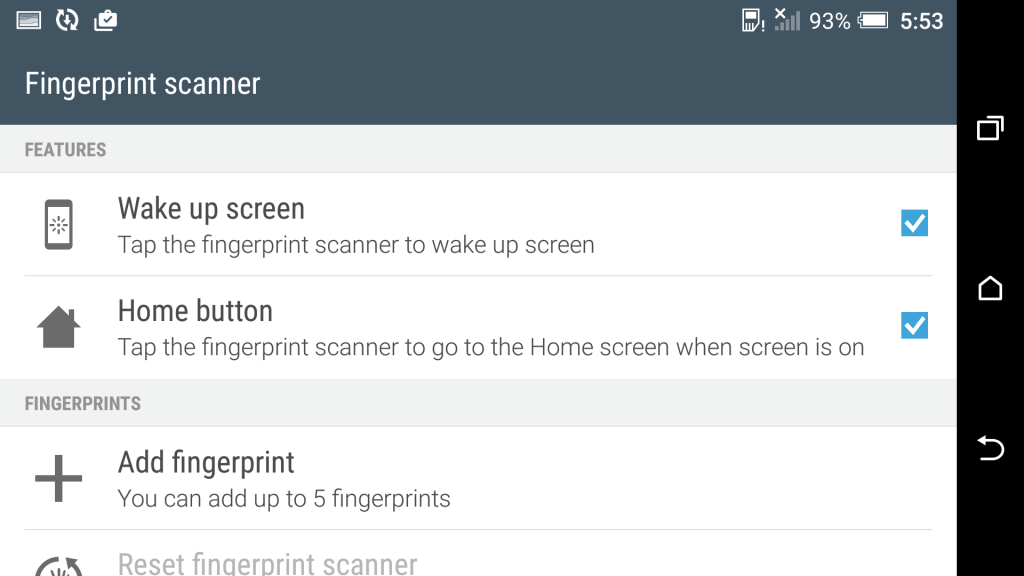
HTC One A9 comes with a fingerprint sensor that works great and feels even better. Like most of the fingerprint readers, it can be used to unlock the phone and make playstore purchases, but this is not all. In the Fingerprint scanner options in Settings menu, you can enable or disable two gestures which can be used as usability shortcuts to save time and taps. The two options are:
Wake up screen- If you do not want turn on the double tap to wake gesture from the off-screen gestures, you can simply use the fingerprint sensor to tap and wake up the screen.
Home button- You can directly reach the home screen when the screen is turned on, by simply tapping the fingerprint sensor once.
GET EXISTING CONTENT OUT OF YOUR OLD PHONE
One of the main issues faced while switching from old phone to a new smartphone is the transfer of data from your old device to the new one. HTC come all prepared to rescue users from this issue, it comes constructed within the skill to get content material from any of your smartphone including, iPhone or any other Android phone.
To backup your data on your HTC One A9, there are few simple tasks to do. Open up the Settings and navigate to get content material from old phone. You’ll see choices for “HTC Android smartphone, Other “Android smartphone,” and “iPhone.” Tap the one you wish to backup and follow the directions.
USE SMARTLOCK TO AVOID LOCKING IN FAVOURABLE SCENARIOS
Out of all the methods, fingerprint is the best way to unlock your device, instead of putting pin, pattern, and passcode to access your device. Android stacks a great feature touted as the Smartlock in the privacy settings, you’ll be able to have your smartphone mechanically unlock the lockscreen display once you enter house, or your car. The Smartlock feature saves trusted devices when paired to your smartphone and keeps the phone unlocked when you are hooked up to a Bluetooth software like your smartwatch, wireless speaker, or automotive stereo.
Go to Settings > Security > Smart Lock (input password/PIN/trend). From there you’ll have a couple of choices:
- Trusted devices– keep your smartphone unlocked while paired to precise units (speaker, car stereo, smartwatch) using Bluetooth.
- Trusted places– keep your phone unlocked while you arrive in particular areas (house, office, and so on.).
- Trusted face– Smartphone will automatically unlock while it acknowledges your face after turning the display on.
- Trusted voice– It recognizes your pre saved voice command and unlocks the phone.
USE GESTURES FROM THE LOCK DISPLAY AS SHORTCUTS
HTC has incorporated quite a lot of to hand gestures that will let you reach different screen and open apps directly from the lockscreen, or while the display is off. All you need to do is making the most of a couple of swipes and taps to reach immediately into your favorite apps.
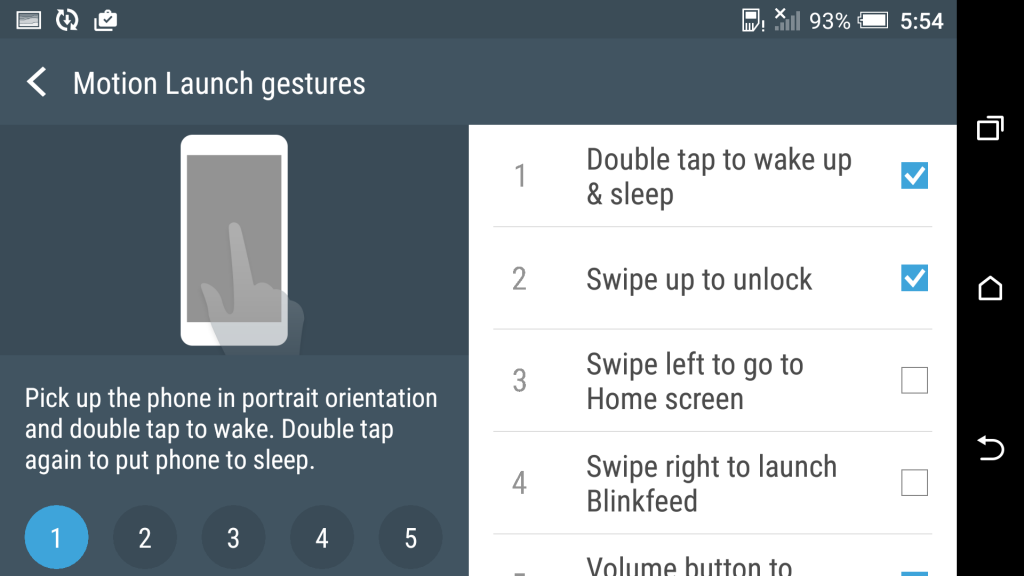
To enable the hand gestures, go to Settings > Display & gestures > Motion Launch gestures.
- Double tap to wake up & sleep– pick out up the smartphone in portrait and double-faucet to wake, do it once more to sleep.
- Swipe up to unlock– pick out up the smartphone in portrait and up to unlock the device.
- Swipe left to visit Home display– pick out up the smartphone in portrait and swipe left to reach home instantly.
- Swipe right to release Blinkfeed– similar factor, however swipe proper to reach to Blinkfeed instantly.
- Volume button to release Camera– pick out up the phone in panorama and press the volume rocker button to launch the camera
CHOOSE WHICH APPS USE THE NOTIFICATION LED AND WHEN
The notification LED is a much required hardware on Android units these days. Luckily One A9 houses one, which is gentle, lively and smart. Some of us make full use of LED light notifications and customizations, where many do not depend much on it. You can’t totally disable the blinking on the One A9, however you have an option to customize the way it blinks.
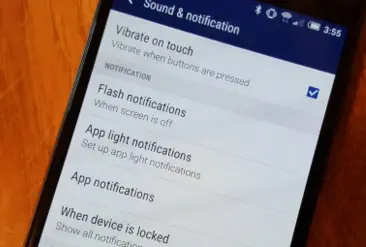
- To setup the notification LED, navigate to Settings > Sound & notification.
- From the displayed menu, tap Flash notifications to make a choice to change the LED from gentle to most effective while the display is off.
- To set flash notifications for person products and apps, tap on App gentle notifications. From here you’ll be able to make a selection to make use of the LED notifications- gentle for ignored calls, voice mail, messages, calendar occasions, mail, and alarms etc.
DISPLAY THE BATTERY PERCENTAGE
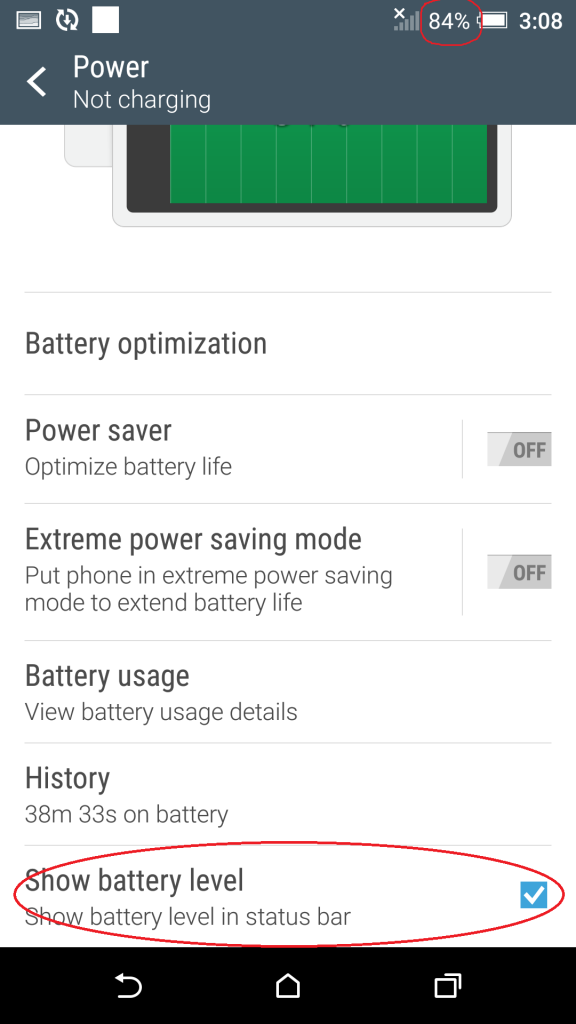
If you are someone who always keeps an eye on battery life, then this feature is for you. You can simply keep a record of your battery status by looking at the remaining battery percentage on the battery icon within the battery bar. Simply go to Settings > Power and test the field subsequent to Show battery level.
ENABLE BATTERY SAVER MODE TO SQUEEZE OUT EXTRA BATTERY LIFE
One of the most crucial factors of concern in the HTC One A9 is its small battery size; it is always a tough choice to choose between a gorgeous shell and a heavy battery. HTC makes sure that you do not end up in that critical state where there is no power outlet around and your battery is dwindling, you could have a few choices.
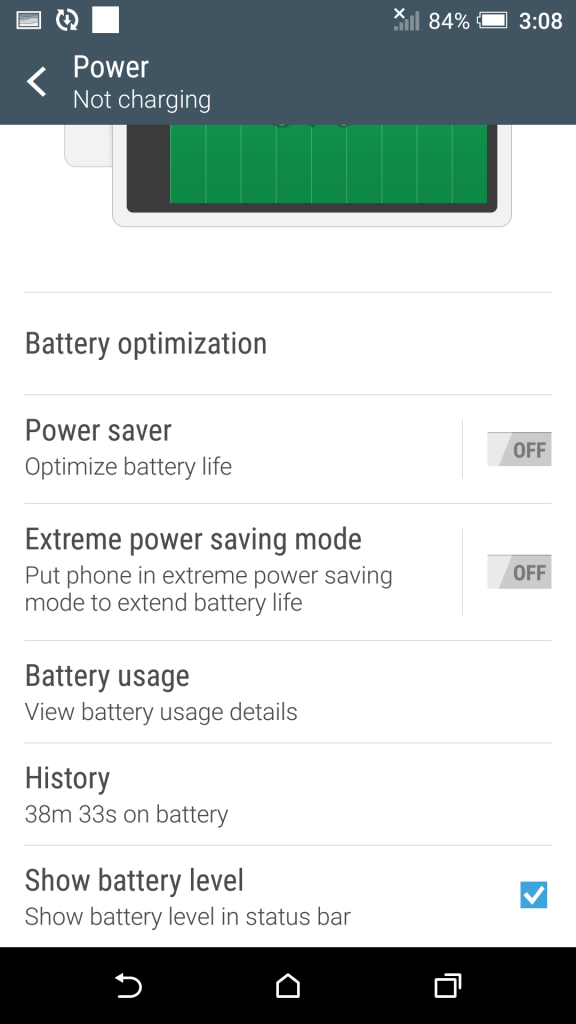
Like all Android Marshmallow devices, the One A9 comes with an integrated battery saver mode. It is enabled automatically while your smartphone drops down to 15%, however it can be manually enabled by navigating to Settings > Power and switching the Power saver on.
If you still wish to have some additional juice, an Ultra energy saving mode can also be enabled in the same setting. This will keep the phone in an extreme energy saving mode. This disables most of the smartphone functions and you are left only with calling texting and a few more options found in feature phones and the display shall be switched to darkish to preserve battery.
TURN OFF ANIMATIONS TO HURRY UP YOUR PHONE
Android devices come with interactive animations; however they may feel sluggish and annoying in some cases, not usually on a device like the One A9. Sometimes we face situations where the animations take more time than you’ll actually take to complete your stuff. Animations are cool, however we would love them more if the transitions have been just a bit faster.
Google has hidden a secret setting to try this on almost every Android device. First, move into Settings > About > Software knowledge > More.
Find “Build quantity” and tap it repeatedly. You’ll realize a message telling you that Developer choices were unlocked. Go again to Settings and tap the Developer choices option. Scroll down to Advanced; you are all set to set up the window animation, transition animation, and animation periods.
ADD OR REMOVE CONTENT MATERIAL TO BLINKFEED
BlinkFeed is HTC’s very own all-in-one widget dedicated to your information feeds, social updates, and location based tips, all simply accessed with a easy swipe to the left from your homescreen. Configuring BlinkFeed is as simple as using it, you need to follow these methods for the desired change:
TO UPLOAD OR DISPOSE OF PIECES FROM BLINKFEED:
- From your homescreen, swipe to the left to open BlinkFeed
- Tap the menu icon within the top-left corner
- Tap the + icon so as to add or do away with content material
You will now have an option to make a choice for the content you want to view via your BlinkFeed from a choice of social networks and different sources (or on the other hand unselecting the sources will remove the places you do not want to obtain updates from).
TO ENABLE OR DISABLE LOCATION BASED TIPS
- From your house display, swipe left to get right of entry to BlinkFeed
- Tap the menu icon within the upper left corner
- Tap the + icon
- Check or uncheck Real time package
REMOVE BLINKFEED FROM YOUR HOMESCREEN
If you want to take away BlinkFeed from your homescreen altogether, you’ll be needed to follow these steps. Simply navigate to the BlinkFeed settings menu as stated above, elect Manage homescreen panels, make a selection your BlinkFeed panel, and tap Remove. You can add BlinkFeed at any time by navigating to Settings > Personalize > Manage homescreen panels.
ADJUST THE DISPLAY COLOUR MODE
The One A9 has an AMOLED display. Basically, this means darks are darker and colours are vivid and bright. HTC has done a great job with the display on One A9, however they’ve additionally inbuilt a display setting mode that permits you to change colour scheme for better visibility under different conditions.
- Go to Settings > Display & gestures
- Tap on Color profileand make a selection AMOLED or sRGB
SWITCH CAMERA TO PRO, HYPERLAPSE, OR SLOW MOTION MODES
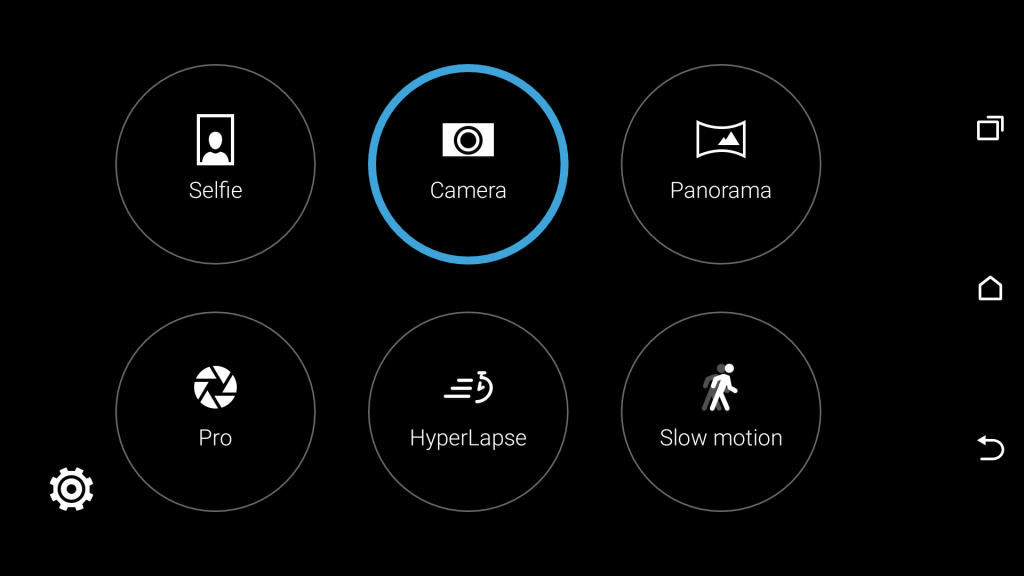
The default camera user interface and usability is very basic and easy for everybody to make use of. If you favor something dedicated a bit extra to photography, there’s Pro Mode and a few more different modes to play and be creative with. Pro Mode will give you keep an eye on over settings like ISO, White Balance, and opting for RAW layout. You can simply switch to another mode each time you’d wish. Open the camera app and tap the 4 circles icon. Choose from the listing of modes.
- Pro– ISO, white balance, exposure, colour output
- Hyperlapse– compress an extended video right into an amazing time lapse.
- Slow Motion– records slow movement videos.
- Selfie– take a photograph with the front camera
- Panorama– helps you line up consecutive photographs for a landscape photograph to get a 360 degree view of your surroundings.
[stbpro id=”grey”]Recommended: HTC One A9 FAQ, Pros, Cons and User Queries[/stbpro]
SET UP ANDROID PAY TO MAKE PAYMENTS
If you are fed up of pulling out your wallets and swiping your bank card every time you make a purchase, you desperately need an alternative to rest your wallets at home and make purchases even when you are away. Android Pay makes it easier to make purchases using nothing other than your phone. The HTC One A9 supports Android Pay and to set up your card you need to follow these steps:
- Open the Android Payapp for your smartphone
- Touch the + sign on the left top corner.
- Touch Add a credit or debit card
- If you have already got associated cards, select one or select Add some other card to add a new one.
- Use the camera to scan your card information or enter it manually
USE GOOGLE NOW ON TAP TO SEEK CONTENT
Since the HTC One A9 is among the few devices to come with Android Marshmallow out of the box, you get the chance to play with Google’s most up to date features and tweaks. One of the most productive new features in Marshmallow is called the “Google Now on Tap.”It is a new way to look for things that without typing or switching to Google. All you must do is to long-press the home button. Google will scan your active screen, after which it detects the existing text on the screen. If you’re looking for GadgetsToUse it’s going to come up with links to its Youtube channel, website and social networks.
