Quick Answer
- So, today we are going to tell you how you can change the default Calibri font to the Times New Roman or another font that you like.
- This is how you can change the default font on your Microsoft Word on your Mac or Windows PC.
- Click the little arrow in the bottom right corner of the Font section in the toolbar above.
Microsoft Word is one of the most popular word processing app out there for your Windows or even on a MacOS PC. A few of the reasons are the versatility and wide usage of this software. Microsoft has changed the default font of the Microsoft Word since Office Suite 2017.
The default font has been changed from the Times New Roman to Calibri and it is like that since then. Calibri is not a bad font or anything but it just doesn’t feel right when you launch Word and start writing.
So, today we are going to tell you how you can change the default Calibri font to the Times New Roman or another font that you like.
Steps to Change the Default Font on Microsoft Word
- Open the Word on your Windows or Mac PC and open a new document.
- Click the little arrow in the bottom right corner of the Font section in the toolbar above.

- You will see a new popup window called Font.
- Here you can change the font, size, style, and more according to your needs.
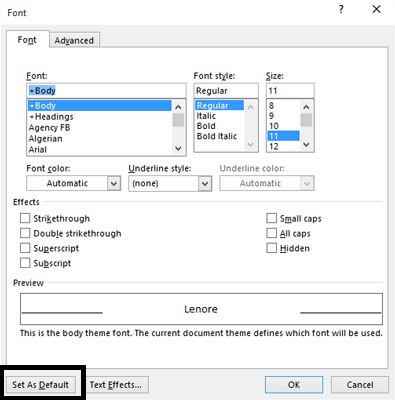
- Once you selected all the attributes, click the Set as Default button to make it your default font.
- Now, every time you will open Word and start typing, you will see the new font which you just set.
Also, Read | 2 Ways to Change Font Color in iPhone and iPad Notes
Wrapping up
This is how you can change the default font on your Microsoft Word on your Mac or Windows PC. If you want to change it again, you can do that from the same settings. For more tips and tricks like this, follow GadgetsToUse on social media.