Quick Answer
- There are 3 ways to fix the issues discusses above, they are either to refresh the cached version of the website, clear or disable the browsing cache, or clear the local storage and session of data.
- If the old cache file is creating an issue, and you want to clear or remove old cache files, then this can be done from the developer option or Inspect Element.
- In the case of web browsing, to increase the speed of page loading, web browsers are designed to download web pages and store them locally on your computer’s hard drive in an area called “cache”.
You must have heard about Cache Memory, it is a chip-based computer component that makes retrieving data from the computer’s memory more efficient. It acts as a temporary storage area that the computer’s processor can retrieve data from easily. Cached Memory is used in phones, tablets, and even computers. In the case of web browsing, to increase the speed of page loading, web browsers are designed to download web pages and store them locally on your computer’s hard drive in an area called “cache”.
Related Tip: 2 Ways to Increase Video, Audio Volume in Google Chrome
This can cause a little issue if you have made any changes to your website as they might not show up. Also for a normal consumer cache files can affect the performance as the computer can slow down and your hard drive may run out of space. Today, we are going to share how to refresh or clear these webpage cache files, so as to solve these problems.
Also, Read | Understand Levels of Safe Browsing in Google Chrome; Which Level is Best For You?
3 Ways To Force Refresh Webpage In Google Chrome and Disable Cached Pages
There are 3 ways to fix the issues discusses above, they are either to refresh the cached version of the website, clear or disable the browsing cache, or clear the local storage and session of data. We have discussed how to do this below.
Force Refresh Cache
We can do a Force Cache Refresh to see the changes made to the website, the key combination is different for different operating systems.
- Windows: ctrl + F5
- Mac/Apple: command + R
- Linux: F5
Also, Read | Google Chrome Hidden Features That Will Make Your Browsing Easier
Clear Local Storage and Session Storage
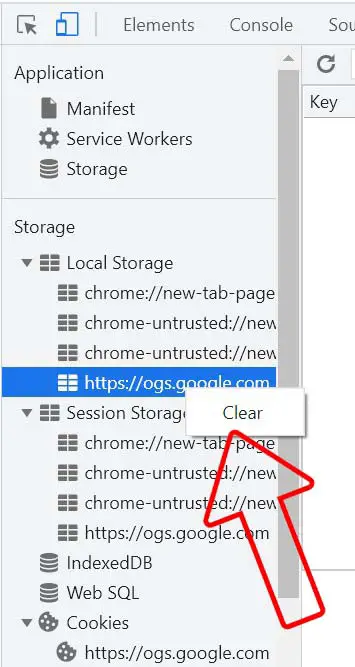
If the old cache file is creating an issue, and you want to clear or remove old cache files, then this can be done from the developer option or Inspect Element.
- Open Google Chrome and navigate to the page you want to test.
- Right-click on the page and go to inspect
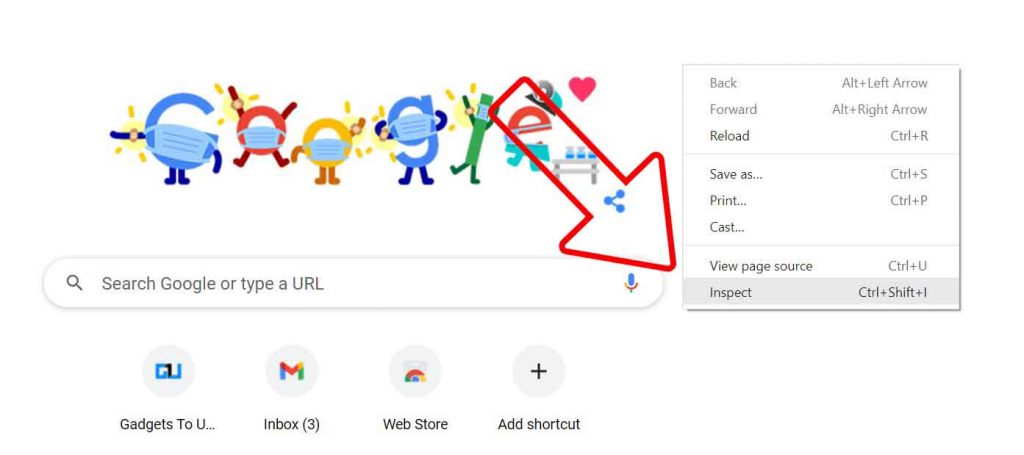
- Click on the Application tab

- Under Local Storage, Session Storage, and Cookies the previous cached file and cookies can be cleared by right-clicking on each file.
[irp]
Disable Browsing Cache
If you would like to completely disable the cache, then it can be done from the developer option or Inspect Element. Disabling the cache is also good from the Privacy point of view, as anyone who has access to your computer, can not look up the cached files of browsing history.
- Open Google Chrome and navigate to the page you want to test.
- Right-click on the page and go to inspect

- Click on the Network tab

- Check the Disable Cache Box

- That’s it, now the cache files of your future browsing history will not be saved.
So this is how you can force refresh cache, clear local storage and session storage, or completely disable webpage cache files for smooth website development or a more private browsing experience. How often do you experience such issues, and what do you think about this? Do let us know in the comments down below.
You can also follow us for instant tech news at Google News or for tips and tricks, smartphones & gadgets reviews, join GadgetsToUse Telegram Group or for the latest review videos subscribe GadgetsToUse Youtube Channel.


