Quick Answer
- Below are the quick and easy steps to set up the DigiYatra app on your Android and iPhone for a seamless and quick boarding process using facial recognition technology at Indian Airports.
- Once the boarding pass is added, you can tap on it to see details or share it in the future.
- Check the box next to the privacy policy and “Agree” to the terms to allow DigiYatra to access your DigiLocker data.
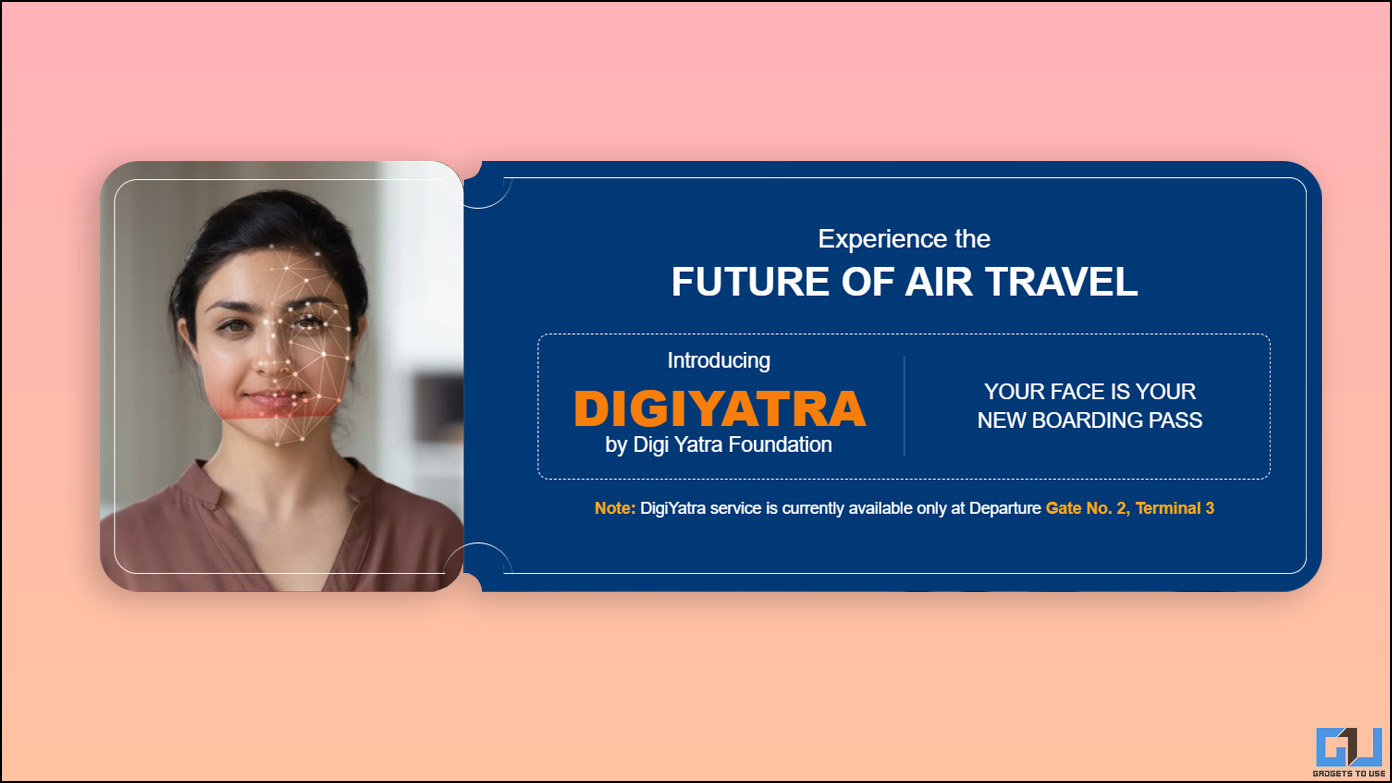
If you get tired of long queues whenever you visit Airport to board a flight, there’s good news. The DigiYatra app, inaugurated by Indian Civil Aviation, facilitates quick facial recognition technology to offer passengers a more seamless and hassle-free boarding experience. Today, in this read, we will guide you in setting up and using the DigiYatra app on your phone.
Originally introduced in 2022, the DigiYatra app has got refreshed in 2024. What’s to be noted is that the refresh is not just in terms of UI overall but a new app altogether. We have updated the entire guide to go inline with the new DigiYatra app.
https://twitter.com/DigiYatraOffice/status/1772902997388906899
Steps to Setup DigiYatra Facial Recognition
Below are the quick and easy steps to set up the DigiYatra app on your Android and iPhone for a seamless and quick boarding process using facial recognition technology at Indian Airports.
Hon’ble Minister @MoCA_GoI @JM_Scindia inaugurated #DigiYatra at Terminal 3, #DelhiAirport, offering passengers a more seamless and hassle-free boarding experience with facial recognition technology.
Skip the queue and save time!#DELairport #FacialRecognition #DigitalIndia pic.twitter.com/rpe0FRUYk4
— Delhi Airport (@DelhiAirport) December 1, 2022
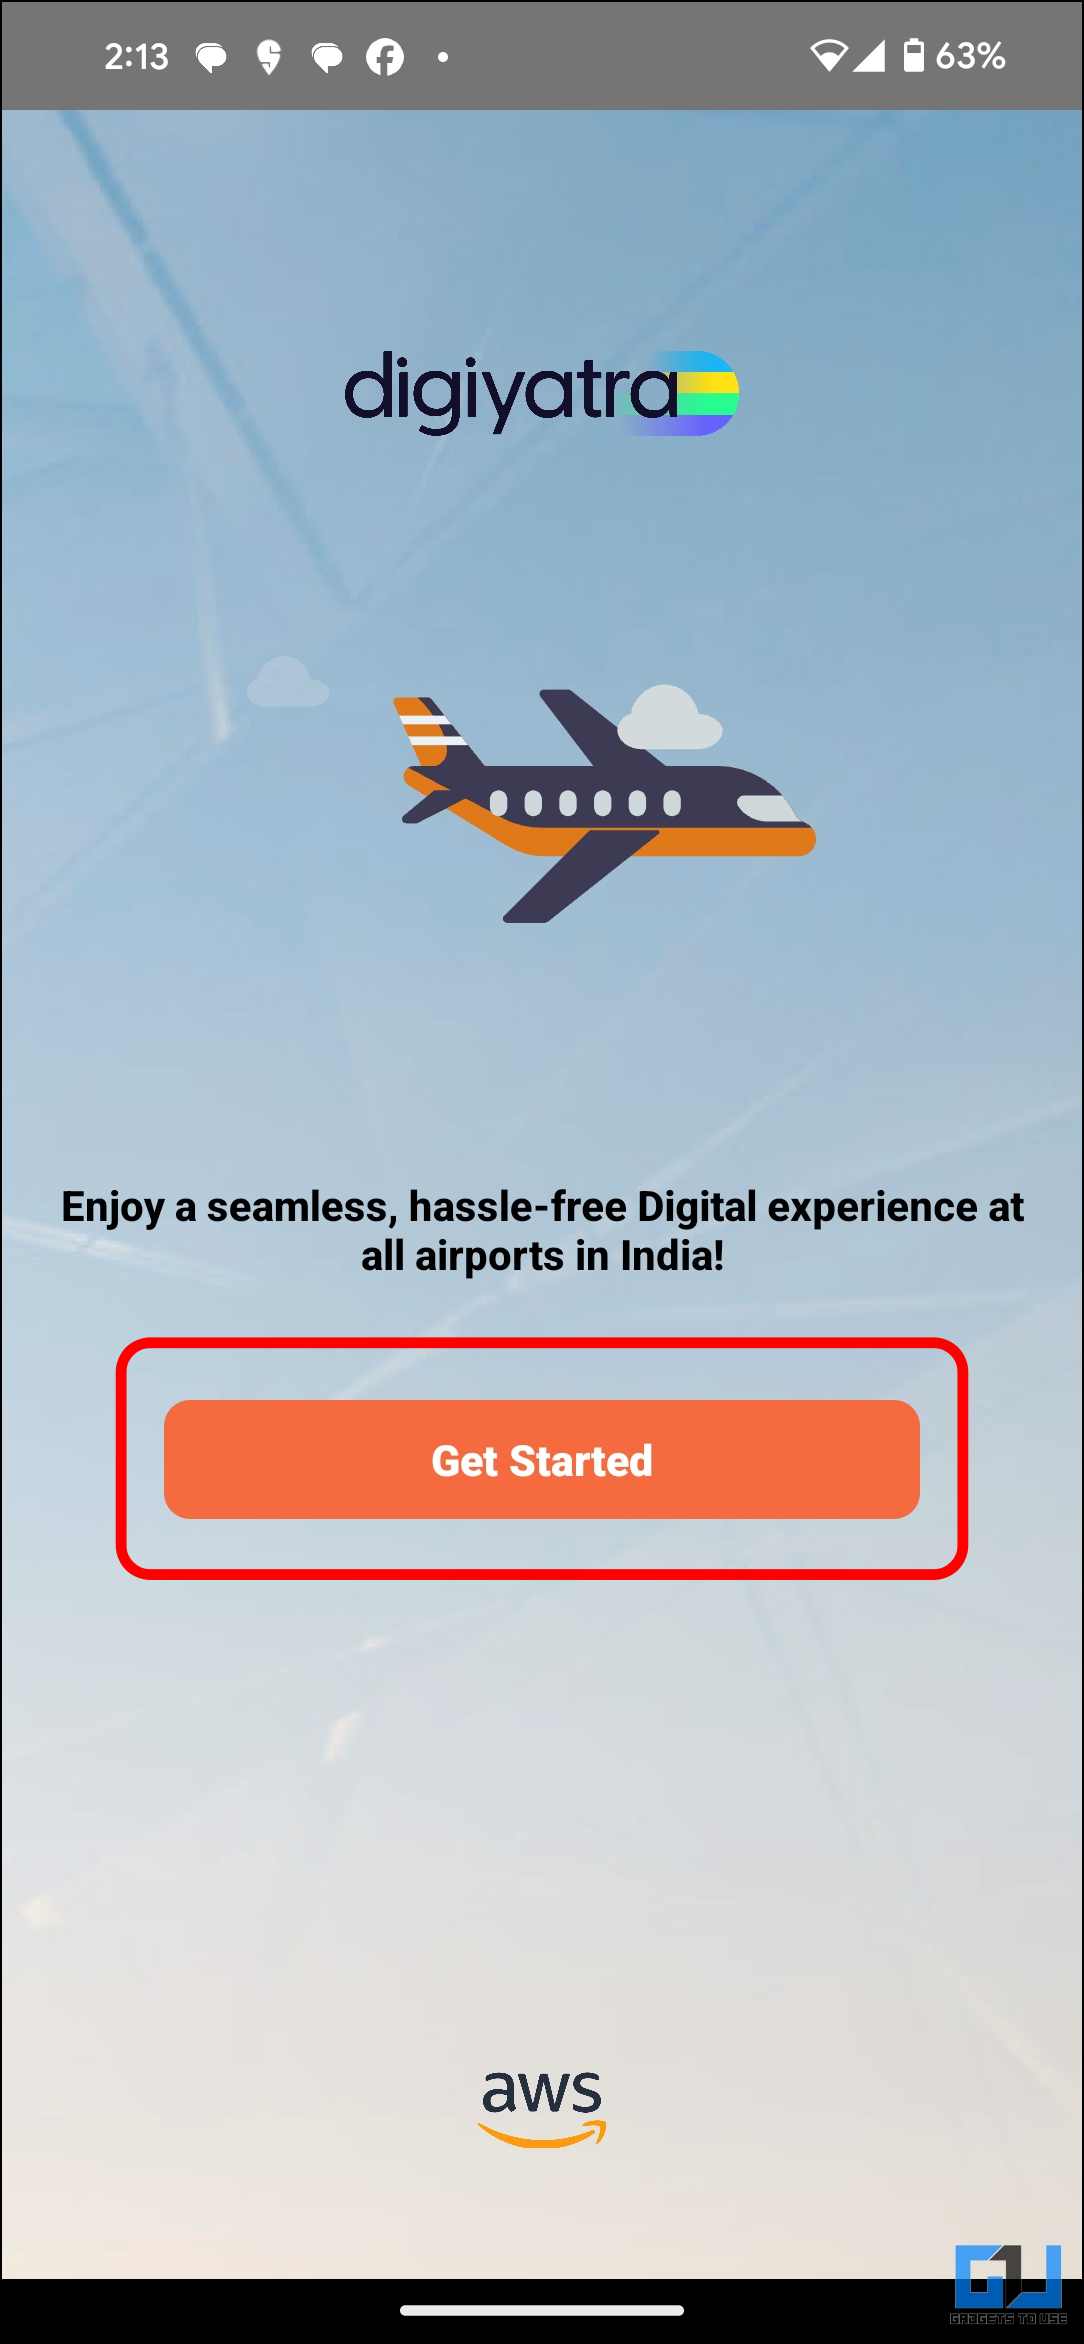
1. Download the DigiYatra App (Android, iOS) on your smartphone.
2. Click the “Get Started” button once the app is installed.
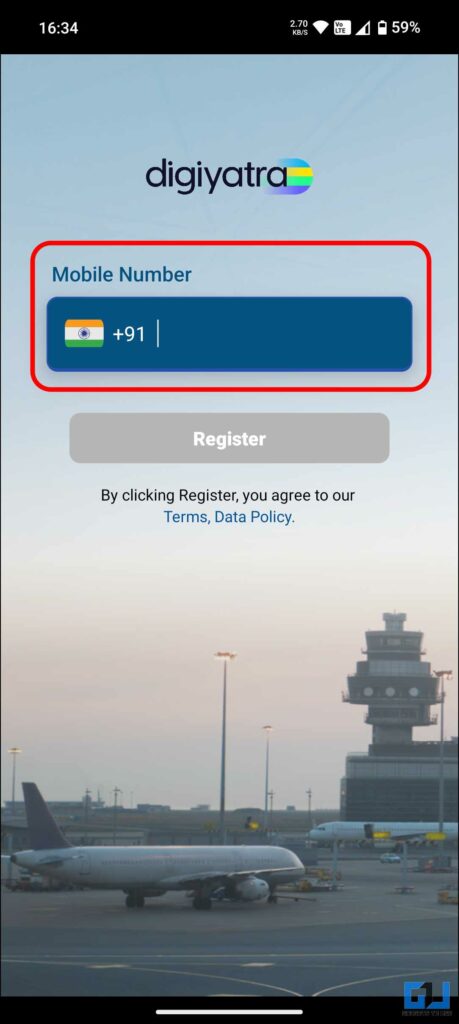
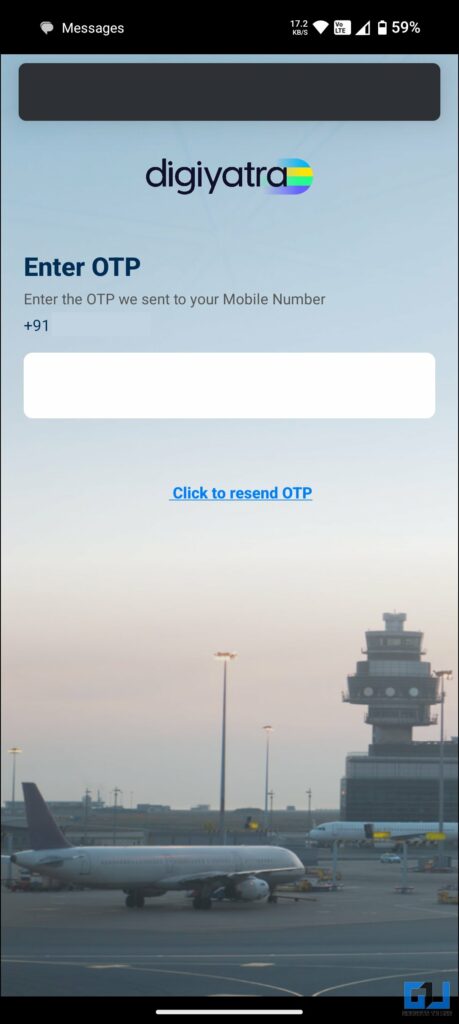
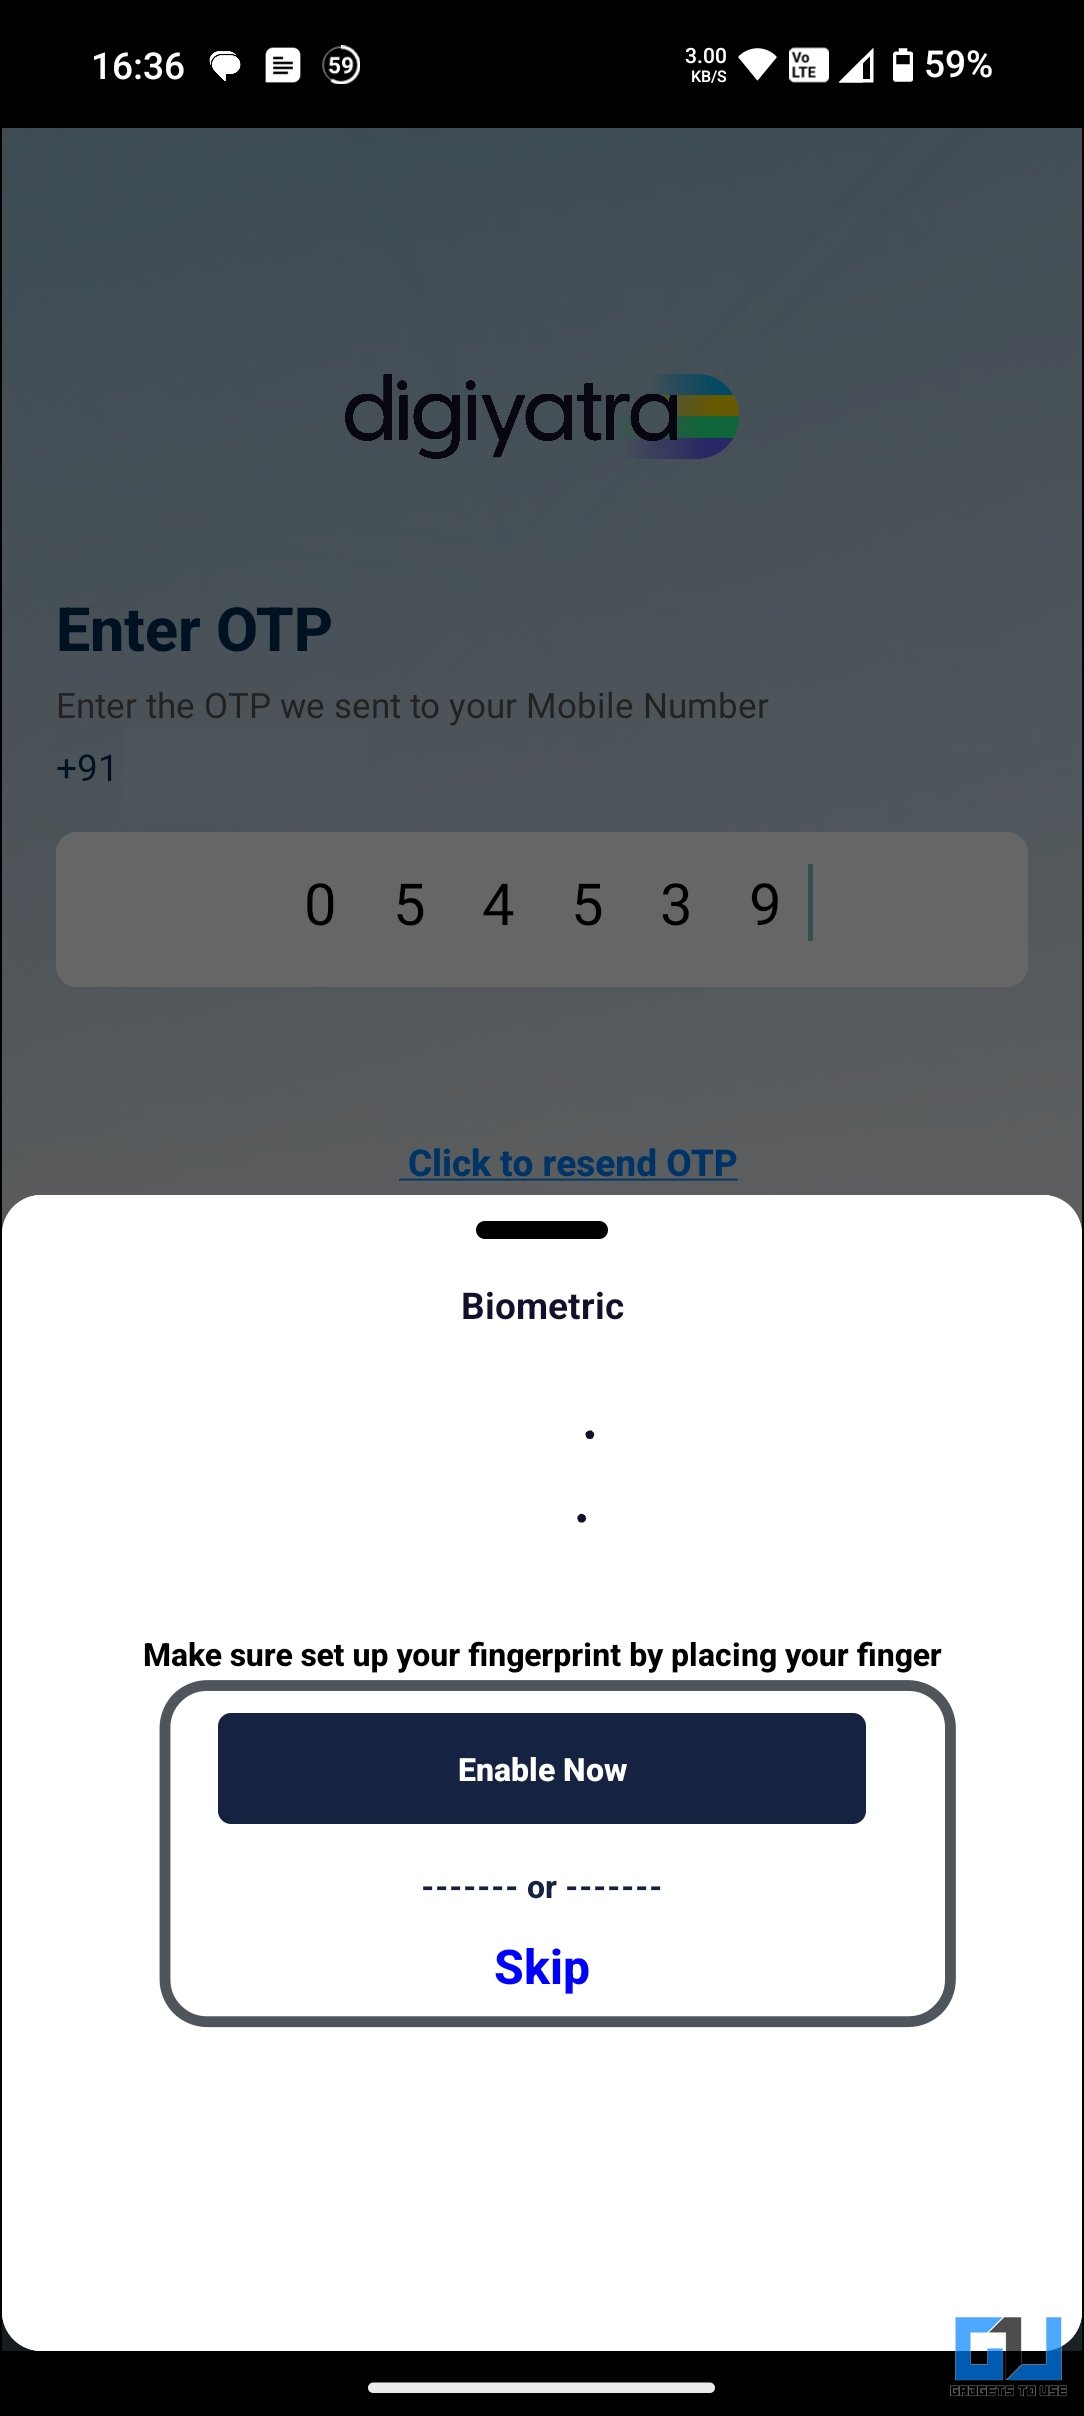
3. Type in your mobile number and verify using an OTP to “Register.”
4. You can tap on “Enable Now” to set up a biometric login.
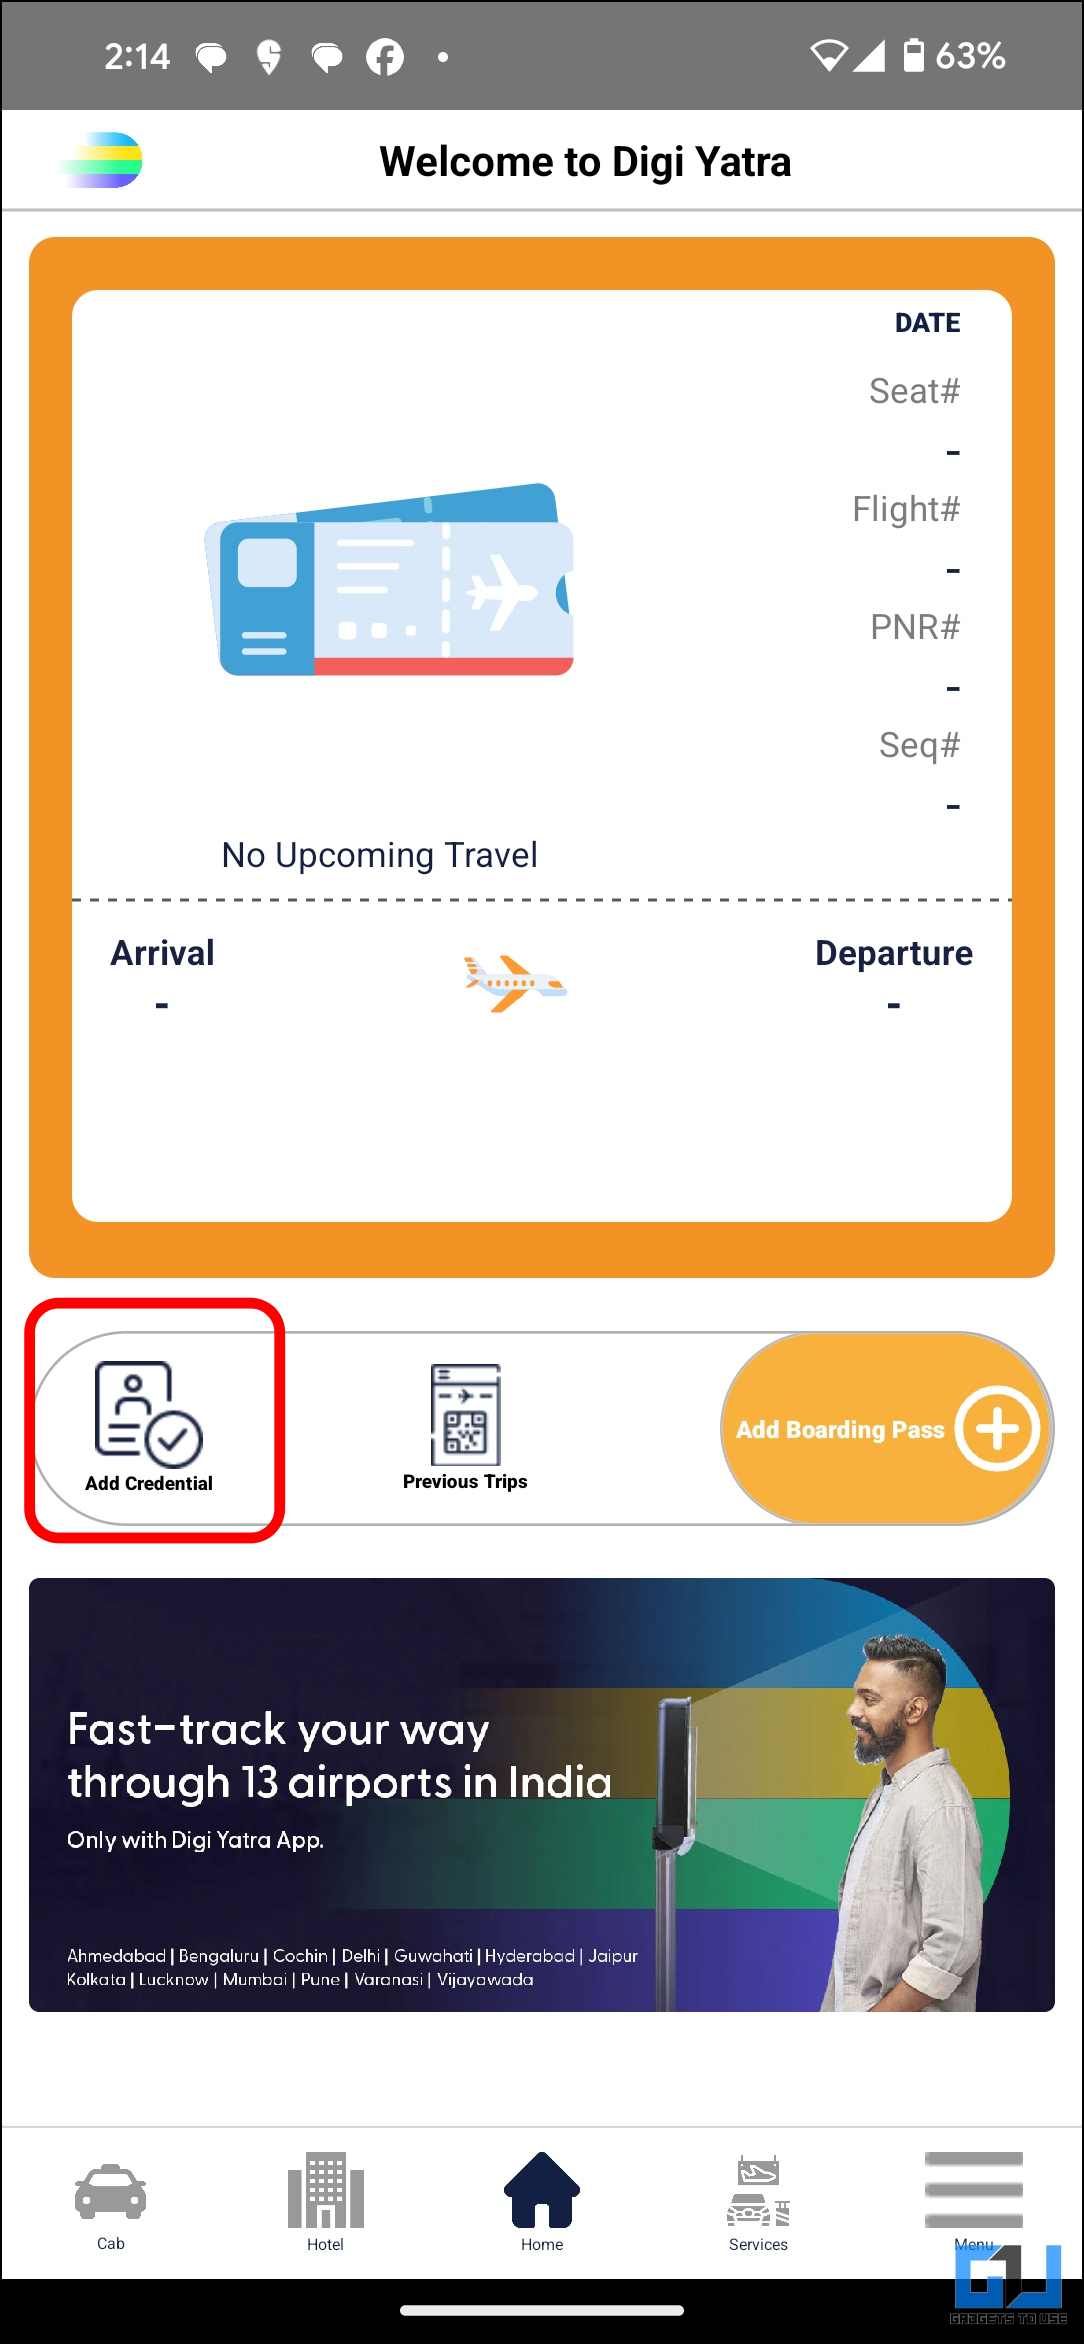
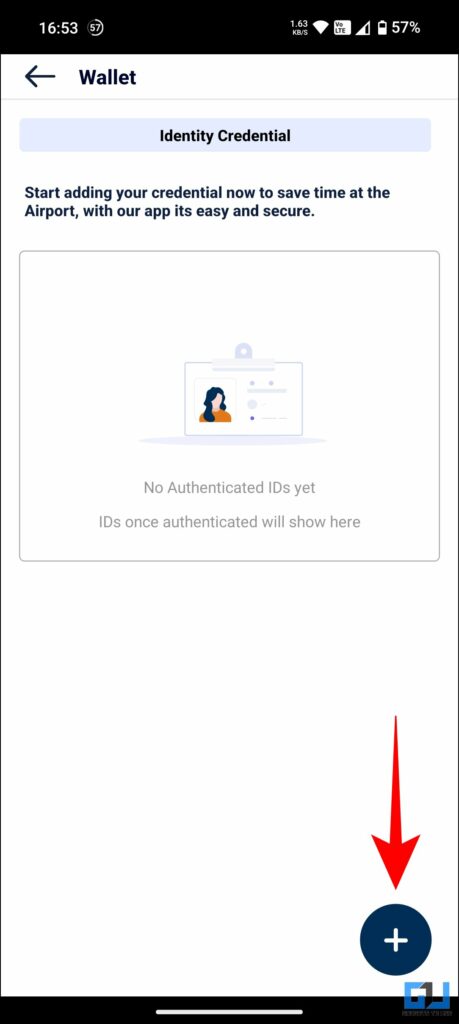
5. Once inside the app dashboard, tap “Add Credential” to add your Identity document.
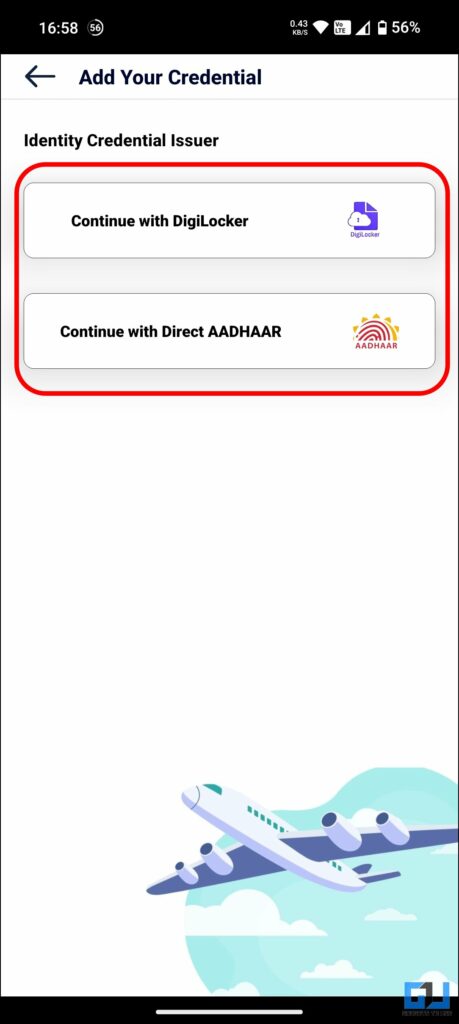
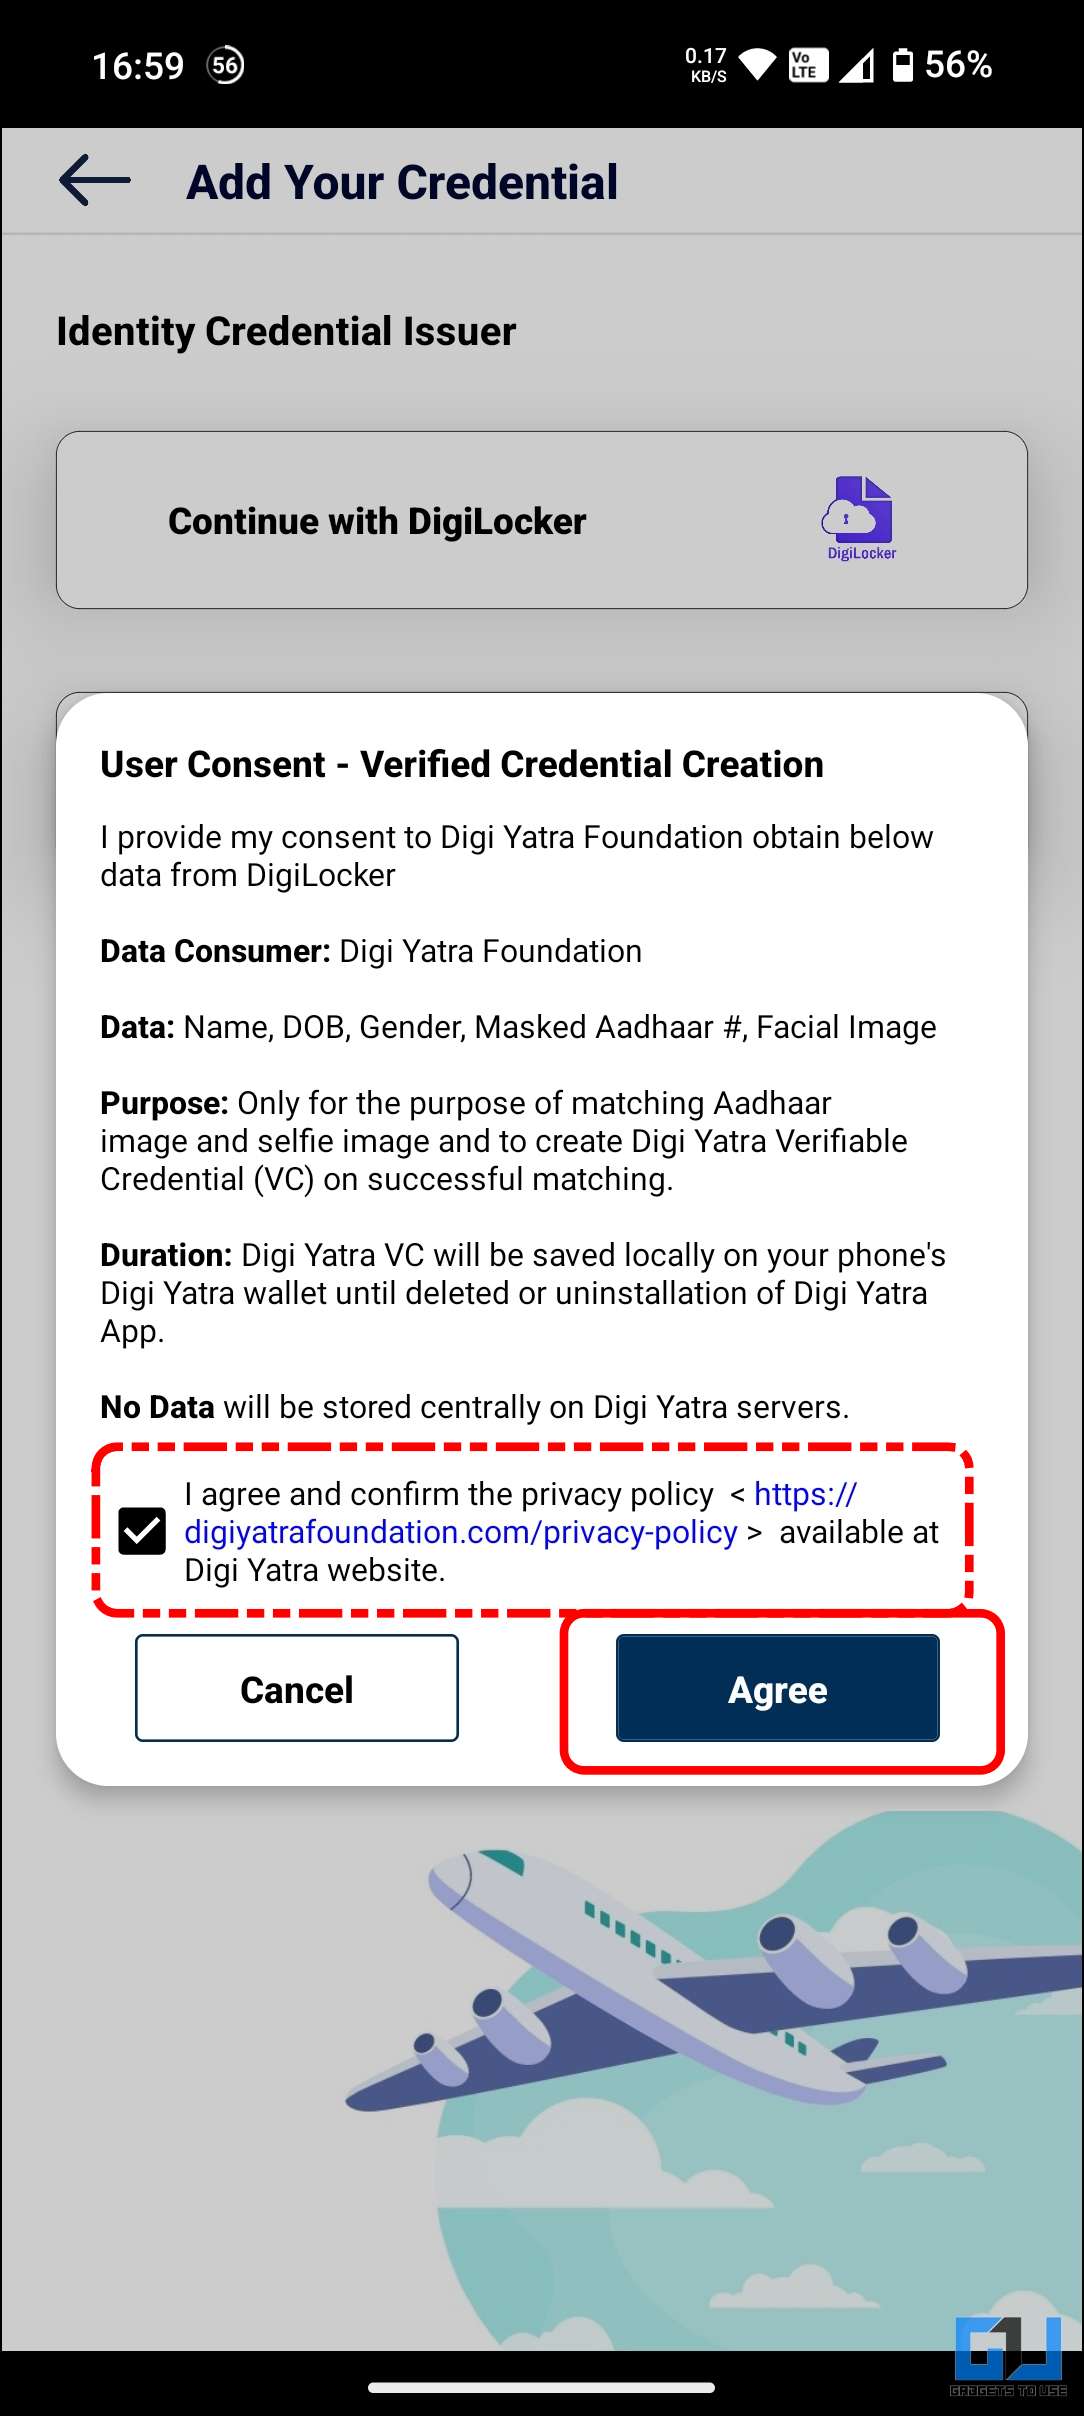
6. Tap the “Add” (+) icon to select your Identity Credential issuer among:
- Digilocker – If you have stored your documents in the Digilocker account.
- Aadhaar – If you have not added your documents to Digilocer, you can proceed with Aadhaar.
7. Check the box next to the privacy policy and “Agree” to the terms to allow DigiYatra to access your DigiLocker data.
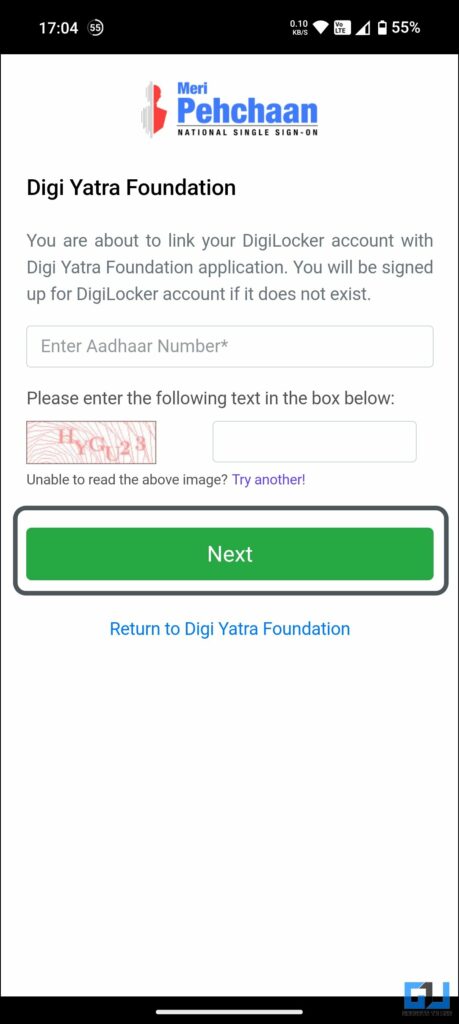
8. Type in the following details and tap on “Next” to log in to your DigiLocker account:
- Aadhaar Number,
- Captcha.
9. Enter the OTP and tap “Continue” to verify it.

10. Type in your 6-digit security PIN and tap “Continue” to log in to your DigiLocker Account.

11. Select the details you would like to link with the DigiYatra foundation, according to your consent:
- Select the issued documents stored in DigiLocker,
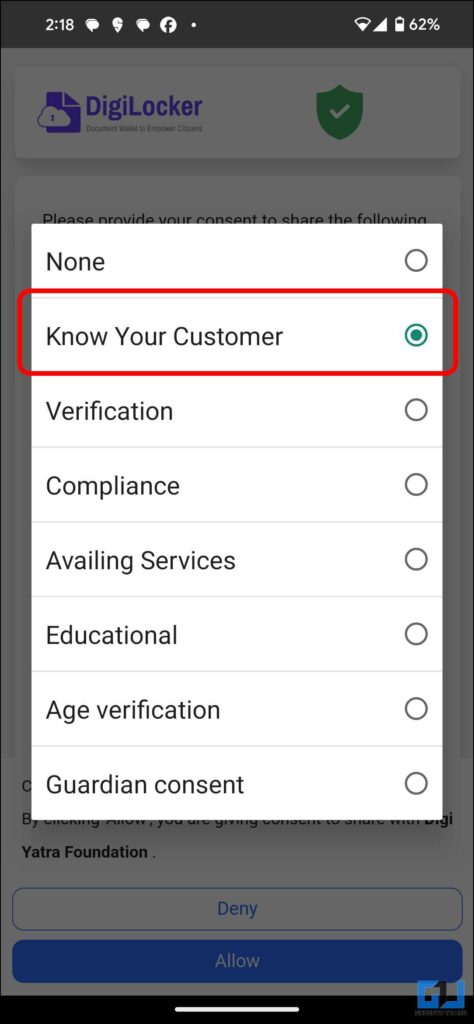
- Select “Know Your Customer” as the purpose.
By default, PAN is selected; you can uncheck it make sure to link at least one document
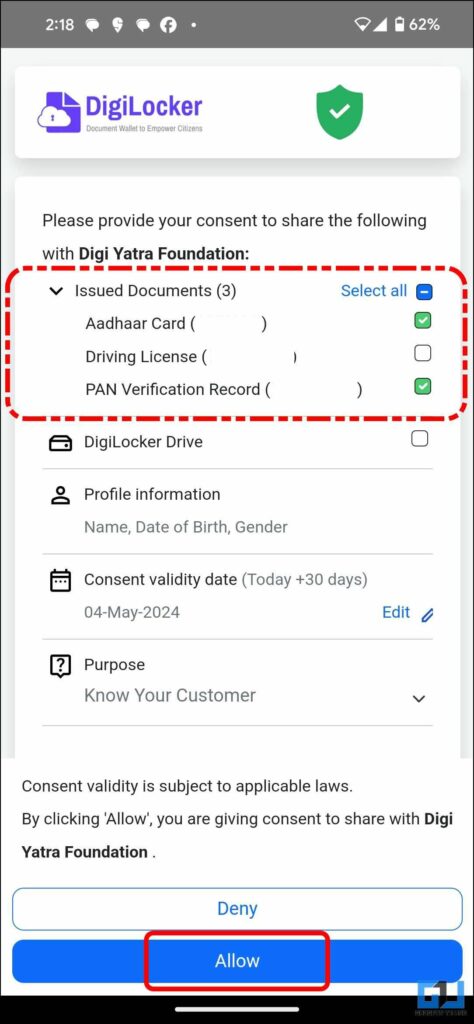
The consent will be valid for only 30 days.
12. Tap on “Allow” to proceed.
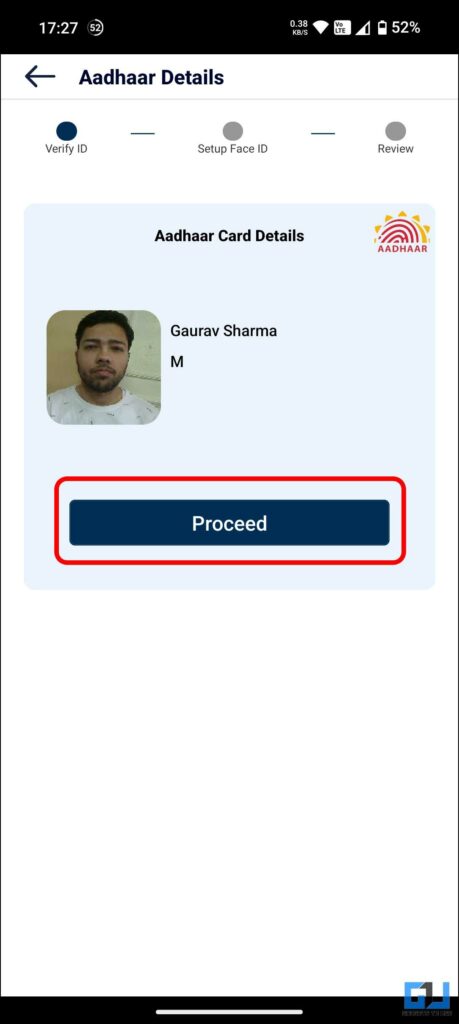
13. Once your Aadhaar card details appear, tap “Proceed” and tap on the “OK” button.
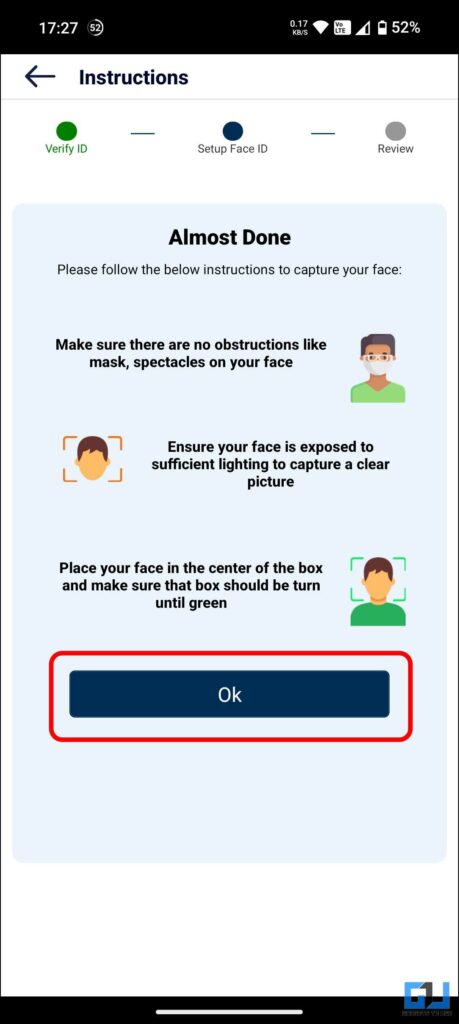
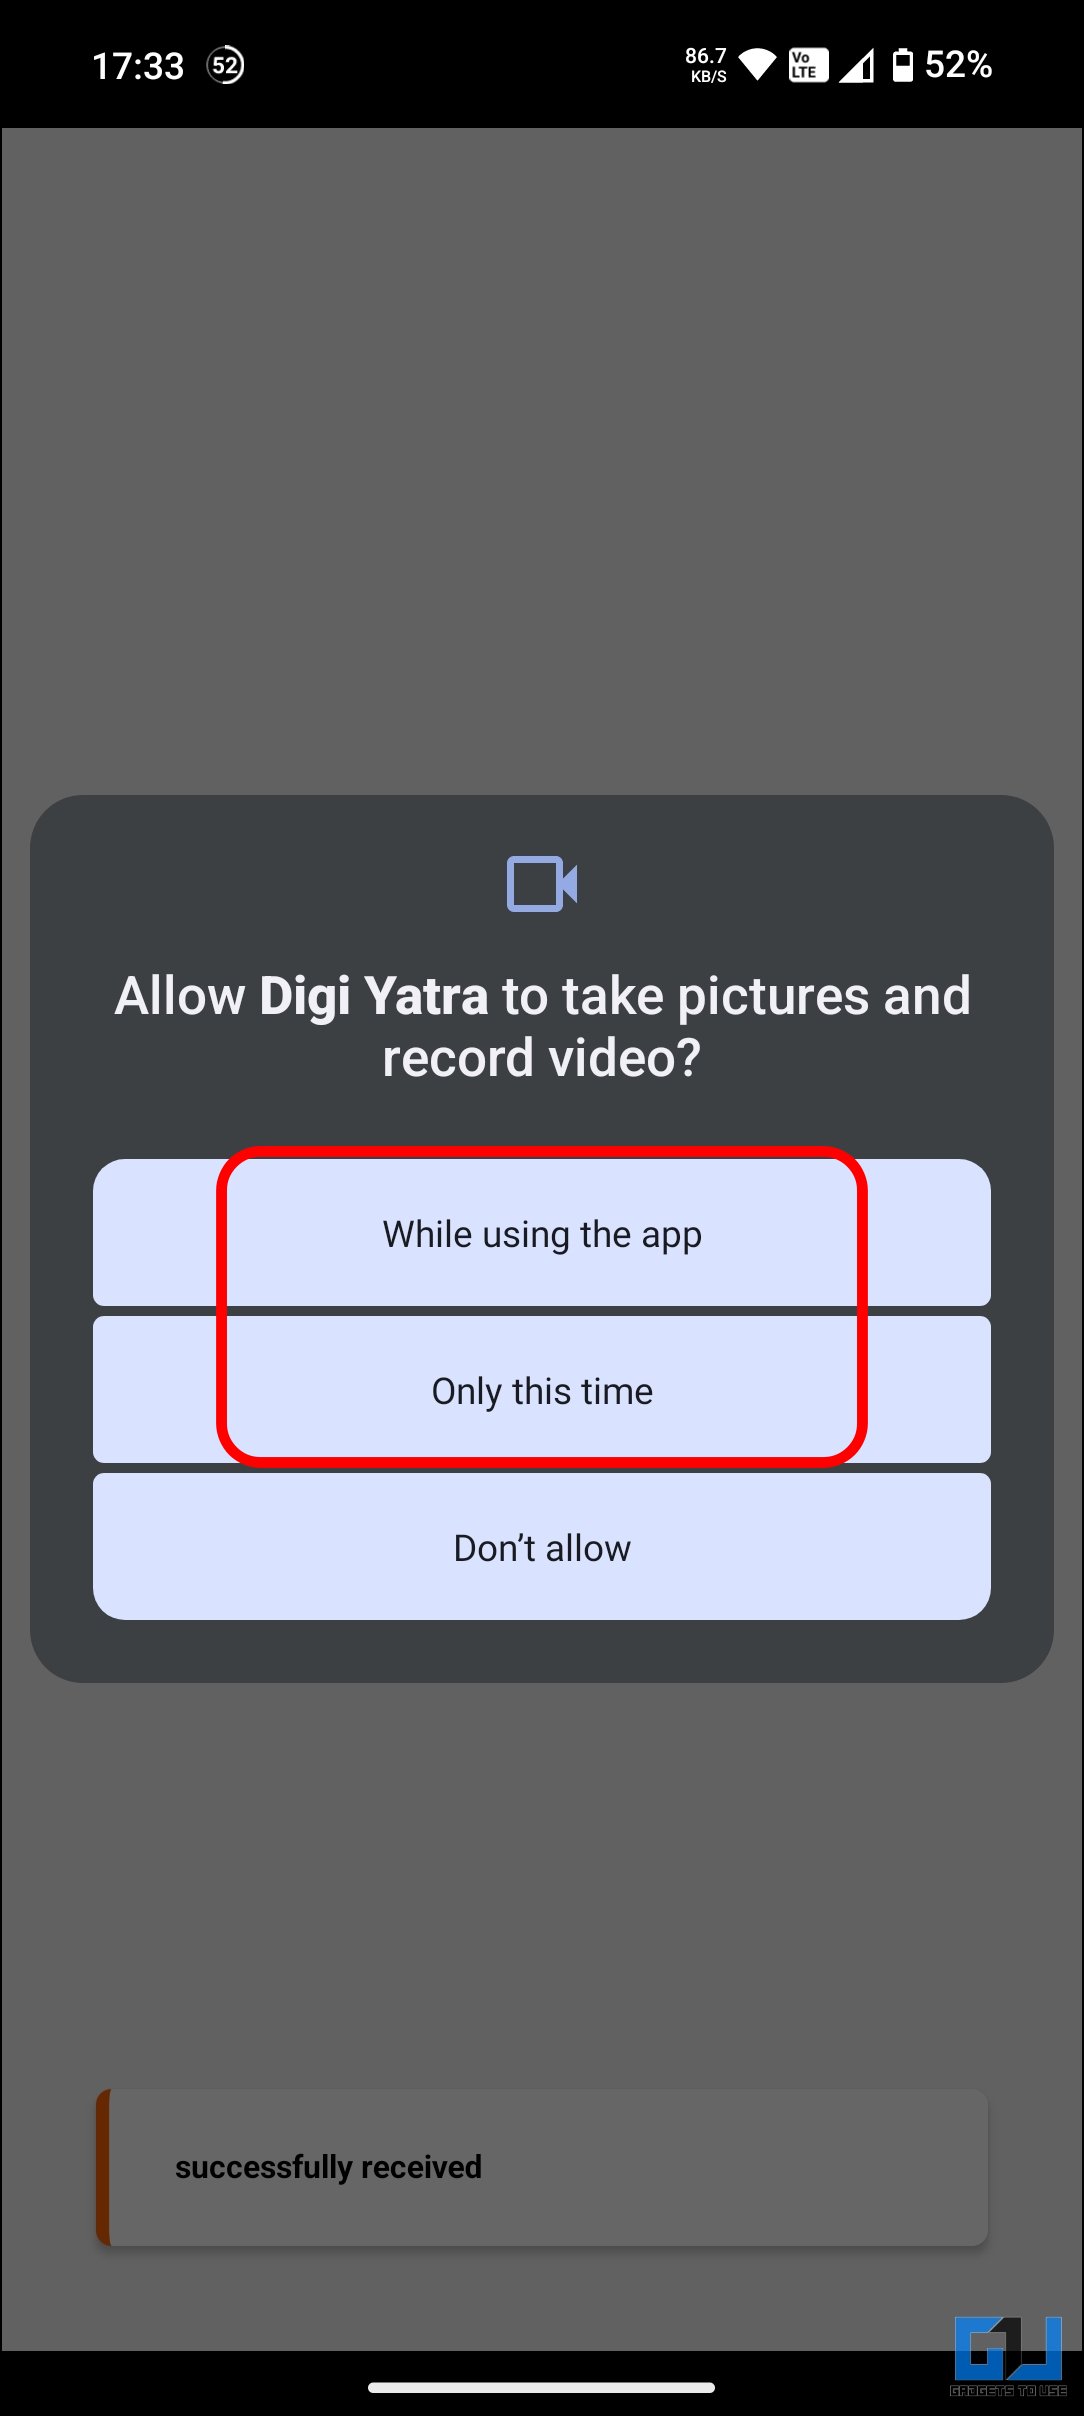
14. When prompted, allow the app to take pictures and record videos using your phone’s camera.
Now, you need to click a photo of yours. Tap on “Proceed” to continue.

Steps to Add Travel Data or Boarding Pass in DigiYatra
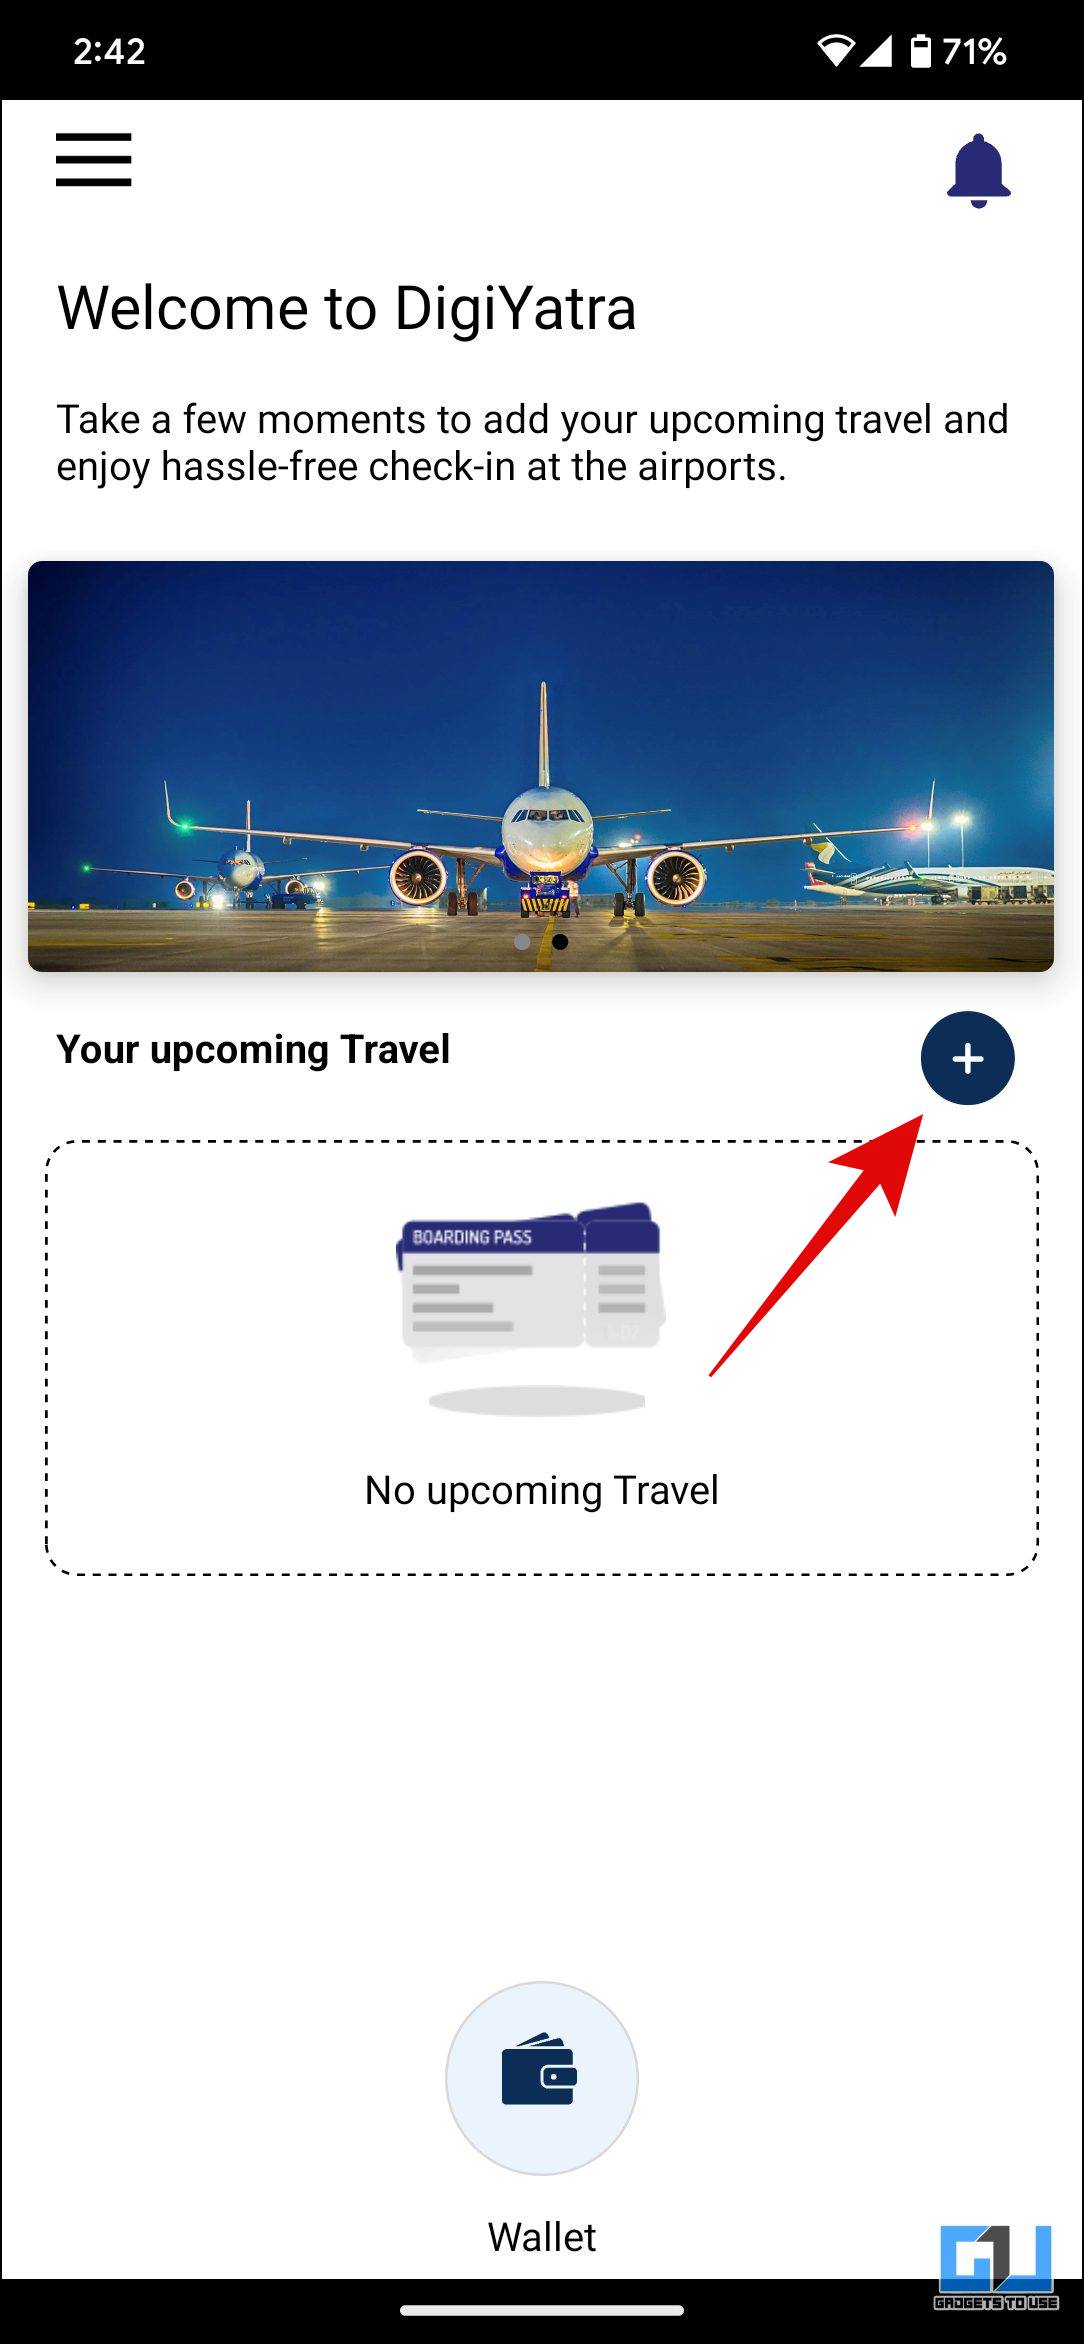
Once your DigiYatra Account is set up, you can add your upcoming travel data to the DigiYatra app. This will make your movement toward the boarding gate smoother and faster. Here’s how to add a boarding pass in DigiYatra.
Boarding passes added to the old app won’t appear here, which means your past travel history record is lost with the old app. The new app does not allow adding old boarding passes either.
1. On the DigiYatra dashboard, tap the “Add Boarding Pass” icon from the right.
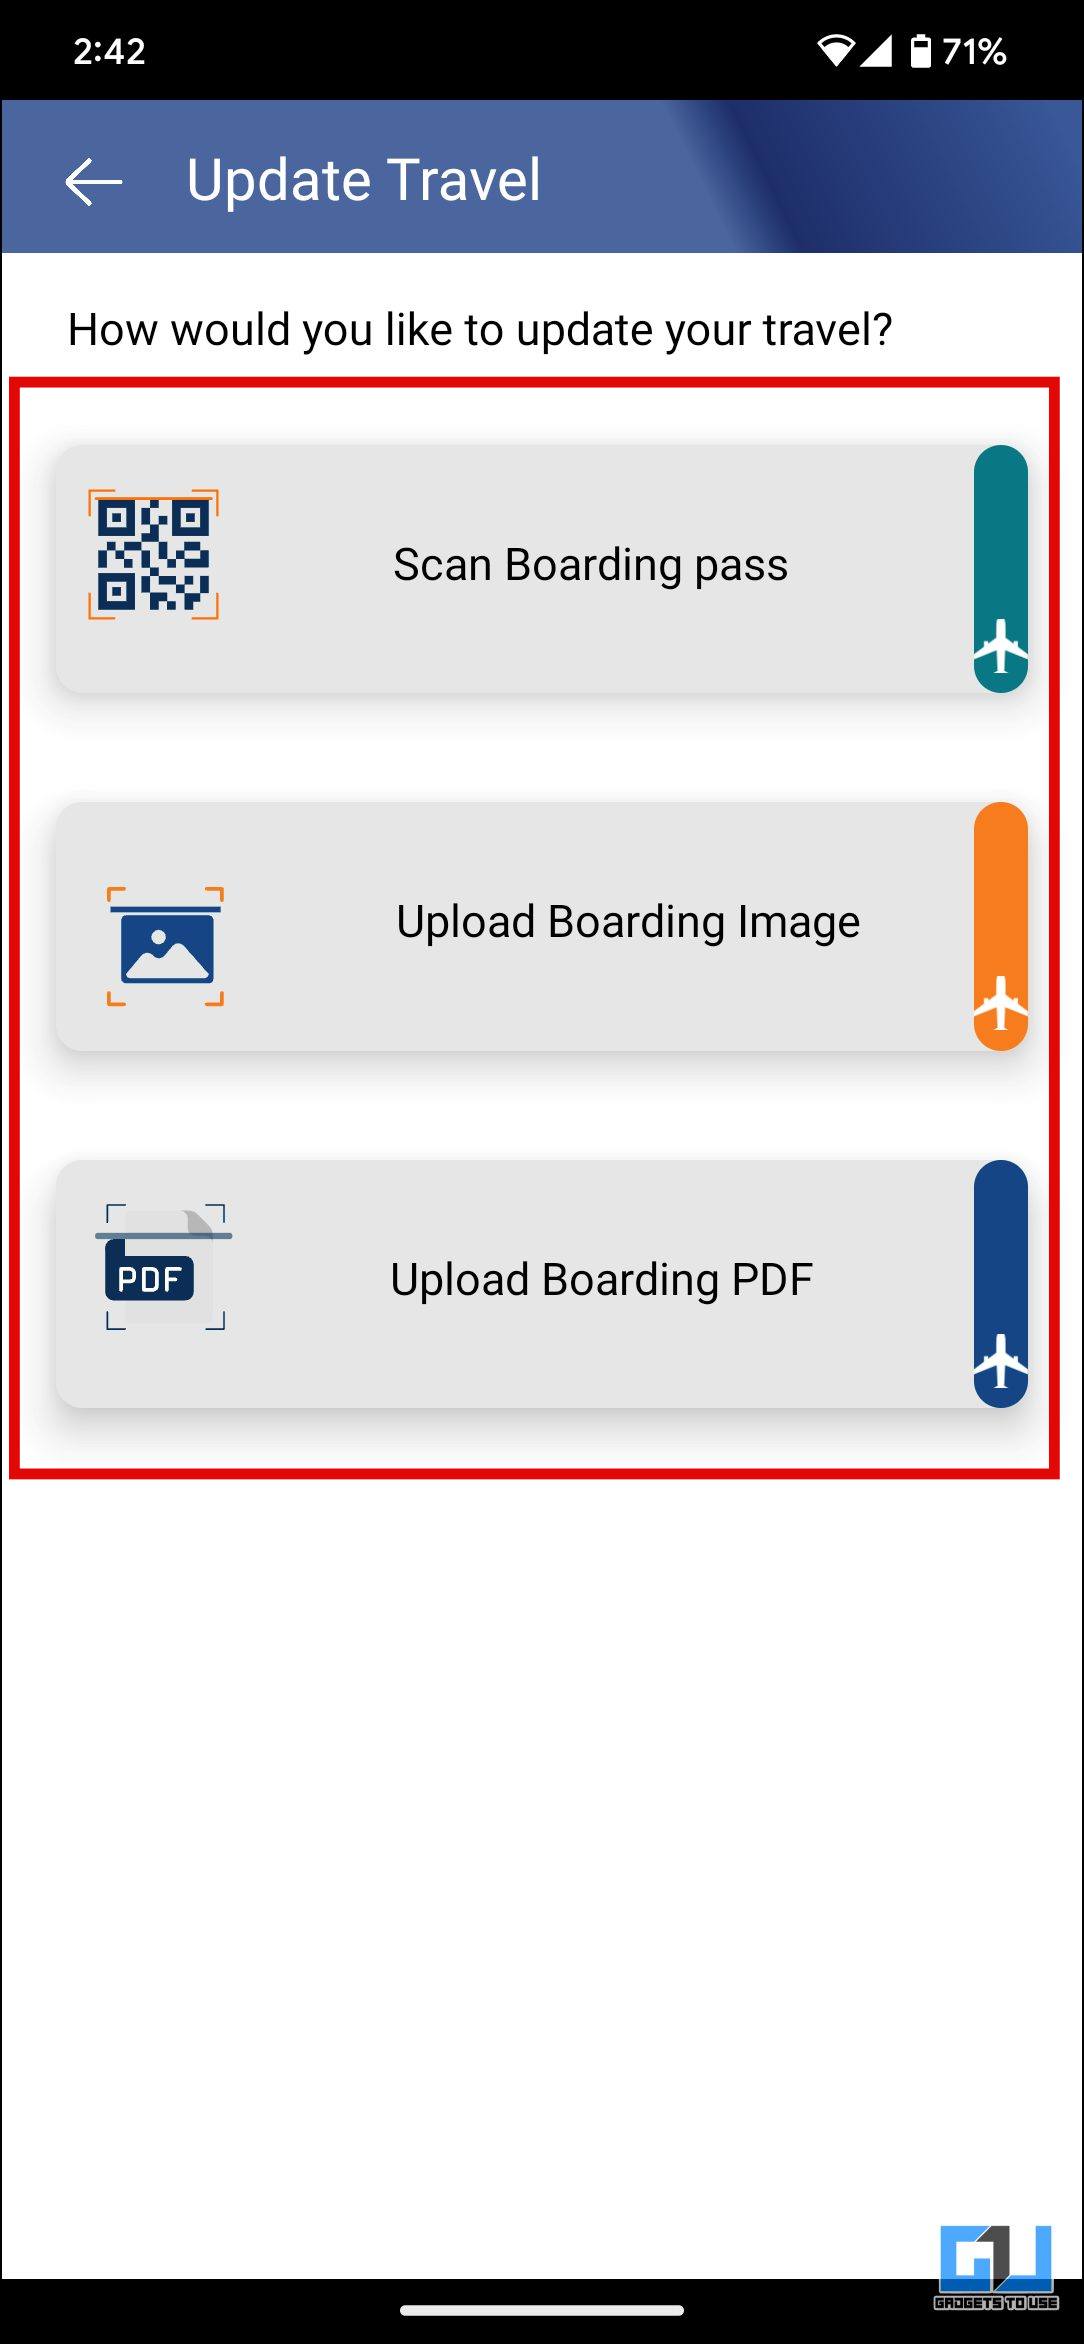
2. Now, you can add your boarding pass as follows:
- Scan the QR code of your boarding pass, or
- Upload an image of it, or
- Upload the PDF.
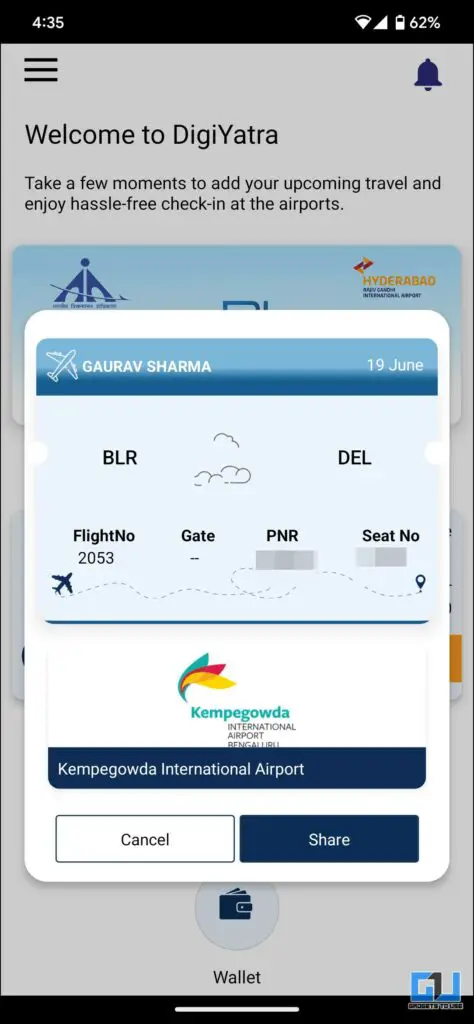
3. Once the boarding pass is added, you can tap on it to see details or share it in the future.
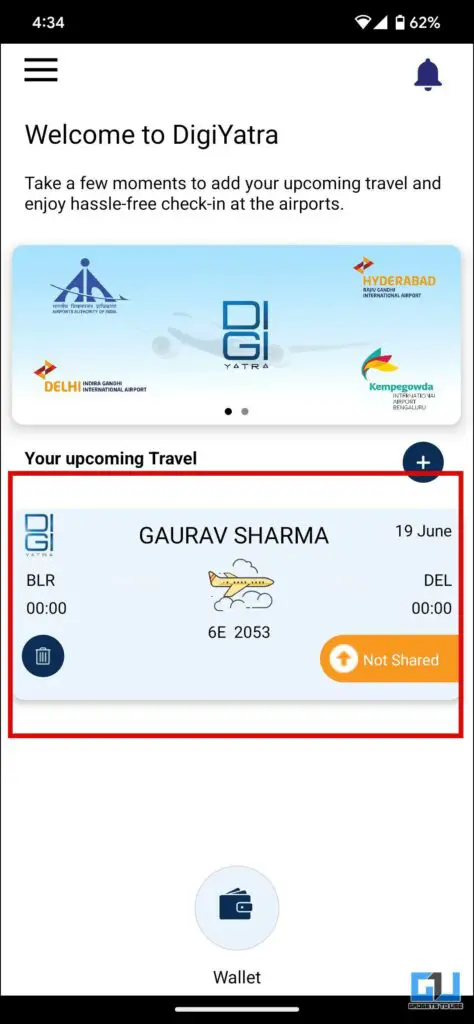
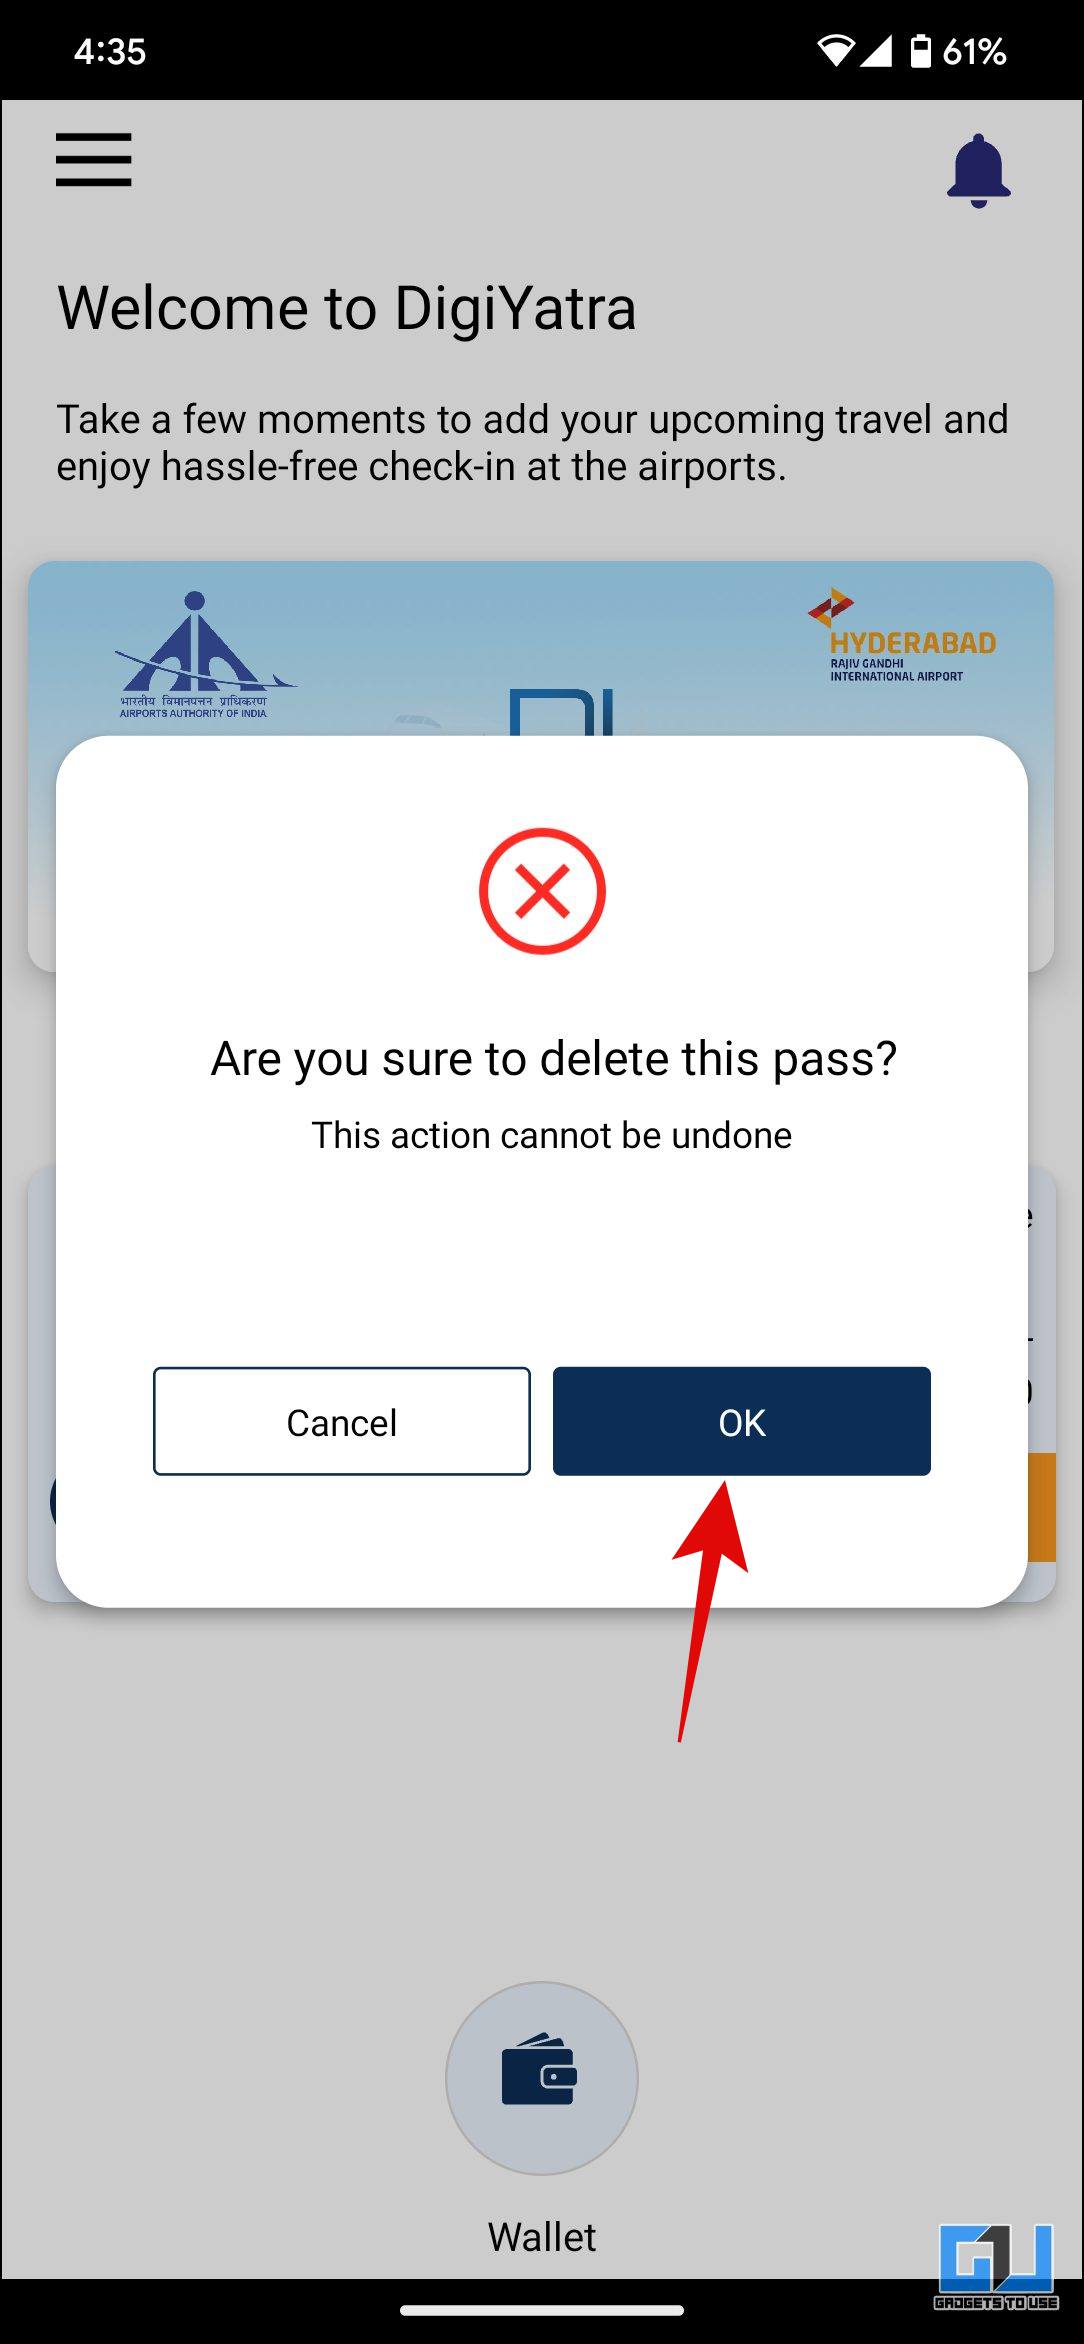
4. You can also delete your old boarding pass for past air travel.
Note: Ensure your name on the boarding pass, flight ticket, and Aadhaar is the same.
How Do You Board a Flight Using the Digiyatra App?
Once you have added the boarding pass to your DigiYatra app on your phone. You can follow the below-mentioned process to board your flight.
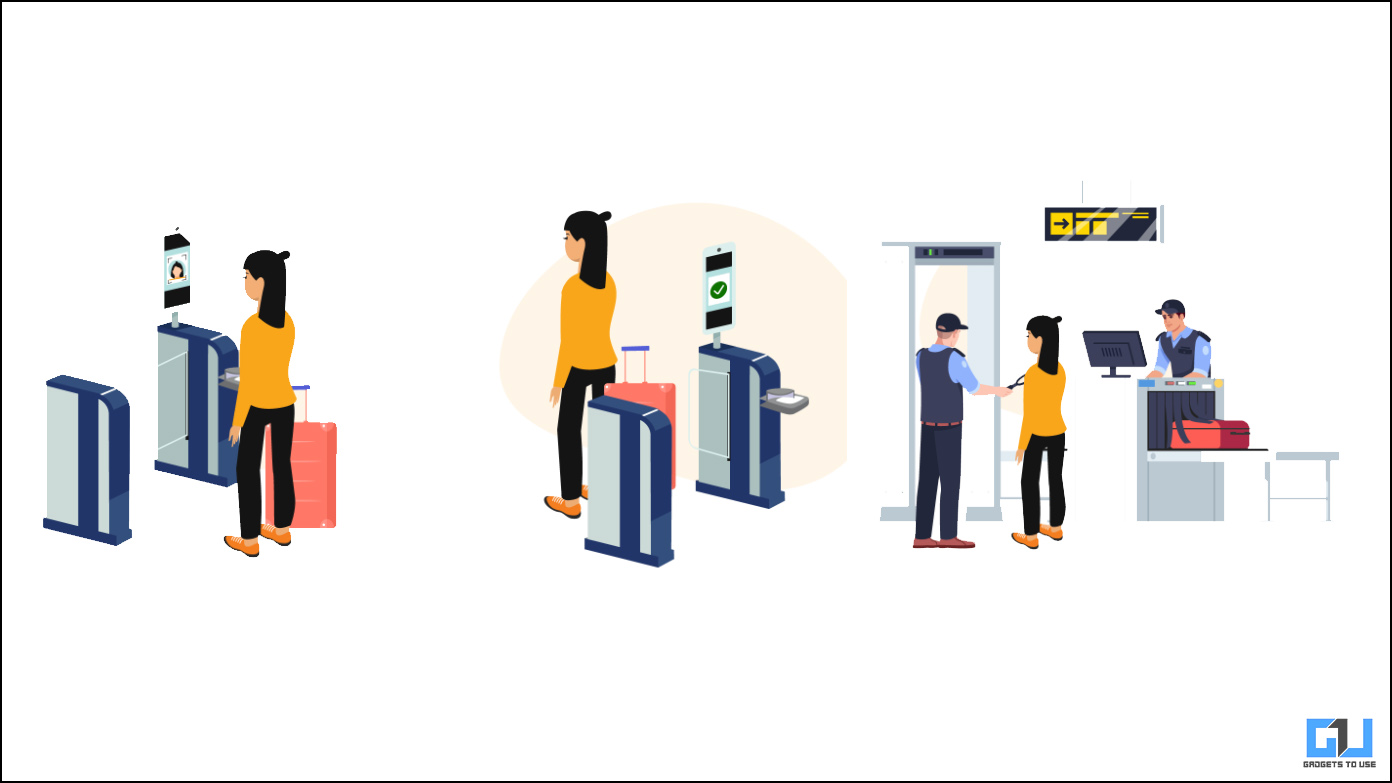
1. Arrive at the entry E-Gate (Gate No. 2, Terminal 3, in case of Delhi Airport).
2. Share and scan your bar-coded Boarding Pass/ Mobile Boarding Pass.
Union Minister @JM_Scindia launches Digi Yatra for Three Airports in The Country
Digi Yatra to achieve contactless, seamless processing of passengers at Airports Based on Facial Recognition Technology
Read here: https://t.co/Eet4VFR3vd pic.twitter.com/NgMonFewXP
— PIB India (@PIB_India) December 1, 2022
3. Look at the Face Recognition System (FRS) installed in the E-Gate camera.
4. On successful validation, the E-Gate will open to let you inside the Airport.
5. Once inside the terminal, drop your luggage at the airline check-in desk. If you have no luggage, proceed towards the DigiYatra Gate at Zone 1 PESC (near Business Class entry).
My awesome experience with #DigiYatra: Ensuring Ease of Flying ✈️
Digi Yatra App is a seamless & contactless solution to airport long queues 👏✌️👍@JM_Scindia @Gen_VKSingh @MoCA_GoI @AAI_Official @_DigitalIndia #NewIndia pic.twitter.com/T6ybfnOwXA
— Abhishek Bhatnagar (@abhishek) December 22, 2022
6. Look at the Face Recognition System (FRS) installed in the E-Gate camera.
7. On successful validation, the E-Gate will open to allow you in for a security check.
FAQs
Q. How Do You Use Facial Recognition Boarding at Indian Airports?
To use facial recognition at Indian airports, you must download and set up the DigiYatra app. Follow the above guide to learn the process.
Q. Which Indian Airports Use Facial Recognition?
Facial recognition is available at Delhi, Bangalore, and Varanasi Airports and will soon be expanded to other airports.
Q. Why Is the Digiyatra App Not Working on My Phone?
The old DigiYatra app is discontinued and won’t work on your phone anymore. To access and use the easy boarding process, you must install and set up the new DigiYatra app on your phone, refer to the steps mentioned above to learn more.
Q. Will the Old Digiyatra App Continue to Work?
No. The old DigiYatra app is now discontinued entirely; it is now automatically renamed to “DigiYatra Old” and prompts users to download the newer DigiYatra app.
Q. Where Is Data From the Old Digiyatra App?
The data from the old DigiYatra app will not be transferred to the new DigiYatra app, so you won’t be able to access your past travel data on the new DigiYatra app.
Wrapping Up
So this is how you can set up the DigiYatra app on your Android or iPhone and add your ID cards and boarding pass for a seamless and hassle-free boarding experience. It is available at Delhi, Bangalore, and Varanasi Airports and will be expanded to more airports soon. Check out other tips linked below, and stay tuned to GadgetsToUse for more tips.
You might be interested in:
- How to Check If Your Power Bank is Allowed on Flights?
- How to Add Your Passport Number on COVID Vaccination Certificate
- How to Successfully Book An Online Appointment for a Passport?
- 2 Easy Ways To Change and Update Mobile Numbers on Aadhaar Cards
You can also follow us for instant tech news at Google News or for tips and tricks, smartphones & gadgets reviews, join GadgetsToUse Telegram Group or for the latest review videos subscribe GadgetsToUse YouTube Channel.