Have you ever faced a situation where the photo you had didn’t go well due to a messy background? Well, we all have some near-to-perfect pictures that are ruined by the unwanted details in the background, consequently spoiling the whole atmosphere of the photo.
Anyways, changing the background itself is the best thing you can do here. Now some may think of going the photoshop way, but then again it’s not everyone’s cup of tea. That said, here’s a simple guide using which you can easily change the background of an image.
Change the Background of an Image
Method 1- Change photo background on Android
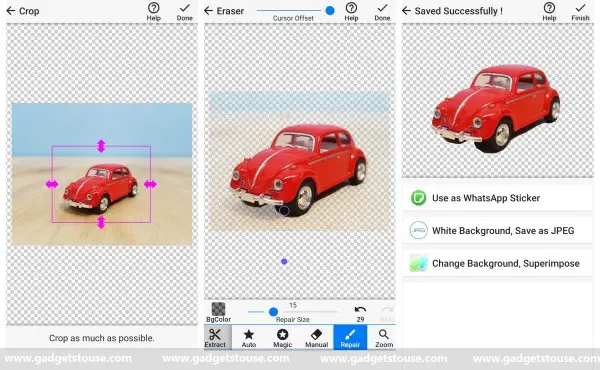
You can easily change the background of an image on your phone using certain apps. Firstly, you need to separate the subject from the background using Background Eraser. After which, you can superimpose a new background using the PhotoLayers app.
Check out the steps mentioned below for a detailed walkaround:
To remove background from an image:
1] Download and install Background Eraser from the Google Play Store.
2] Open the app and tap on Load a photo and select the picture you want to edit.
3] Next, proceed with cropping the image. It’s recommended to crop it as much as possible while making sure that the subject stays in the frame.
4] Now, there are a total of three methods to remove the background- Auto, Magic, and Manual. Notably, the Auto mode removes similarly colored pixels from the image. You can use this when the background has an even color shade.
The Magic mode, on the other hand, detects the edges automatically similar to Photoshop’s Magic Wand tool.
Lastly, as the name suggests, the manual method requires you to define the background and remove it from the image manually.
5] After removing the background, select the Repair tool. Now, tap on Done and choose the level of smoothness for the edges.
6] On finishing up, tap on Save and you’ll now have a picture with a transparent background.
To replace the transparent background with a new image:
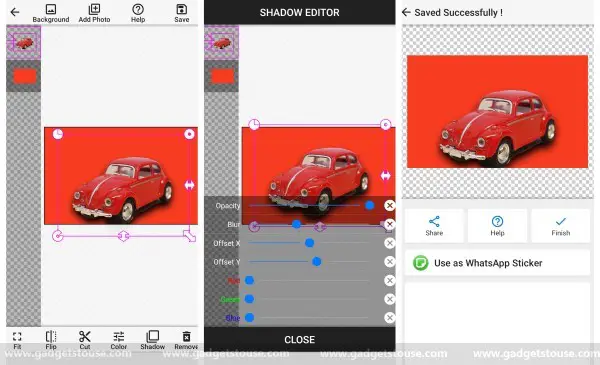
1] Download the PhotoLayers app by the same developer from Google Play Store and open it.
2] Now load both the photos- the one you edited just now and the other for background replacement. Now, crop the image, align the subject accordingly, and tweak its colors and shadows.
3] That’s it; you’ve now successfully replaced the background. Tap on Save to download the edited image to your gallery.
Method 2- Change photo background online
1] Visit https://www.remove.bg/. Tap on Select a Photo and choose the image you’d like to edit. Alternatively, you can also pull images that are already present online using the enter a URL option.
2] After the photo is uploaded, RemoveBG will use its artificial intelligence to separate the object from the background accurately.
3] Once the process is completed, you can simply download the image and place a background by either using Paint 3D or apps like PhotoLayers.
As you’d acknowledge, this method consumes very less time and minimal efforts. In fact, the results it produces are too accurate to be termed as a software-job by someone.
Wrapping Up
So this was all about how you can change the background of an image either on Android or on your desktop. We’ve tried keeping simple and straightforward methods to make things easy for you.
That being said, do let us know what’s your preferred method for replacing photo backgrounds. Also, feel free to reach us via the comments section below in case of any queries.
Also read, How to Add Shot on Watermark to Your Photos on Any Android Phone.


