Quick Answer
- Apart from basic options, you can start video recording, change the quality of the video, and point the camera to the area of your choice using the directional control buttons on the dashboard.
- That’s it, you have successfully completed the setup of Mi Home Security Camera 360°, and you can now start live monitoring of the same on your phone through the Mi Home app.
- However, if it takes a lot of time, or is unsuccessful, you can opt for the manual option and select Mi Home Security Camera 360 under the Camera section.
The Mi Security Camera 360 topped our list for best wifi home security cameras, thanks to the slew of features it has on offer. For starters, it’s a tiny wireless camera that can be managed right on your smartphone through the Mi Home app. In case if you’ve already bought one, here’s how to connect and install MI Security Camera 360 on Phone.
Connect and Install MI Security Camera 360 on Phone
1] First of all, you need to download and install the Mi Home app on your smartphone. You can download it for both Android and iOS using the links given below.
Download Mi Home App for Android | Download Mi Home App for iOS
2] Next, open the app and sign in with your Mi account credentials. You can sign in with either of email or mobile number or can sign up with the same in case you don’t have a Mi account. While setting the app, make sure to set the region as India (recommended).
3] On the next screen, tap on the “+” (Add device) button given on the top right corner. The app will now automatically search for your camera and display the same in the ‘Devices nearby’ section.
However, if it takes a lot of time, or is unsuccessful, you can opt for the manual option and select Mi Home Security Camera 360 under the Camera section.
4] Now, you need to reset the camera. To do the same, plug the camera to a power source, and the camera will automatically calibrate itself by rotating through both the axis. After that, press and hold the “Reset” button given at the camera’s base. You’ll see orange light in the LED near the lens.
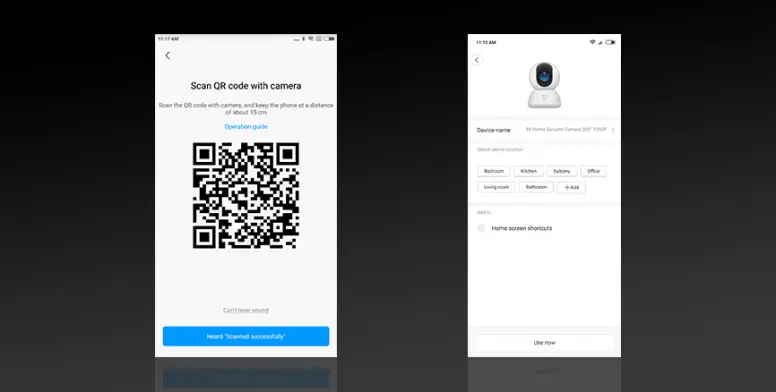
5] Once the process finishes, tap on ‘Next’ and select your home’s WiFi network. The app will now give you a QR Code that needs to be scanned through the Mi Home Security Camera 360°.
Shoot your phone’s brightness to the max level and hold it with given QR code at about 15cms from the Mi Security Camera 360°. After it’s scanned successfully, you will hear a notification sound from the camera. If not, give it a couple of seconds more and click on ‘Heard Scanned successfully.’
Note: Kindly make sure that both your phone and the camera are connected to the same WiFi network.
6] Now comes the final step. Here, you need to choose a name for your camera, followed by the selection of room for the device.
That’s it, you have successfully completed the setup of Mi Home Security Camera 360°, and you can now start live monitoring of the same on your phone through the Mi Home app.
Mi Home Camera 360° Settings
Apart from basic options, you can start video recording, change the quality of the video, and point the camera to the area of your choice using the directional control buttons on the dashboard. The camera also has a number of settings to be tweaked, including options to enhance dynamic range using wide dynamic range mode and lens distortion correction in the Image Settings section.
Plus, you can also turn on auto-sleep mode under Camera settings > Sleep Settings. This will prevent unnecessary recording when you’re home, thereby saving extra storage space on the SD card. There’s also an option to toggle Night-vision settings in the camera, through which, you can shift to colored footage even in low light conditions.
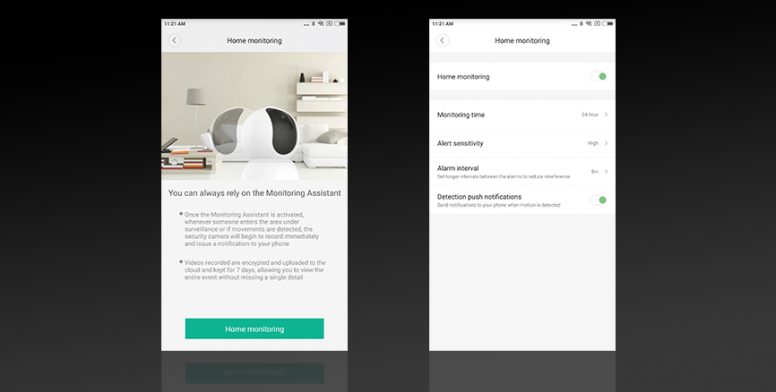
Lastly, you can check out the Motion Alert Settings which when toggled, will notify you of any intrusion registered in the viewfinder. A video recording, too, will be triggered at the same time to record the motion. And the clip will be encrypted and saved in the cloud for seven days. You can further play around with motion detection sensitivity and alert settings under the Home monitoring section.
Wrapping Up
So this was a short guide on how to connect and install Mi Security Camera 360 on your phone. By the way, what’s your favorite feature of the camera? Let us know in the comments below. Feel free to reach us in case of any doubts or queries.
Also, read How to Install Google Camera on Redmi Note 8 Pro
