

Quick Answer
- At times, you may see your iPhone waking up with a flash message pop-up saying “Your SIM sent a text message” or “(Primary) Your SIM sent a text message.
- After following the steps above, see if you’re still getting the message popup saying your SIM has sent a text message on your iPhone.
- Resetting your network settings may help fix the “Your SIM has sent a text message” issue on your iPhone.
Does your iPhone keep saying, “Your SIM sent a text message,” and you don’t know why? Well, several iPhone users have complained of their SIM automatically sending messages. It has been reported across iPhone 12, iPhone 11, iPhone XS, iPhone XR, iPhone X, iPhone 8, iPhone 7, iPhone 6, iPhone 6s, etc. In fact, I myself have faced this issue on the iPhone SE 2020. If you are getting the SIM sending text message notification on your iPhone, do not worry. Here are five quick ways to fix Your SIM sent text message issue on any iPhone running iOS 14.
Fix Your SIM sent a Text Message Issue on iPhone
At times, you may see your iPhone waking up with a flash message pop-up saying “Your SIM sent a text message” or “(Primary) Your SIM sent a text message.” This may seem to be annoying and strange at the same time.
What’s the reason? It usually happens when there’s a SIM card activity or issue between your SIM and the service operator. You may experience it after swapping SIM cards or updating your iPhone. This issue is prevalent with users on Airtel.
Below are some handy tips that will help you stop the SIM card from automatically sending SMS messages on your iPhone.
1. Restart your iPhone
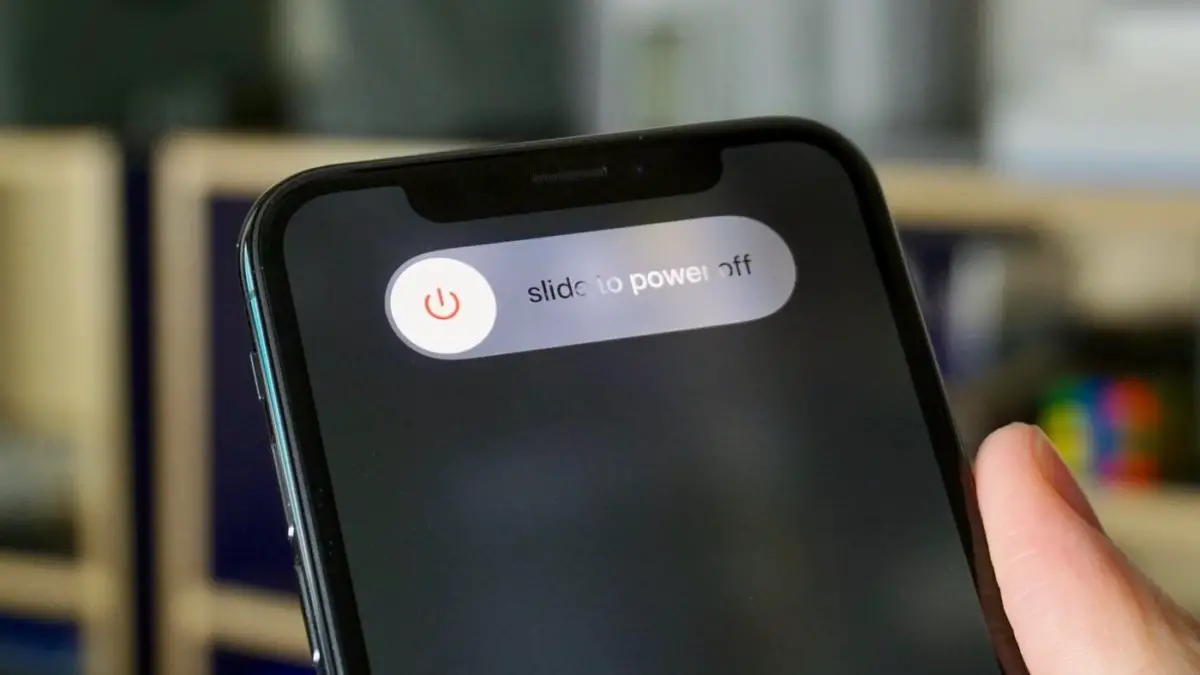 The most common way to fix SIM sending SMS popup is to turn off your iPhone and turn it back again. This will give your iPhone a fresh start.
To do so, press and hold the power button. Once the menu appears, slide the power icon to the right to turn off your iPhone. Then, long-press the power key again to turn it on. This will likely fix the issue.
2. Eject and Re-insert your SIM Card
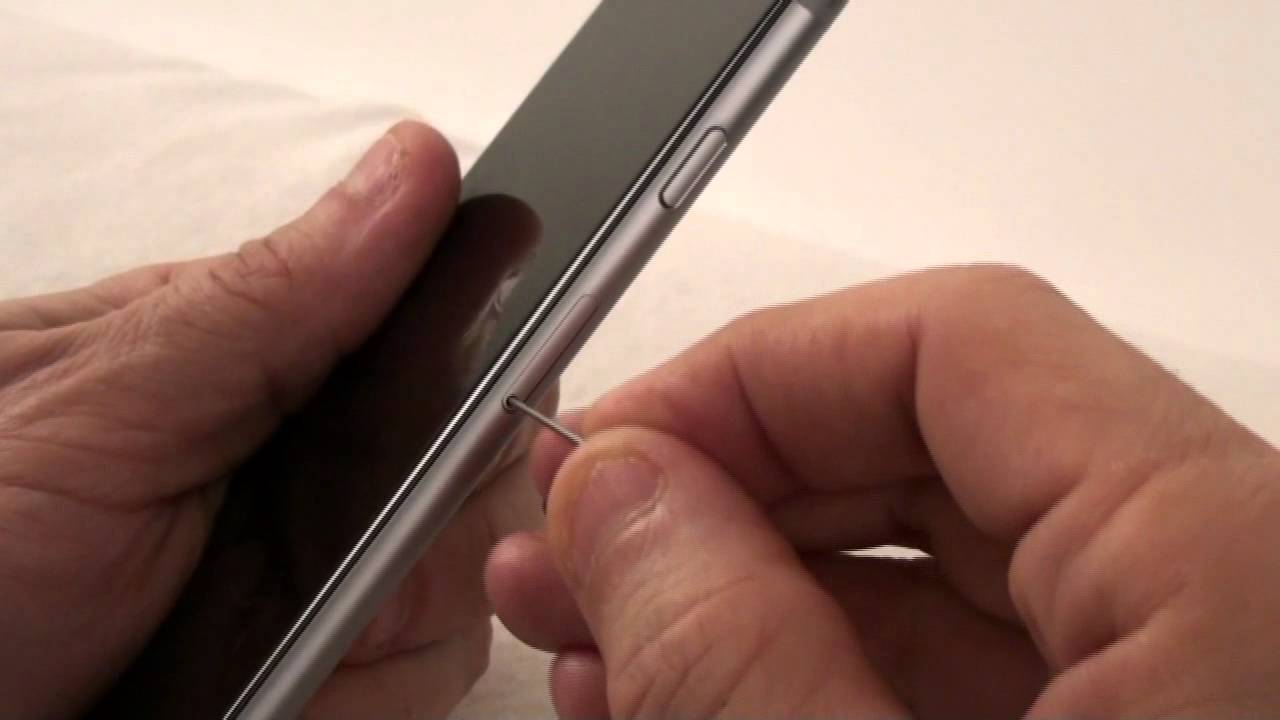 The other option is to eject and re-insert your SIM card to fix any temporary issues. So, remove the SIM card tray using the Sim ejector tool. Then, please put it back in. It’s advised that you switch off your iPhone during the process.
The SIM card tray is usually located to the right of your iPhone. Removing and re-inserting the SIM card will give it a fresh start to connect with the operator. This is what fixed the issue on my iPhone SE.
3. Check for Carrier Settings Update
Your SIM might be sending automatic text messages on your iPhone to contact the carrier’s update server. So, check if you have any pending carrier settings update and install it if available, as follows:
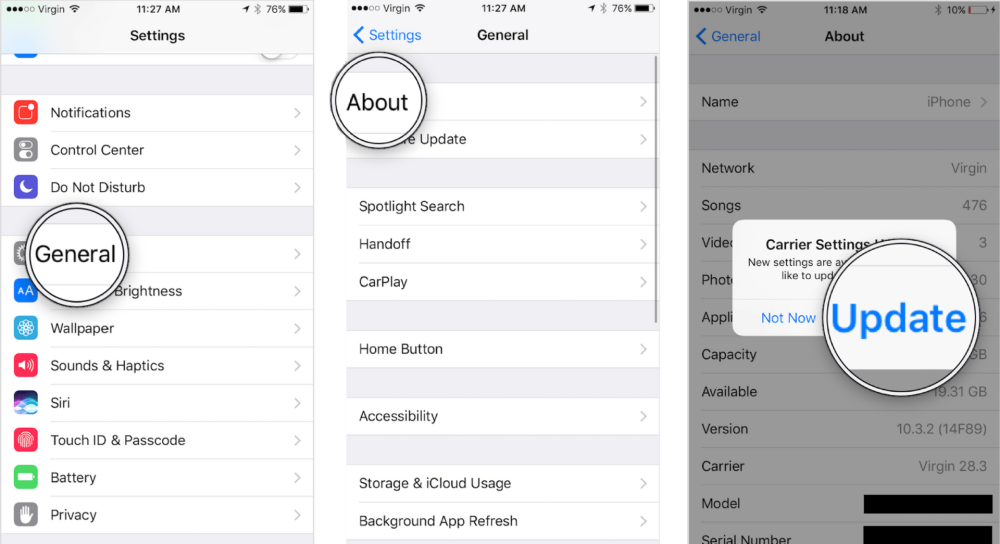
- Open Settings on your iPhone.
- Here, click on General.
- Then, tap About.
- Wait for about a minute.
- If you see a message prompt saying Carrier Settings Update, click on Update.
- Wait till it installs the carrier settings update. Then, reboot your iPhone.
Now, wait some time to see if you face the issue again. If it appears again, proceed with the other steps below. If you didn’t see any update prompt, then probably no carrier updates are available for your iPhone- you can skip this step.
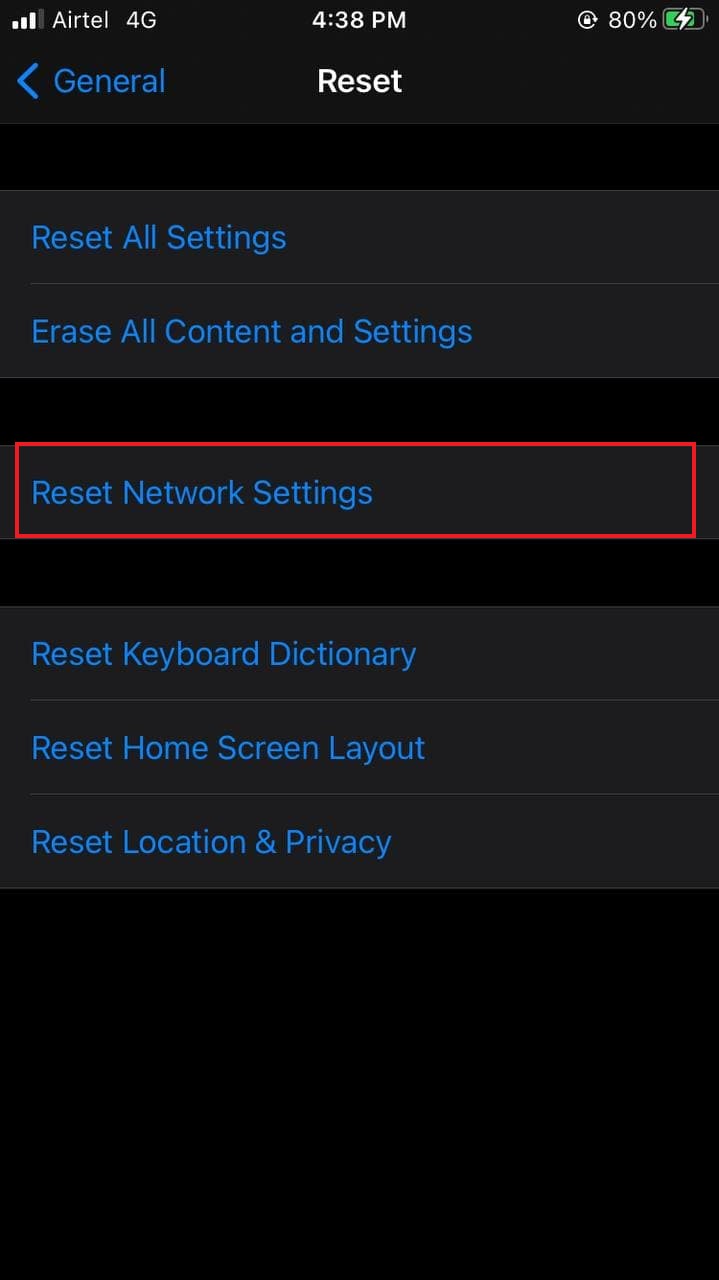
4. Reset Network Settings
Resetting your network settings may help fix the “Your SIM has sent a text message” issue on your iPhone. However, do note that doing so will also erase all your saved Wifi passwords and VPN settings.
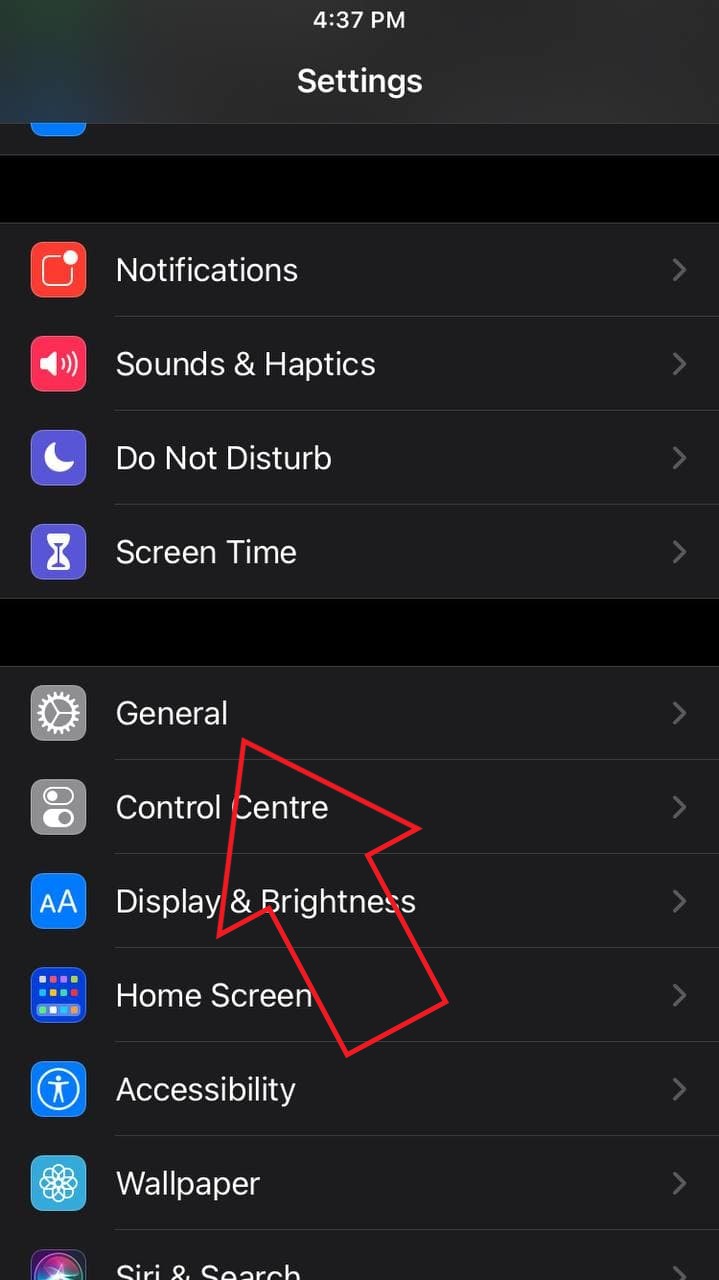
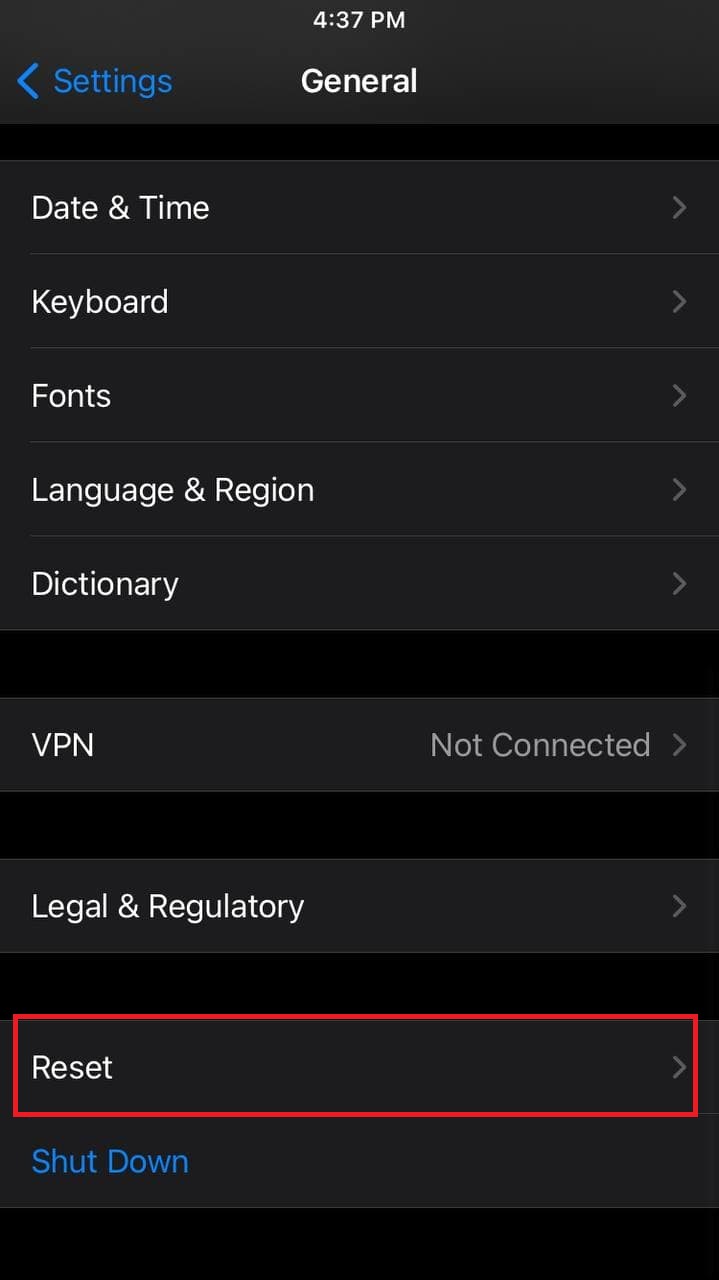
- Open Settings on your iPhone.
- Head to General > Reset.
- Here, click on Reset Network Settings.
- Enter your iPhone passcode to continue.

- Tap Reset Network Settings again to confirm.
5. Contact your Service Provider
After following the steps above, see if you’re still getting the message popup saying your SIM has sent a text message on your iPhone. If yes, then the issue could be from the operator’s side. Try calling your SIM’s service provider to know the possible cause and fix the issue.
If they insist, visit the nearest authorized store and get your SIM card replaced. In the case of Airtel, you can get a replacement SIM card within 10-15 minutes at Airtel Stores. It is usually free of cost, but please confirm with the store.
Wrapping Up
These were five quick ways to fix the “Your SIM sent a text message” issue on any iPhone running iOS 14 or older. Usually, removing and re-inserting the SIM card does the job- that’s what worked for me. Anyway, do let me know which method worked for you in the comments below. Stay tuned for more tips, tricks, and how-tos on iPhone.
Also, read- 3 Ways to Check Carrier Aggregation Support on Android and iPhone
You can also follow us for instant tech news at Google News or for tips and tricks, smartphones & gadgets reviews, join GadgetsToUse Telegram Group or for the latest review videos subscribe GadgetsToUse Youtube Channel.


