Quick Answer
- From using third-party software to trying out the hidden screen recording feature, here are some easy and free-to-use ways to record the screen on any Windows 10 computer.
- On the next page, enable the “Display” toggle on Video Recorder box, and select your screen recording reolsution or set a custom resolution.
- Whatever be the reason, it’s quite easy to record the screen on Windows 10, just like screen recording on a phone.
You may want to record your PC screen for various reasons. It could be for recording tutorials, presentations, or simply recording an issue to show others. Whatever be the reason, it’s quite easy to record the screen on Windows 10, just like screen recording on a phone. While there’s no dedicated screen recording feature, here are four different ways to screen record on Windows 10 for free without any watermark.
Also, read | How to Keep a Window Always On Top in Windows 10 and macOS
Record Screen on Windows 10 for Free without Watermark
From using third-party software to trying out the hidden screen recording feature, here are some easy and free-to-use ways to record the screen on any Windows 10 computer.
Method 1- Windows 10’s In-Built Game Bar
The pre-installed Xbox Game Bar was meant to record game clips. However, it can also be used to screen record other things on your screen. You can re-install the Xbox and Xbox Game Bar app from Microsoft Store if removed in the past.
Before we start, note that not all Windows 10 machines can screen record with Game Bar. It works only if your laptop’s video card supports one of the three encoders- Intel Quick Sync H.264, Nvidia NVENC, or AMD VCE.
Enable Game Bar in Settings
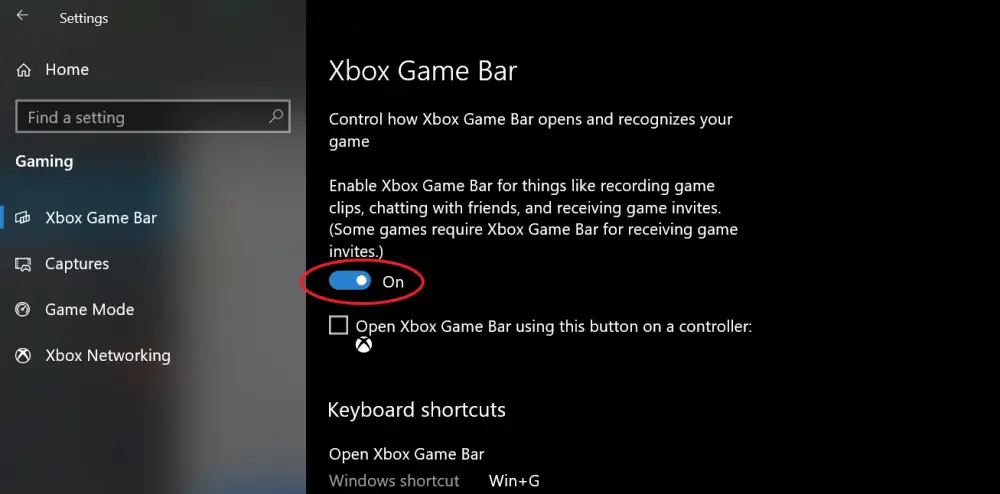
- Open Settings on your computer.
- Click on Gaming.
- On the next screen, check if Game Bar is enabled.
- If not, turn on the toggle for “Enable Xbox Game Bar for things like recording game clip.”
Turn On Screen Recording
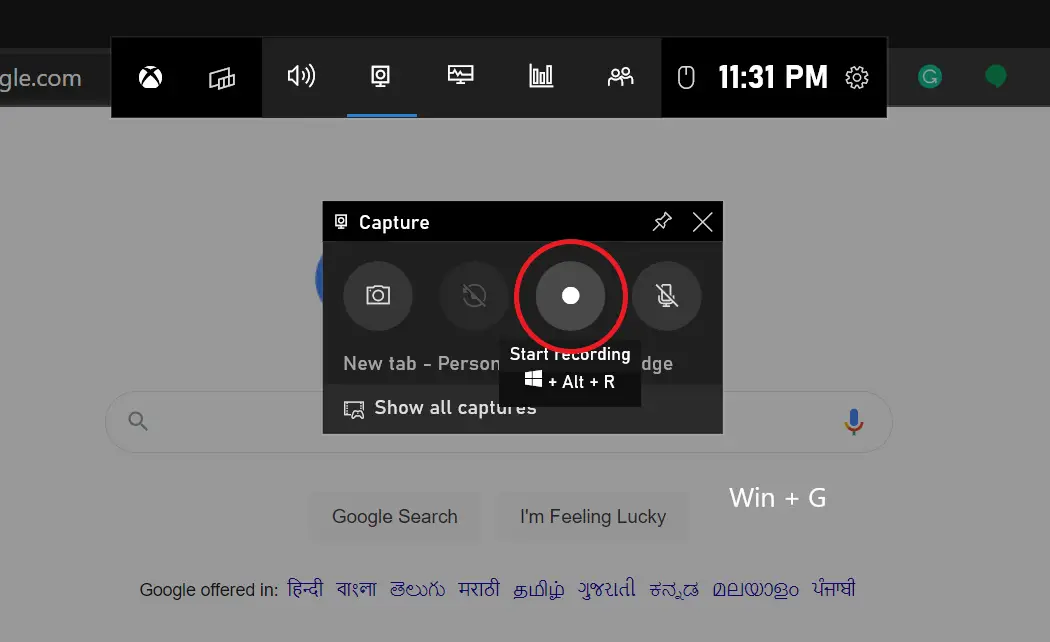
- Press Windows Key + G on your keyboard to open the Game Bar. You can also manually open the Game Bar app from the Start menu.
- Tap “Yes, this is a game” if prompted.
- Now, tap the Record button to start recording. Alternatively, you can press Windows Key + Alt + R to start recording your computer’s screen.
- Use the same button or key combination to stop the screen recording.
The recorded files can be viewed by clicking ‘Show all captures.’ Note that the Game Bar doesn’t support screen recording for desktop and file explorer.
Method 2- TuneFab Screen Recorder
TubeFab is another free-to-use screen recording software that will let you record screen activity, webcam online meetings, live streaming video, gameplay, and more with or without sound. You can try it for free or buy the premium version for some added features.
Here’s how to use this software to record your Windows PC screen for free:
- Go to www.tunefab.com
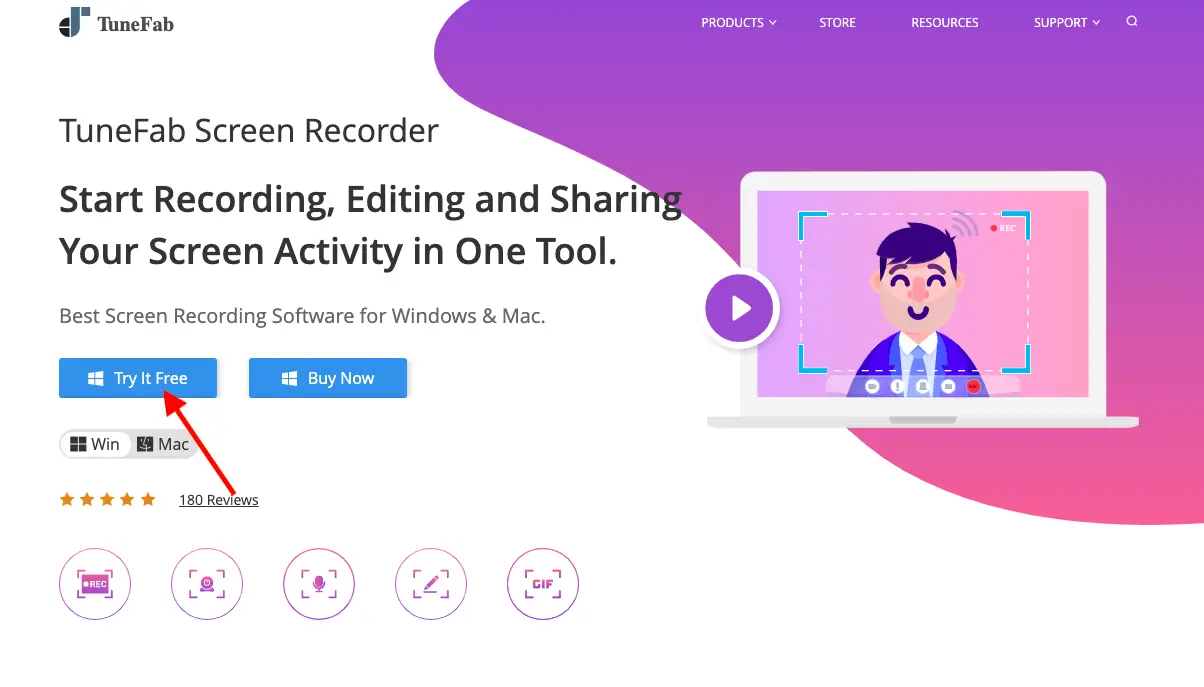
2. Go to Screen Recorder under the featured products section and click on “Try It Free” to download the software.
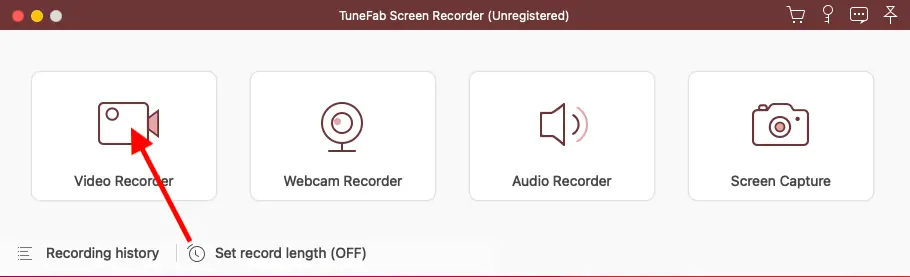
3. Once it is downloaded, install it on your PC.
4. Now, open it and allow it to screen recording permission, and then the recording menu will open.
5. Tap on “Video Recorder” to start recording your screen.
6. On the next page, enable the “Display” toggle on Video Recorder box, and select your screen recording reolsution or set a custom resolution.
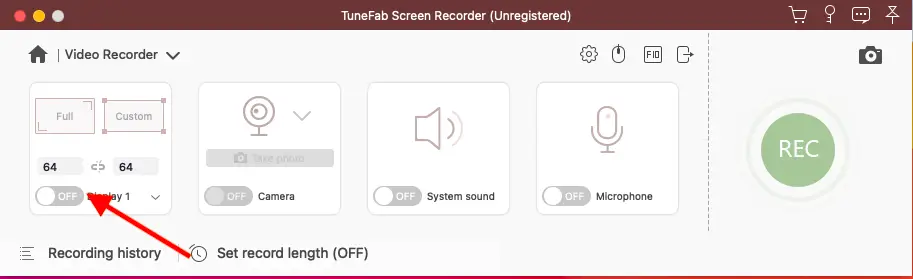
7. Enable the “System sound” toggle and give it permission to record system sound and give “Microphone” permission to record your voice.
8. Moreover, you will need to enable the “Camera” toggle and give it permission to allow webcam recording.
9. Once all permissions are done and all toggles are enabled, click on the “REC” (green) button to start recording.
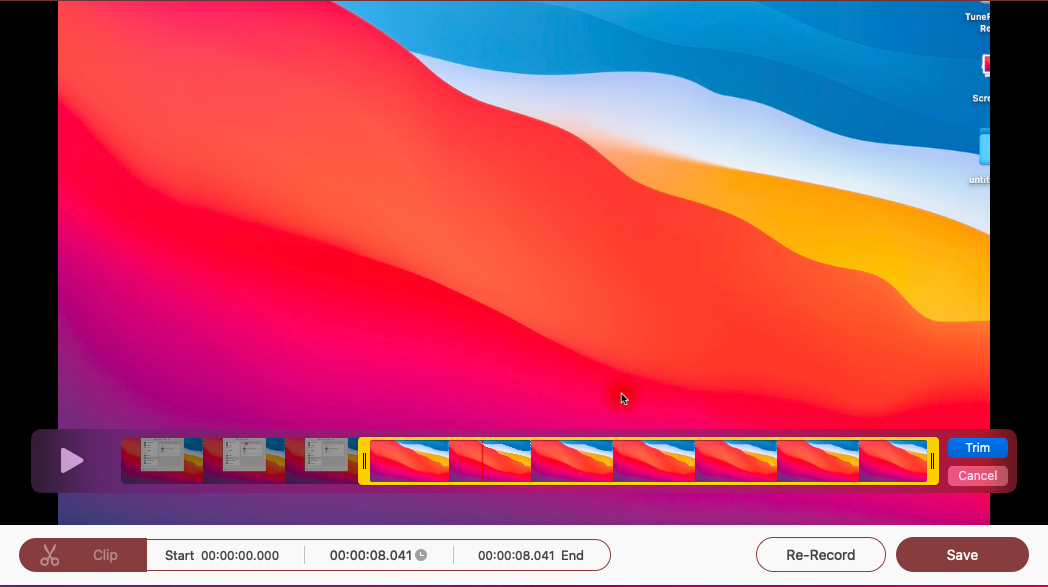
Once you are done recording, tap on the Stop button and then “Save” to save your screen recording. You can also edit the recording and trim it as per your needs.
Method 3- Microsoft PowerPoint
If you have Microsoft PowerPoint installed on your PC, then you need not look anywhere else for screen recording. Yes, you can record your Windows 10’s screen using PowerPoint. Below is how you can use it to record and save your screen video.
Record Screen using PowerPoint
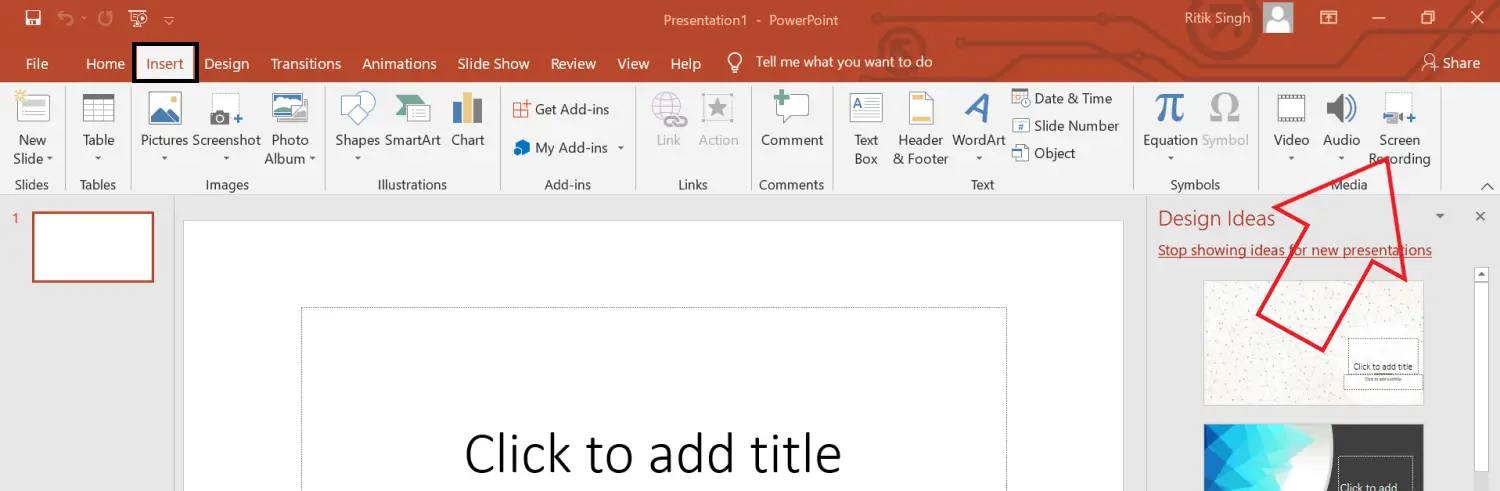
- Launch Microsoft PowerPoint on your computer.
- Open a blank presentation.
- Once the presentation opens, click on Insert from the toolbar at the top.
- Then, click on Screen Recording at the extreme right.
- Now, select the screen area you want to record.
- Press the Record button to start the screen recording.
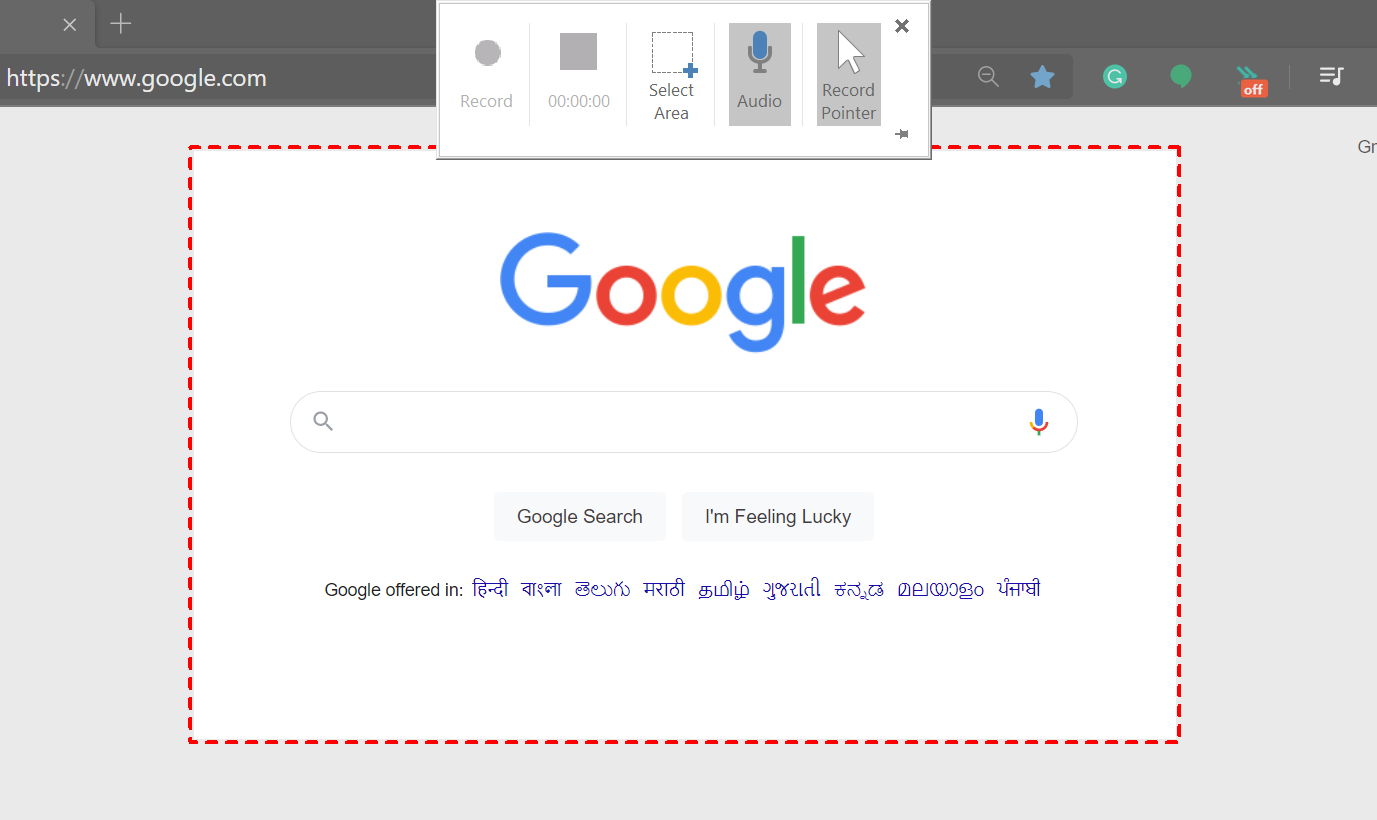
- Once done, click it again to stop the recording. Can’t see the option? Hover your mouse at the top of the screen.
Save the Video File
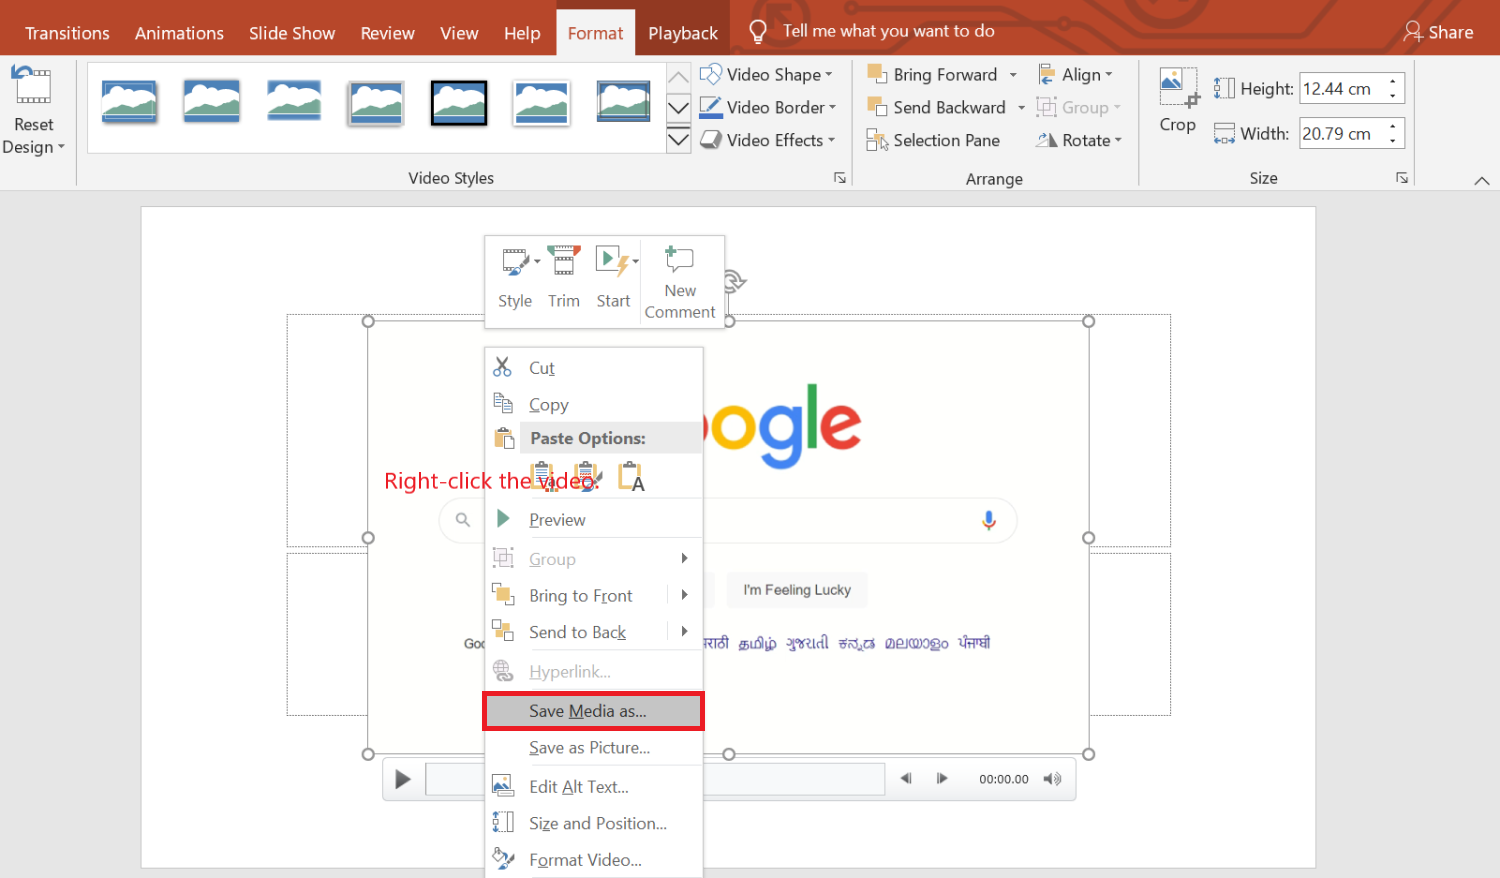
- The screen recording will automatically be embedded in the presentation.
- To save it as a video file on your computer, right-click on it.
- Then, select Save Media As and choose where you want to save it.
- The screen recording will be saved as an MP4 video file in the desired folder.
Method 4- Apowersoft Free Online Screen Recorder
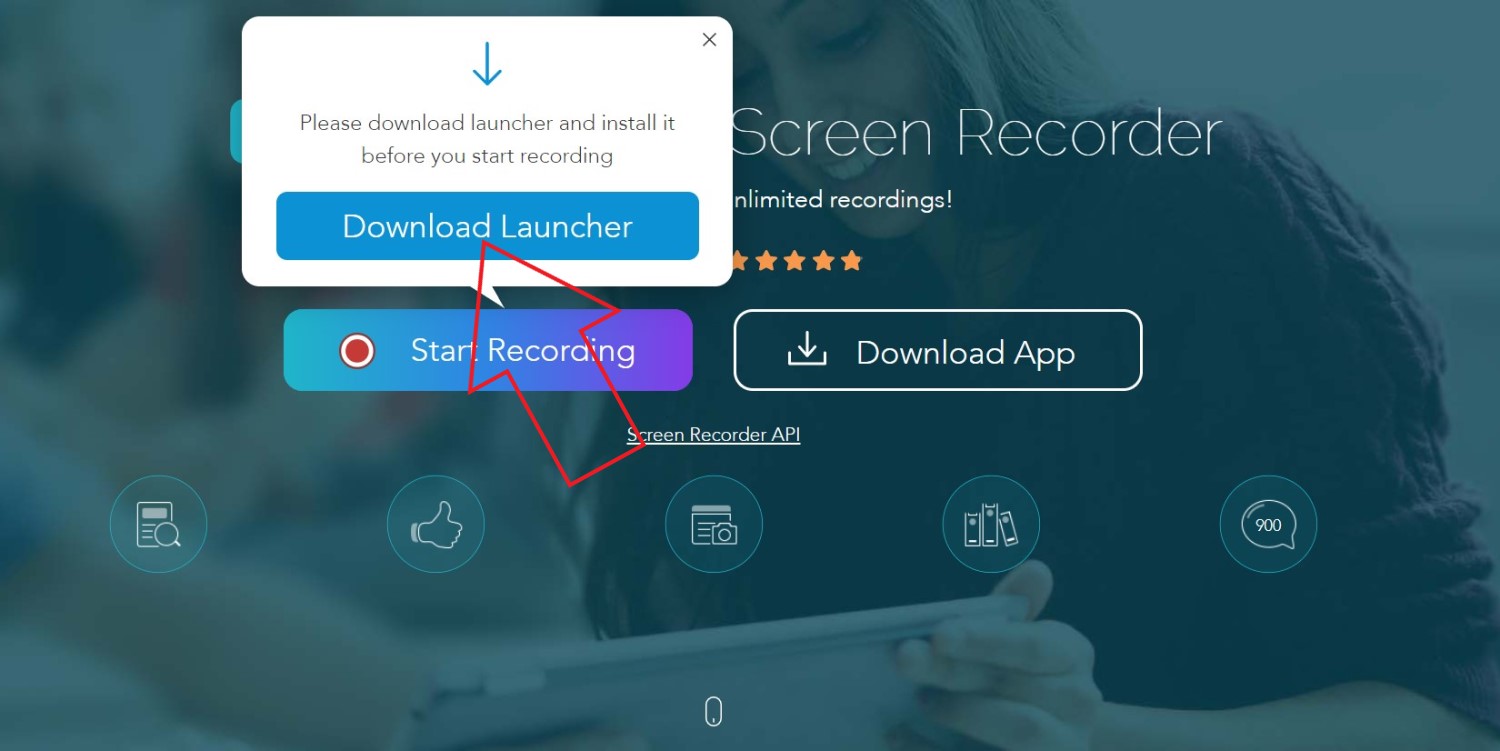
Apowersoft Online Screen Recorder is a browser-based tool that lets you record your Windows PC’s screen. To use it, visit this page and click on Start Recording > Download Launcher. Once the launcher is downloaded, open it, and you’re ready to go.
The online screen recorder is lightweight, free-to-use, and doesn’t annoy with watermarks. It also lets you record system audio alongside the audio from the microphone. Plus, you can record webcam video side-by-side, which can be useful while giving tutorials.
All-inclusive, it may not be ideal for screen recording games, but it is more than enough if you want to record some tutorials or presentations.
Method 5- OBS Studio
OBS Studio is a very feature-rich screen recording software for Windows 10. You can use it for video recording and live streaming without any watermark, ads, or time limit.
It is an open-source program that lets you record full screen or windowed region alongside audio from the system or microphone and video from the webcam. You can also screen record and live stream on YouTube, Twitch, and more simultaneously.
However, it can be overwhelming, and beginners may find it hard to use. To make things easier, below are steps to screen record Windows 10 using OBS Studio.
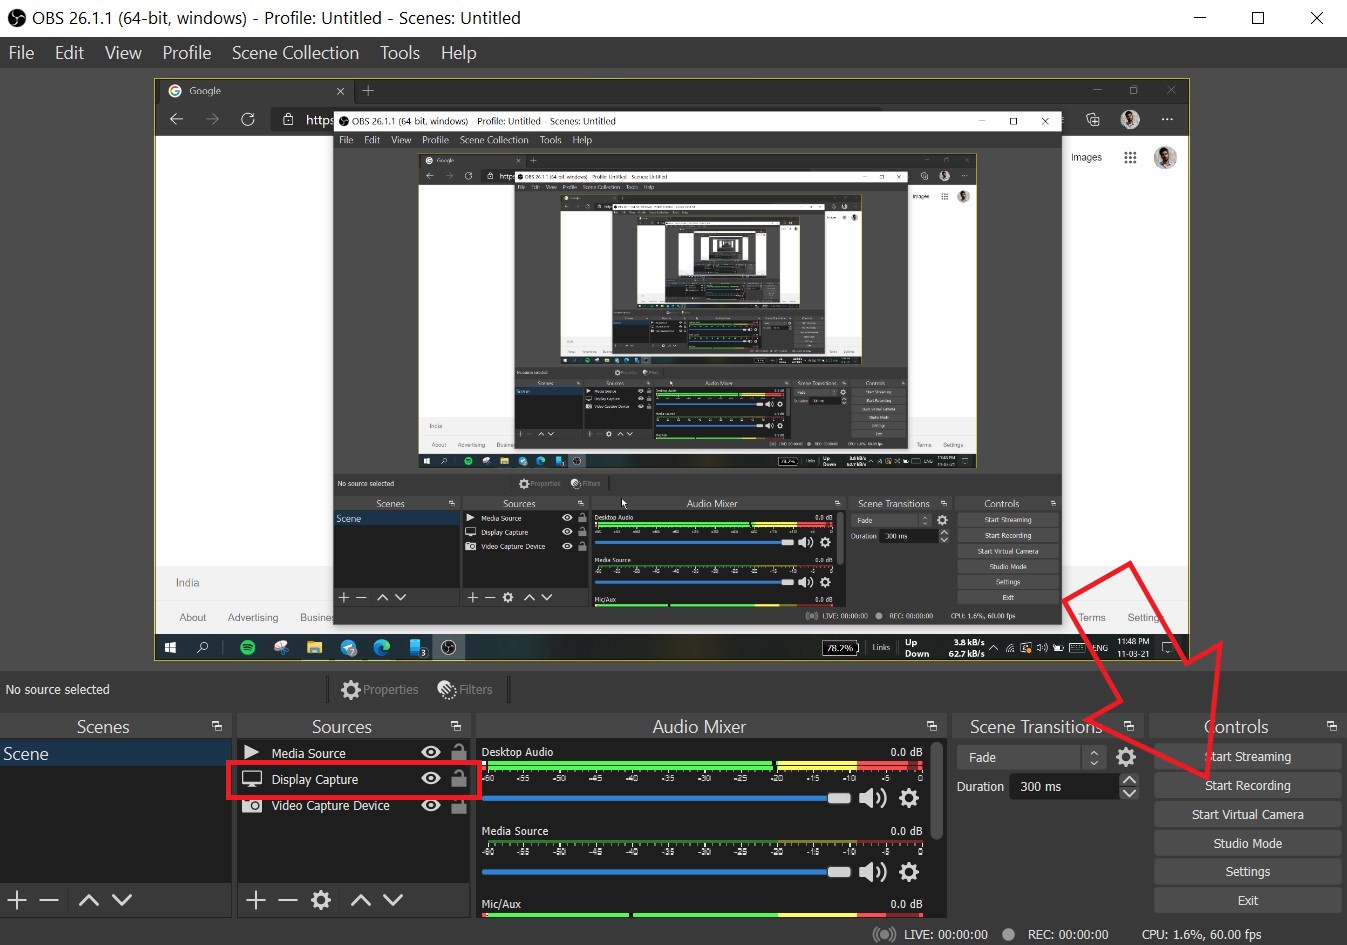
- Download and install OBS Studio from the official website.
- Open the app and select Display Capture under Sources. If you don’t see the option, click “+” and add Display Capture manually.
- Then, click on Start Recording at the bottom right to start the screen recording.
Are you facing the black screen issue in OBS recordings?
It’s a widespread issue where OBS Studio can produce black screen recordings with no video on Windows 10. If that’s the case, here’s the fix that you need to follow:
- Open Settings from the Windows Start menu.
- Here, click on System > Display.
- Scroll all the way to the bottom and click Graphics Settings.
- Click on Browse and select the OBS Studio executable file. The default location is C:\Program Files\obs-studio\bin\64bit\obs64.exe.

- Once OBS Studio is added, tap on it and select Options.

- Select Power Saving and click Save.
This should fix the black screen issue in OBS Studio. However, if it still doesn’t, repeat the steps and select High performance instead of Power Saving.
Wrapping Up- Screen Record Windows 10 without Watermark
These were the top four ways to screen record on your Windows 10 PC for free. Out of all, I personally use PowerPoint to record the stuff on my computer’s screen. Anyway, what will you be using for it? Let me know in the comments below. Stay tuned for more such articles.
Also, read- 3 Ways to Remove Activate Windows Watermark on Windows 10
You can also follow us for instant tech news at Google News or for tips and tricks, smartphones & gadgets reviews, join GadgetsToUse Telegram Group or for the latest review videos subscribe GadgetsToUse Youtube Channel.