Quick Answer
- To save time and remove all the saved Wi-Fi networks at once on your iPhone, you can reset the network settings on your iPhone, by following these steps.
- Like Android, you can either remove a single wireless network saved on your iPhone or remove all the saved networks simultaneously by resetting the network settings.
- Next, tap on Wi-Fi and press the Saved Networks option to view the list of all the saved Wi-Fi networks on your device.
Having multiple saved Wi-Fi networks is always good, but if your device gets connected to a saved network automatically, you have to spend some extra time switching it back to your desired network. You must remove all the saved Wi-Fi networks to resolve this auto-connecting issue. This explainer demonstrates several methods to remove saved Wi-Fi networks on Android, iPhone, iPad, Windows, and Mac. Furthermore, you can learn to find and block people connected to your Wi-Fi.
Removing Saved Wi-Fi Networks on Android, iPhone, iPad, Windows, and Mac
Below we have discussed multiple ways to remove saved Wi-Fi networks covering platforms like Android, iOS, iPadOS, Windows, and Mac. So without any further ado, let’s get started.
Remove Saved Wi-Fi Networks on Android
Removing saved wireless networks on Android is as easy as eating a pie. You can do it either from the Settings app on your phone or by resetting the entire network settings altogether. Here’s what you need to follow.
Method 1 – Using the Settings App
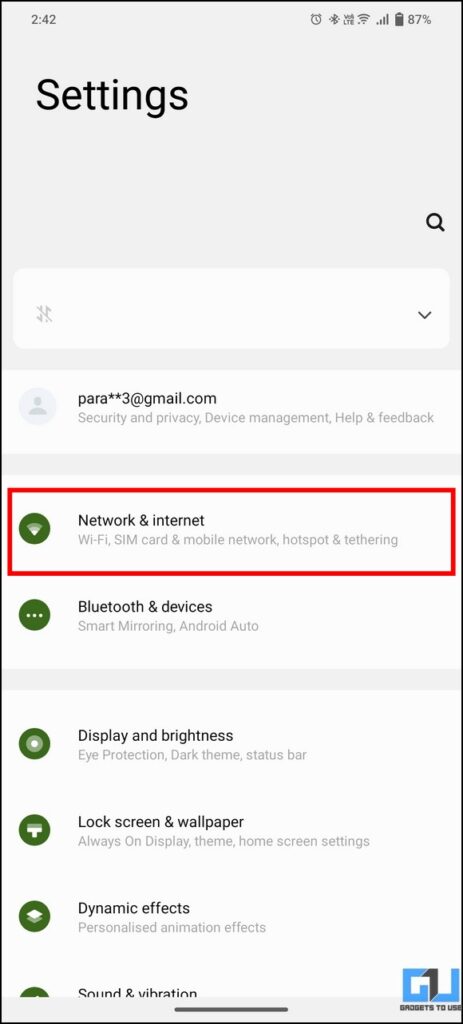
1. Open the Settings app and tap the Network & Internet option.
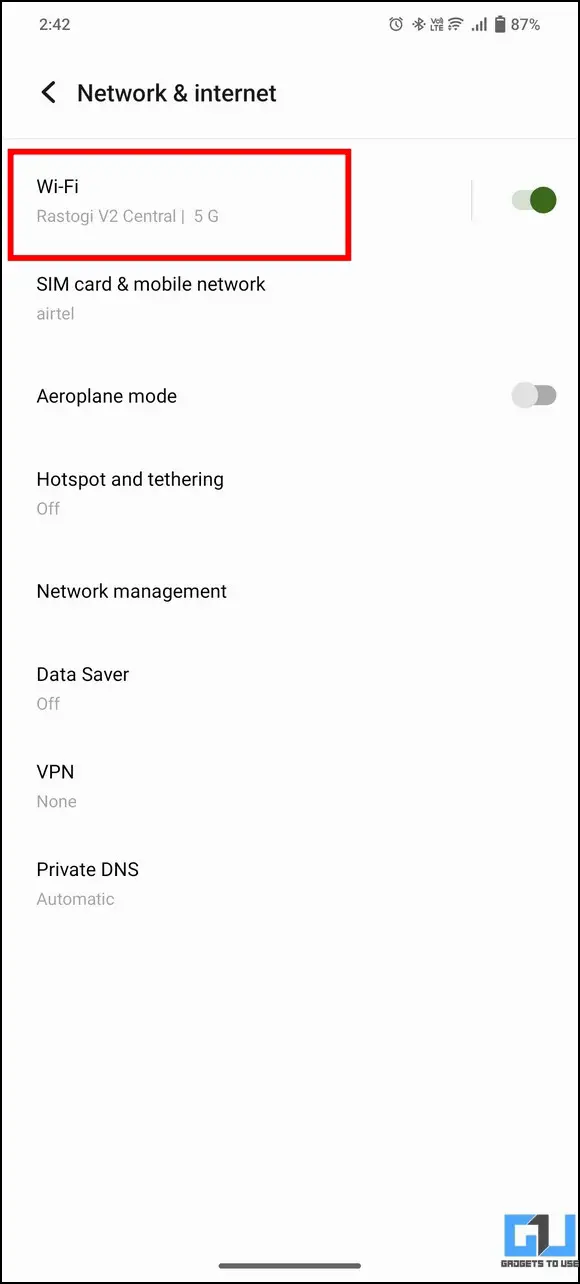
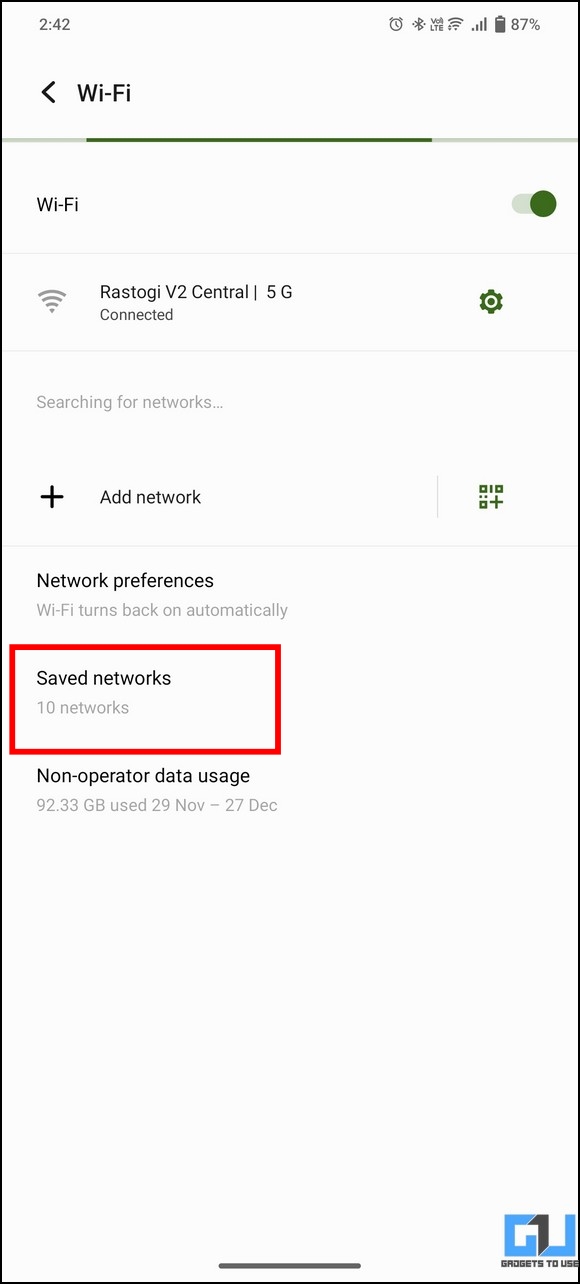
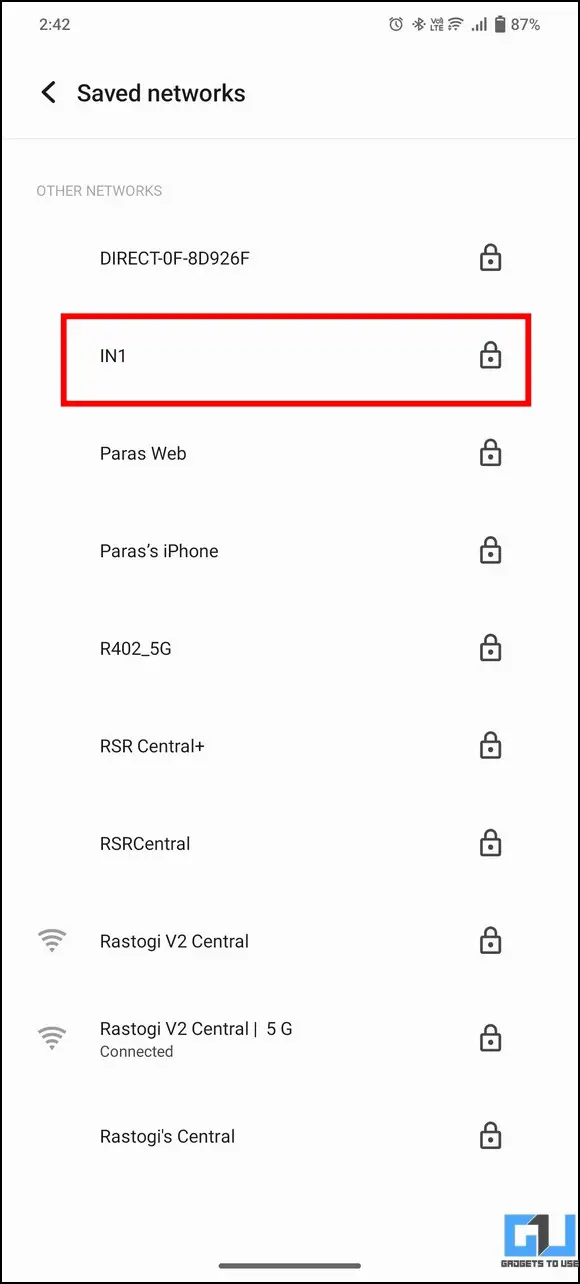
2. Next, tap on Wi-Fi and press the Saved Networks option to view the list of all the saved Wi-Fi networks on your device.
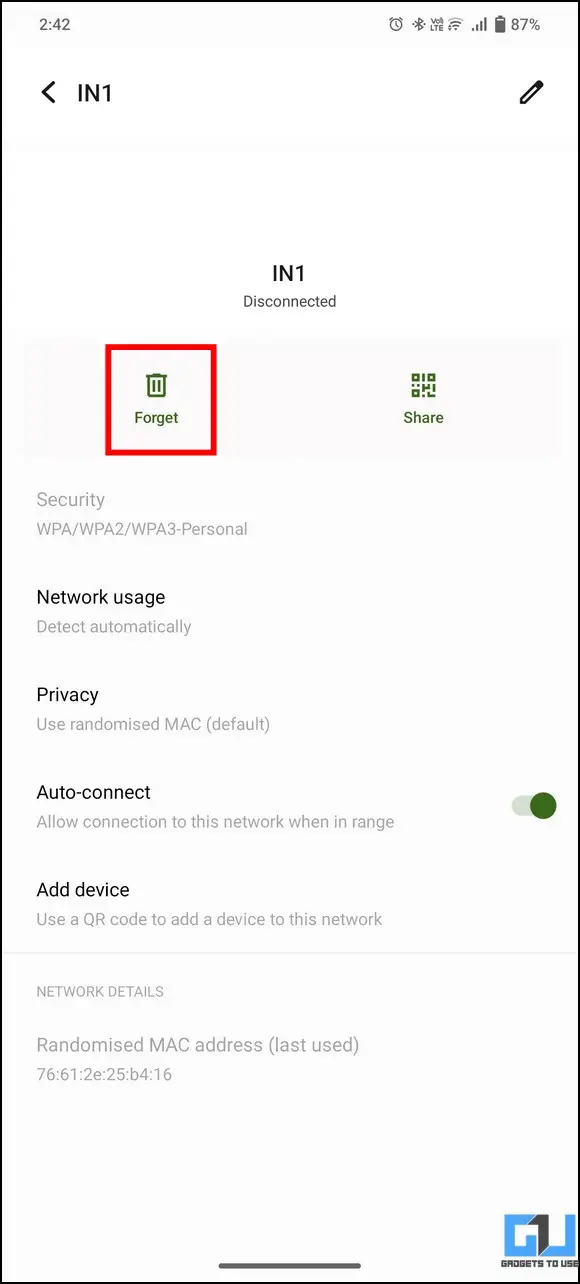
3. Select your desired Wi-Fi network name and tap the Forget button to remove it.
4. Repeat the above steps to remove other saved networks from the list.
Method 2 – Reset All Network Settings
If you wish to remove all the saved Wi-Fi networks on your Android phone in one go, resetting the device’s network settings can be useful. Here’s how to reset network settings.
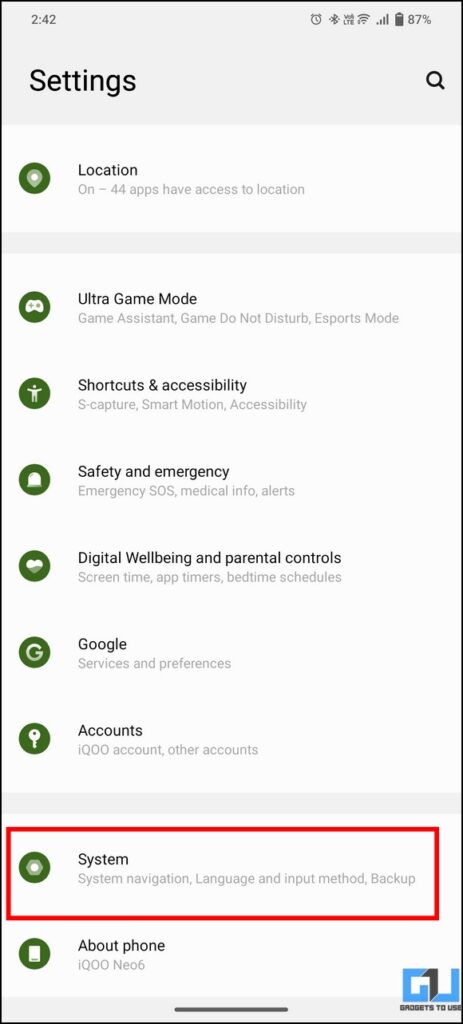
1. Open the Settings app and expand the System option.
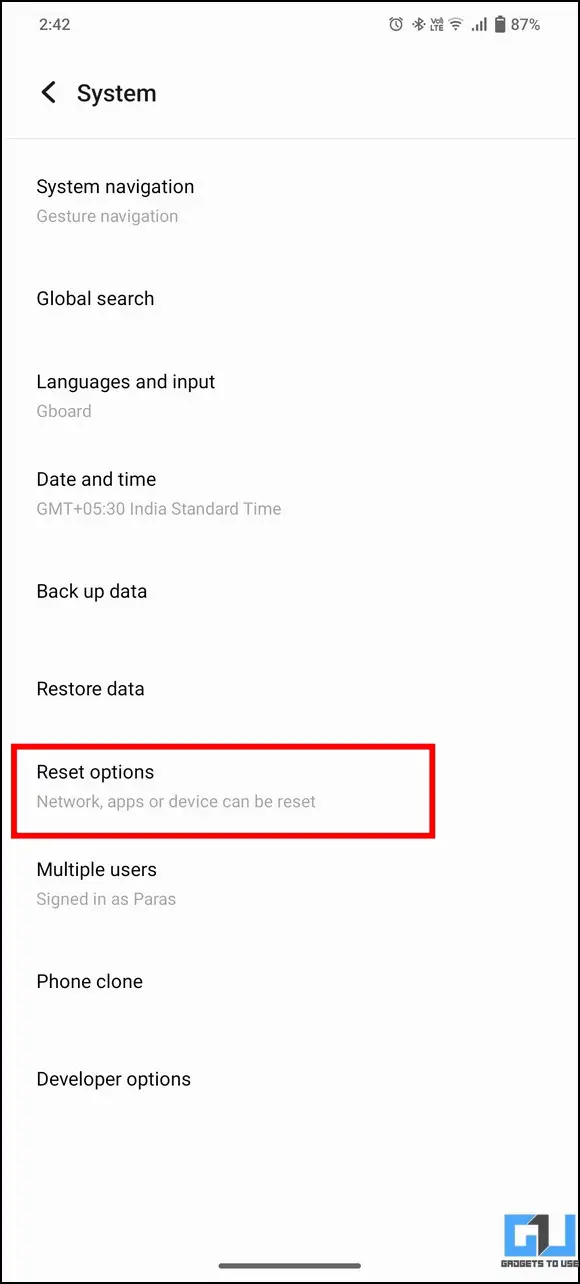
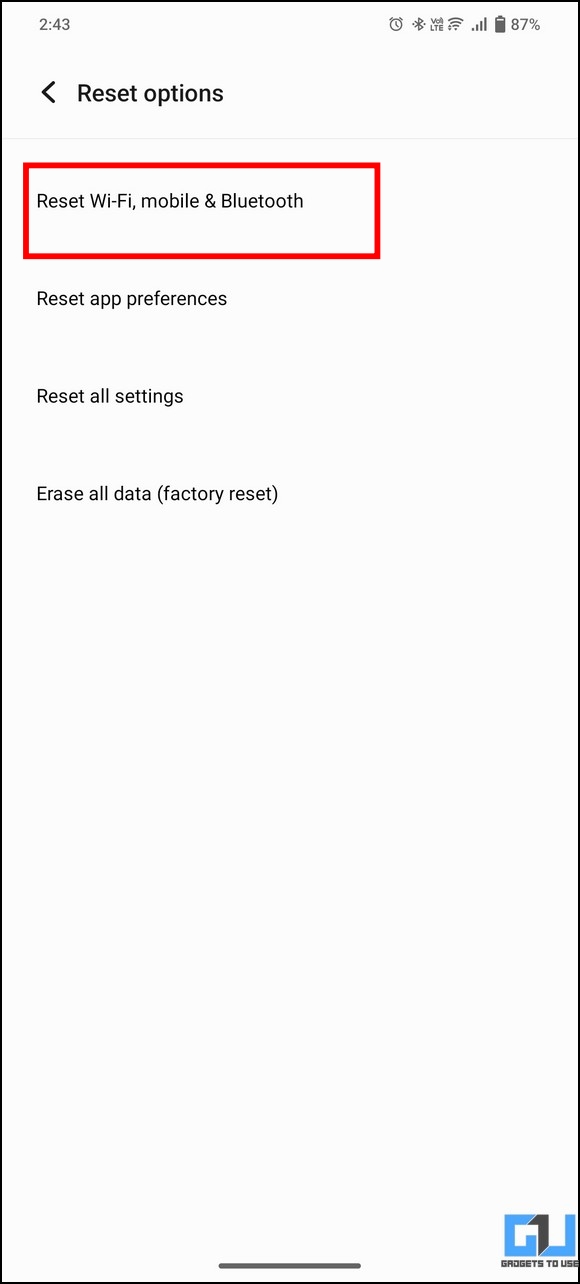
2. Next, go to the Reset Options and press the Reset Wi-Fi, mobile & Bluetooth options in the list.
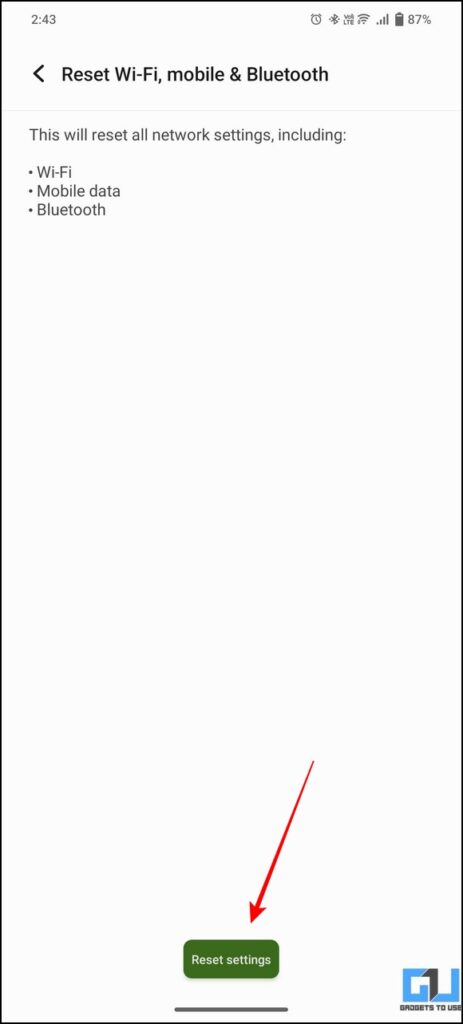
3. Finally, tap the Reset Settings button and enter your device’s password to remove all saved Wi-Fi networks at once.
Note: Once you’ve performed a network reset, you must reconnect to existing Wi-Fi networks to use them again.
Remove Saved Wi-Fi Networks on iPhone
Like Android, you can either remove a single wireless network saved on your iPhone or remove all the saved networks simultaneously by resetting the network settings.
Method 1 – Using the Settings App
1. Open the Settings app and tap on Wi-Fi.
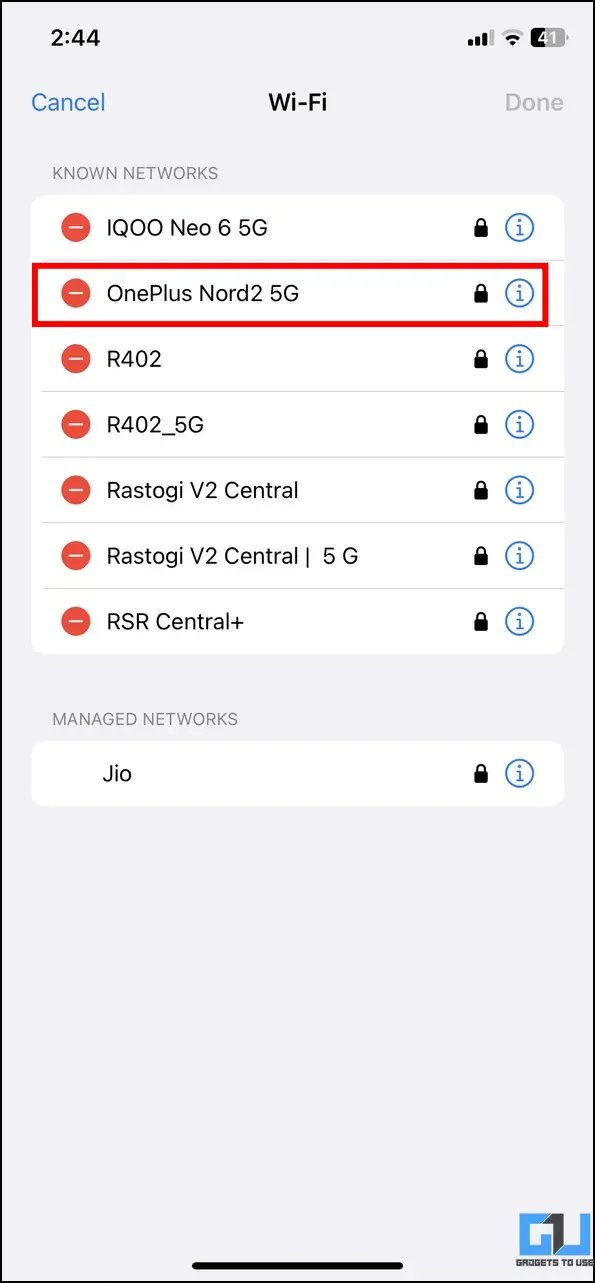
2. Press the Edit button in the top-right corner to view your the saved Wi-Fi networks.
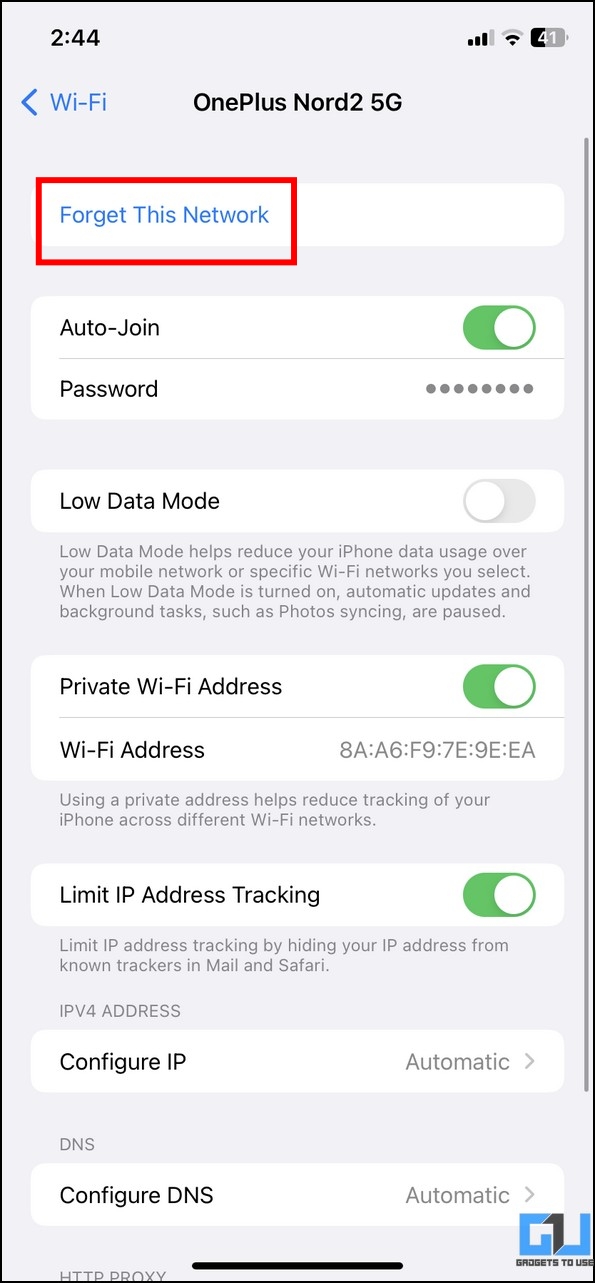
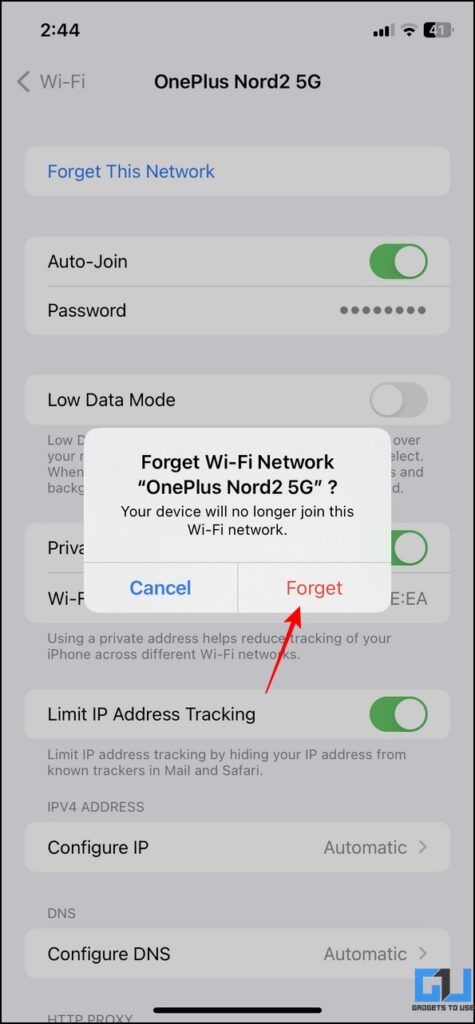
3. Finally, tap the desired saved network name to remove it and press the Forget This Network button.
4. Confirm your action by pressing the Forget button.
Method 2 – Reset All Network Settings
To save time and remove all the saved Wi-Fi networks at once on your iPhone, you can reset the network settings on your iPhone, by following these steps.
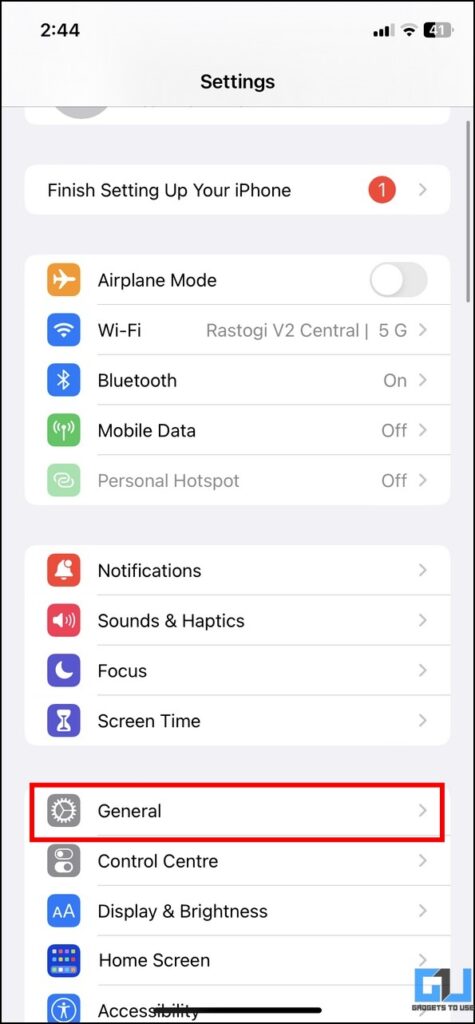
1. Open the Settings app and tap on General.
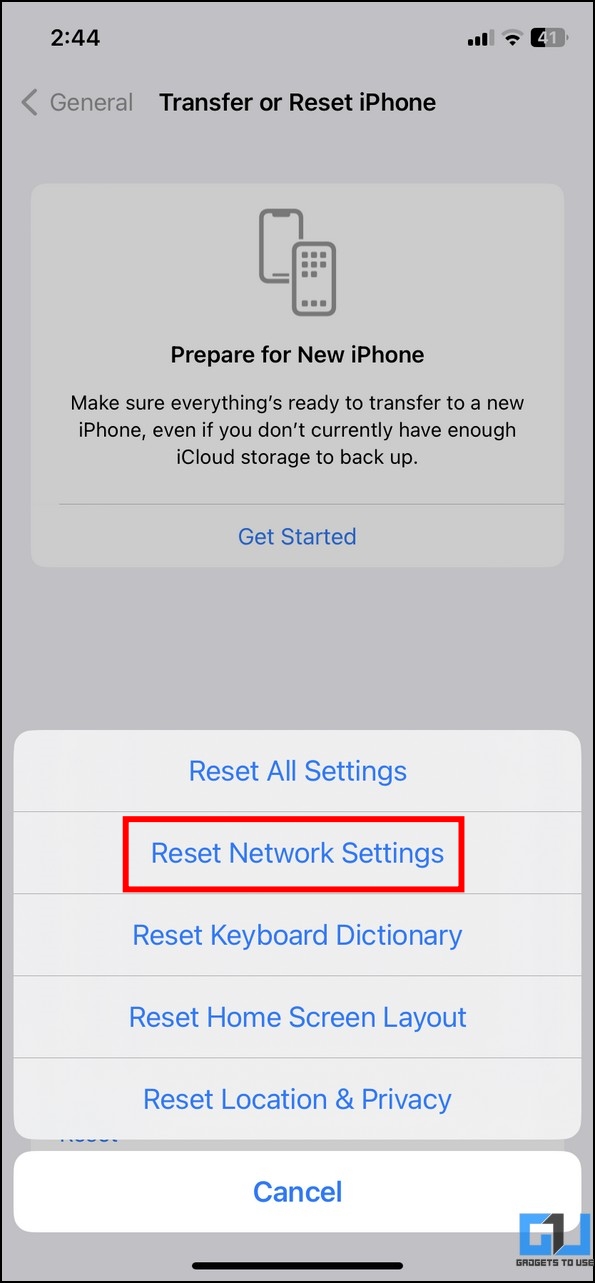
2. Scroll to the bottom and select the Transfer or Reset iPhone option, and tap the Reset button on the next page.
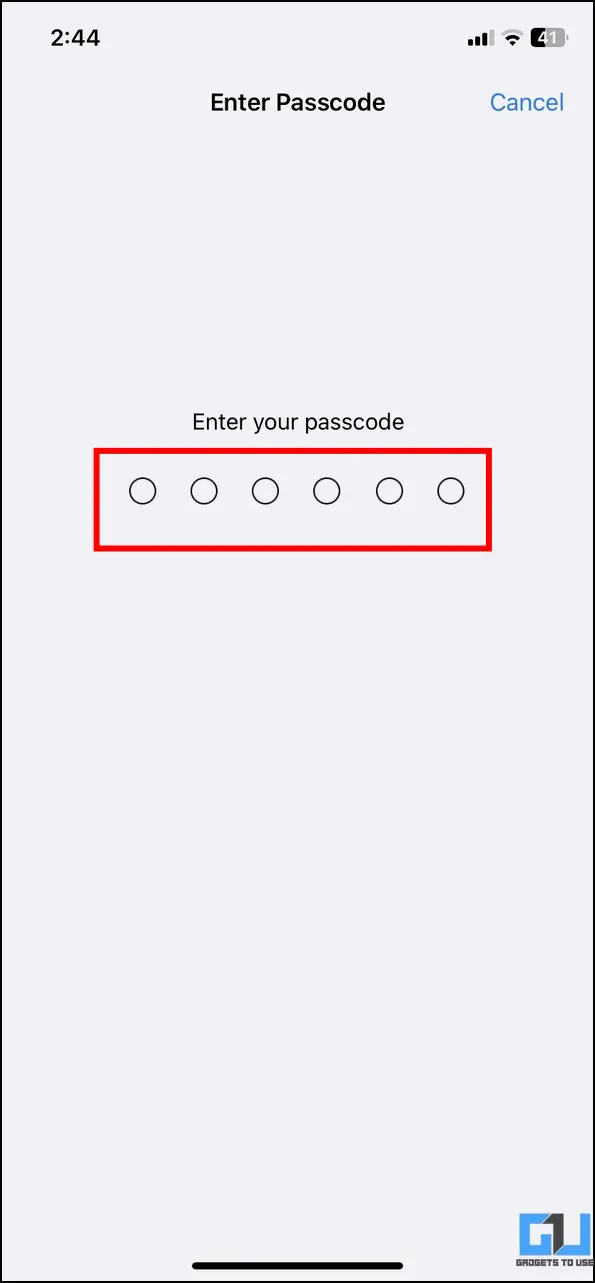
3. Finally, press the Reset Network Settings button and enter your iPhone’s passcode to remove all saved networks.
Remove Saved Wi-Fi Networks on iPad
Removing a saved wireless network on iPadOS is somewhat similar to iOS. Here’s what you need to follow:
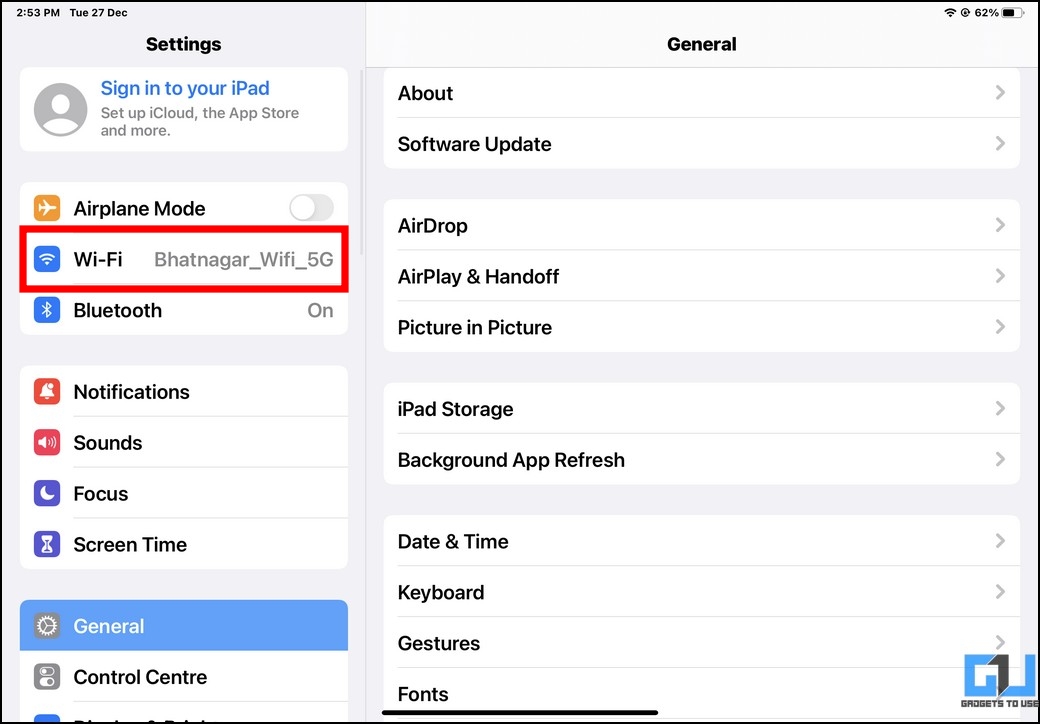
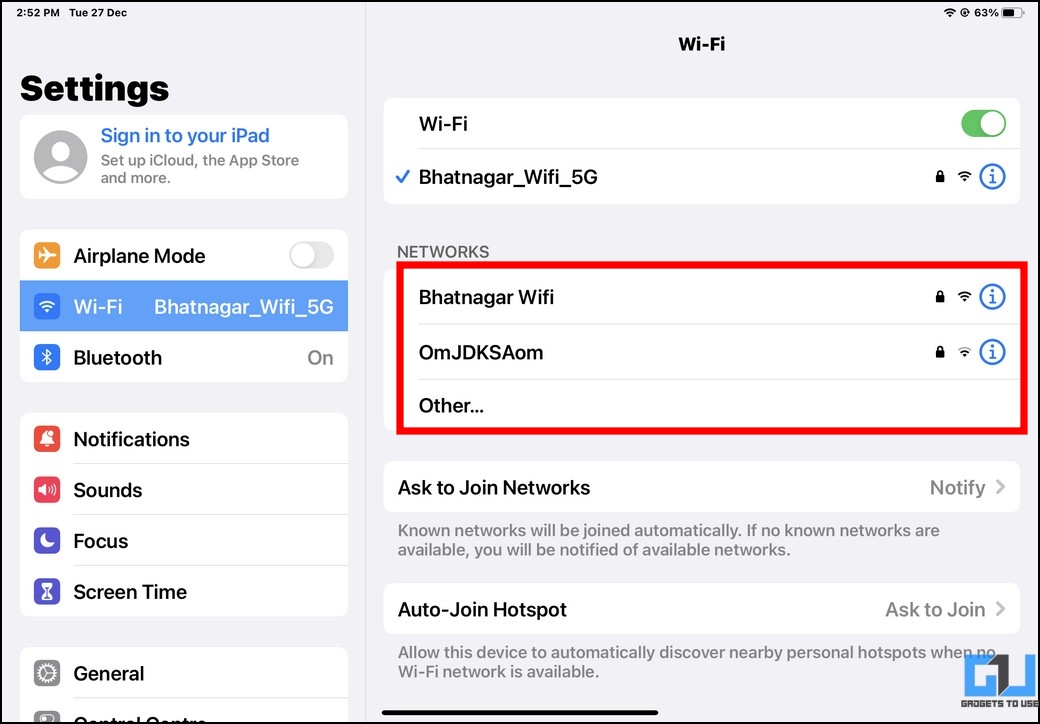
1. Open the Settings app on the iPad and expand the Wi-Fi option in the left sidebar.
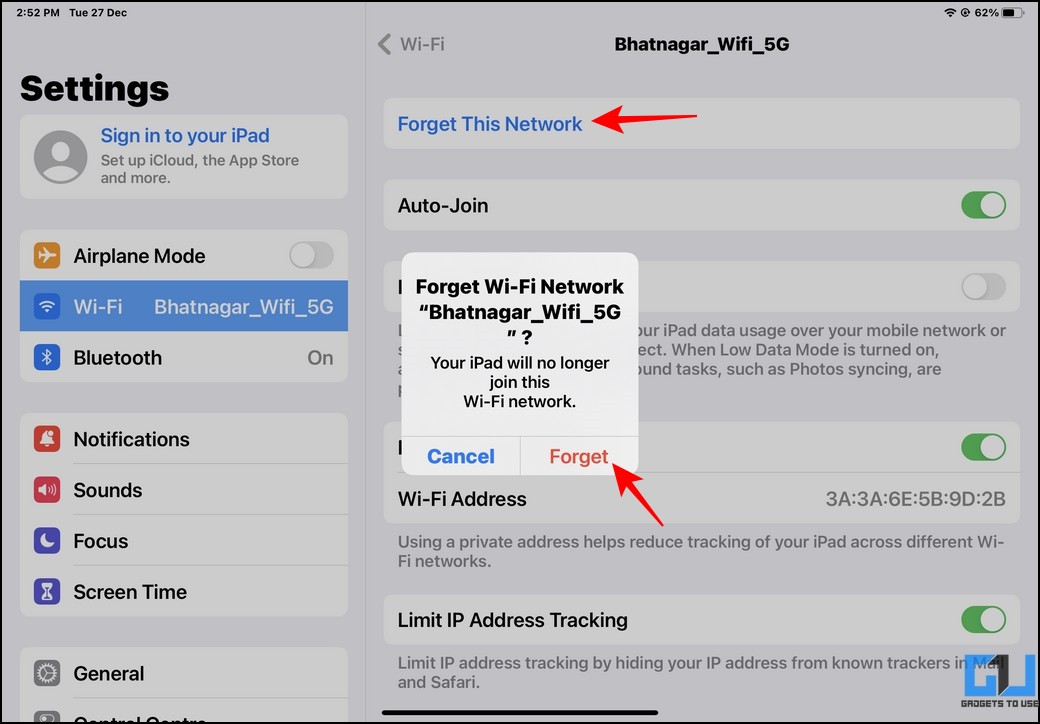
2. Press the ‘i‘ button beside the saved Wi-Fi network name to view associated options.
3. Finally, tap the Forget This Network button to remove it. Confirm your action by pressing the Forget button.
Remove Saved Wi-Fi Networks on Windows
To remove saved Wi-Fi networks from your Windows machine, remove it from Settings or Windows Command Prompt. Let’s look at the steps for both methods.
Method 1 – Using the Settings App
1. Open the Settings app (press the Windows + I key simultaneously) and expand the Privacy and Internet option from the left sidebar.
2. Click on the Wi-Fi option on the right.
3. Next, click Manage Known Networks to view the list of saved Wi-Fi networks.
4. Locate the name of the desired saved network and click the Forget button to remove it.
Method 2 – With the Command Prompt App
Besides the native Settings app on Windows, you can use the Command Prompt tool to remove individual or all saved wireless network entries from your machine. Here’s how it can be done.
1. Open the Run Window by pressing Windows + R key simultaneously and type cmd in the search field to open it.
2. Next, type the following command to view the list of all Wi-Fi networks on your device:
netsh wlan show profiles
3. To delete a single entry from the list of the saved wireless networks, type the following command to execute it:
netsh wlan delete profile name=”networkname”
4. Alternatively, you can type this command to remove all saved wireless network entries from the system:
netsh wlan delete profile name=*
Remove Saved Wi-Fi Networks on Mac
Like Windows, you can remove the saved Wi-Fi Network entries on your Mac by following these simple steps.
1. Expand the Apple Menu in the top-left corner to access System Settings.
2. Next, click on the Wi-Fi option in the left sidebar.
3. Scroll down the WiFi settings on the right and go to Advanced settings.
4. Finally, click the three-dot icon next to the saved Wi-Fi network you wish to remove and select the Remove from List option.
5. Confirm your action by clicking Remove.
Bonus: Find Connected Wi-Fi Passwords on Windows and Smartphones
Have you forgotten your Wi-Fi password or wish to know the password of your friend’s Wi-Fi to whom your device is connected? Check out our dedicated guides to find the password of connected Wi-Fi on Windows and Smartphones.
FAQs
Q: How to Delete/Forget a WiFi Network on Windows?
You can forget or remove a saved WiFi network from your Windows PC using the WiFi settings app or CMD tool. Follow the steps mentioned above for more details.
Q: How to Delete a WiFi Network on Android Phones?
You can delete or remove a saved WiFi network on Android from WiFi settings. Refer to the methods mentioned under the Android section of this article to learn more.
Q: Can You Delete a WiFi Network on Mac?
Yes. You can delete a saved WiFi network on Mac from the System Settings. For more details, check out the Mac method listed above.
Wrapping Up: Manage Saved Networks like a Pro!
This guide discussed several ways to remove the saved Wi-Fi networks across Android, iOS, iPadOS, Windows, or Mac. If you found it helpful, forward it to your friends and check the below links for more useful reads. Stay tuned to GadgetsToUse for more such reads.
You might be interested in the following:
- How to Enable Wi-Fi Calling on iPhone
- 9 Ways to Fix Android Connected to Wi-Fi but No Internet
- How Google Uses your Wi-Fi Connection to Access Your Location
- 5 Ways to Transfer Files from Phone to PC over Wi-Fi for Free
You can also follow us for instant tech news at Google News or for tips and tricks, smartphones & gadgets reviews, join GadgetsToUse Telegram Group or for the latest review videos subscribe GadgetsToUse Youtube Channel.
