Quick Answer
- It will now scan and show you temporary files and large or unused files that you can clean to free up storage on your device.
- It gives us recommendations to free up the disk space by cleaning temporary and large files, files synced to the cloud, and unused apps.
- You can enable Storage Sense on Windows 11 to ensure automatic cleaning of the temporary system and app files whenever required.
Your Windows computer may get slow over time due to the accumulation of junk files. These could be temporary files created by apps, junk internet files, software leftovers, update logs, cache, and more. The clutter not only eats storage space on the device but also makes it feel slow and sluggish. Thankfully, Windows 11 packs several built-in options to free up storage by deleting these unwanted files. In this article, let’s look at some handy ways to clean junk files on your Windows 11 PC.
Related | How to Quickly Reset Windows 11 Without Losing Files
What Are Junk Files in Windows? Why Clean Them?
Junk files are temporary files created by the PC as you use various programs and perform different tasks. These files are required for a short period to speed up the process and get irrelevant over time.
Since these files occupy storage space on the disk drive, they may pile up and slow down your computer, especially if it’s a low-end machine. Hence, it’s a safe and good practice to clean the junk files on your PC regularly.
Some common types of junk files on your computer:
- Temporary files: These are temporary files created by the system or apps as you use them. They are deleted automatically but not always, in which case, you can remove them manually.
- Temporary internet files: It is browser cache, i.e., the files created by your browser to speed up the loading of websites you’ve already visited.
- Thumbnails: The image thumbnails help load previews of images and videos on your computer. When you delete them, it may take slightly longer for the images to load. Windows will recreate them automatically when needed.
- Software leftovers: The temporary files and material related to apps and programs you’ve uninstalled already.
- Windows upgrade log files: Windows creates several log files during updates. These files are essential for troubleshooting problems that may arise after an upgrade.
- Recycle bin files: Files that have been deleted but remain stored in the recycle bin. It helps recover accidentally deleted files.
Clean Junk Files on Your Windows 11 PC
Method 1- Clean Junk Files Using Cleanup Recommendations
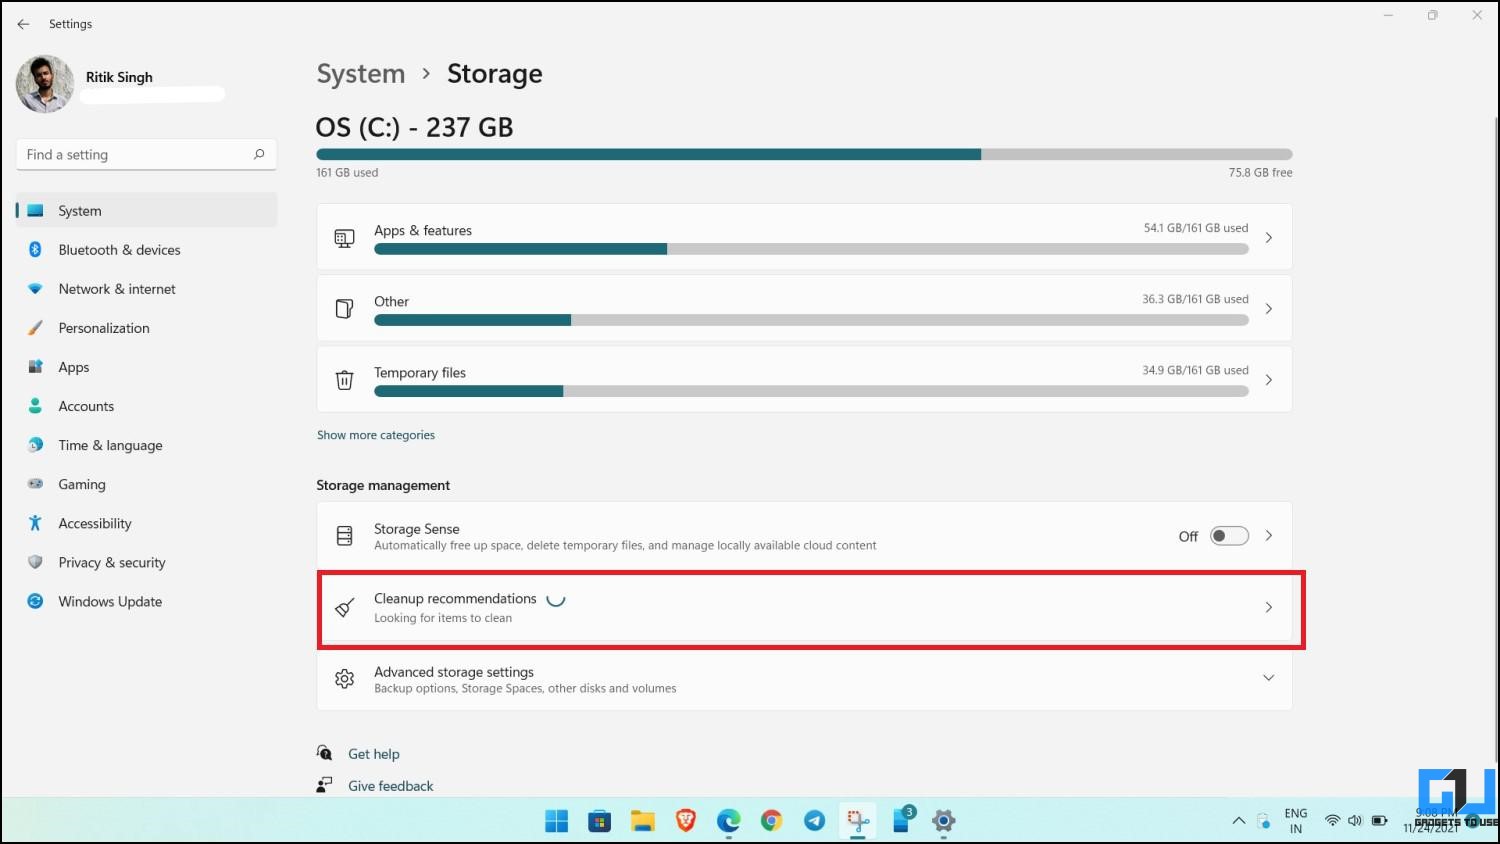
Windows 11 ships with a new feature called Cleanup Recommendations. It gives us recommendations to free up the disk space by cleaning temporary and large files, files synced to the cloud, and unused apps. Here’s how to use it:
- Open Settings on your Windows 11 PC. You can do it either from the Start menu or by pressing Win + I on your keyboard.

- Select System from the sidebar at the left. Click on Storage.

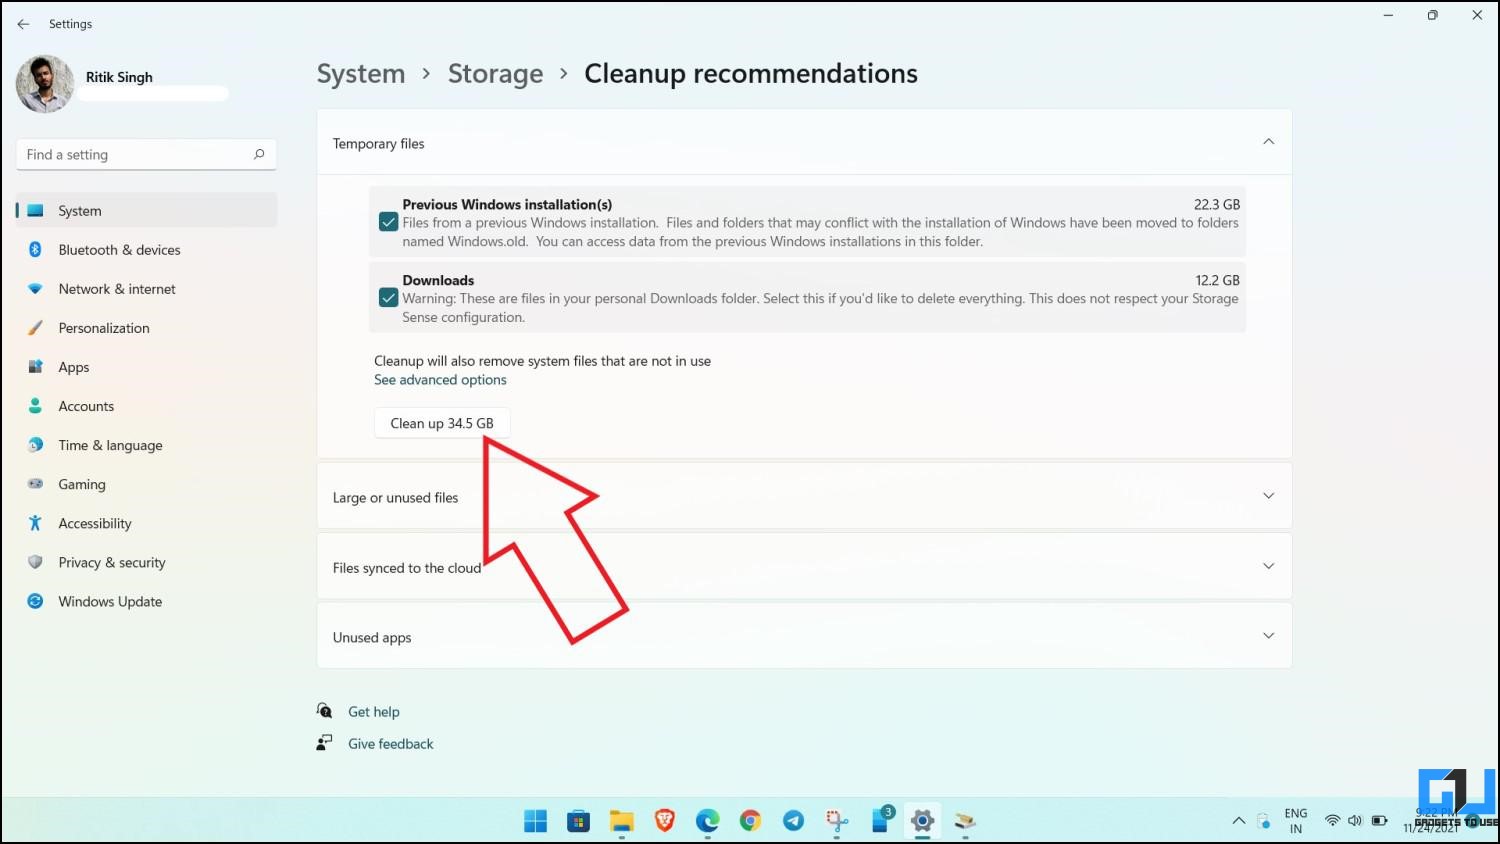
- Here, click on Cleanup Recommendations.
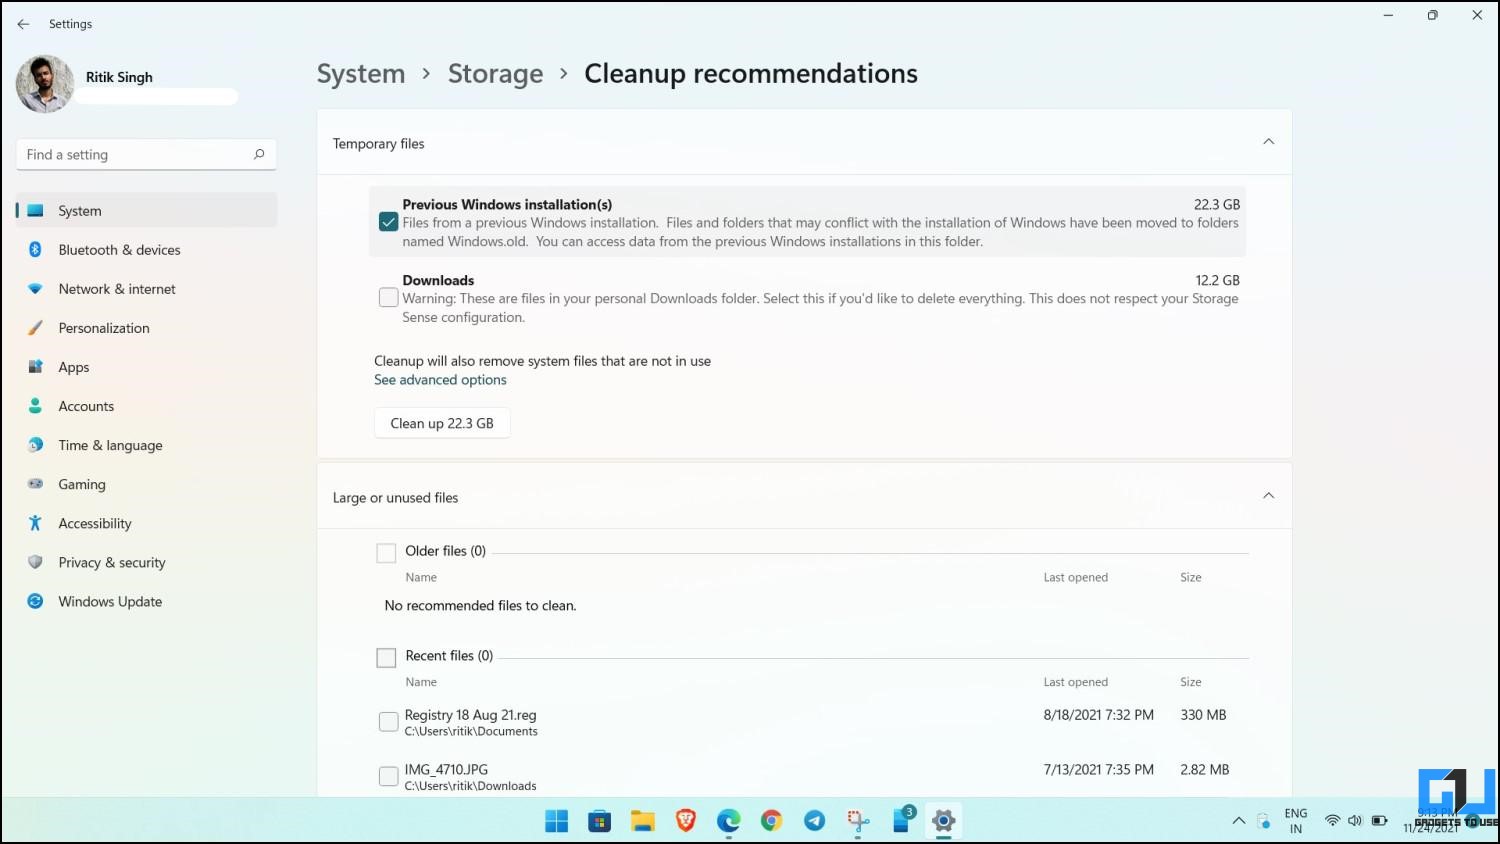
- It will now scan and show you temporary files and large or unused files that you can clean to free up storage on your device.
- Select the files you want to remove and tap Clean up at the bottom.
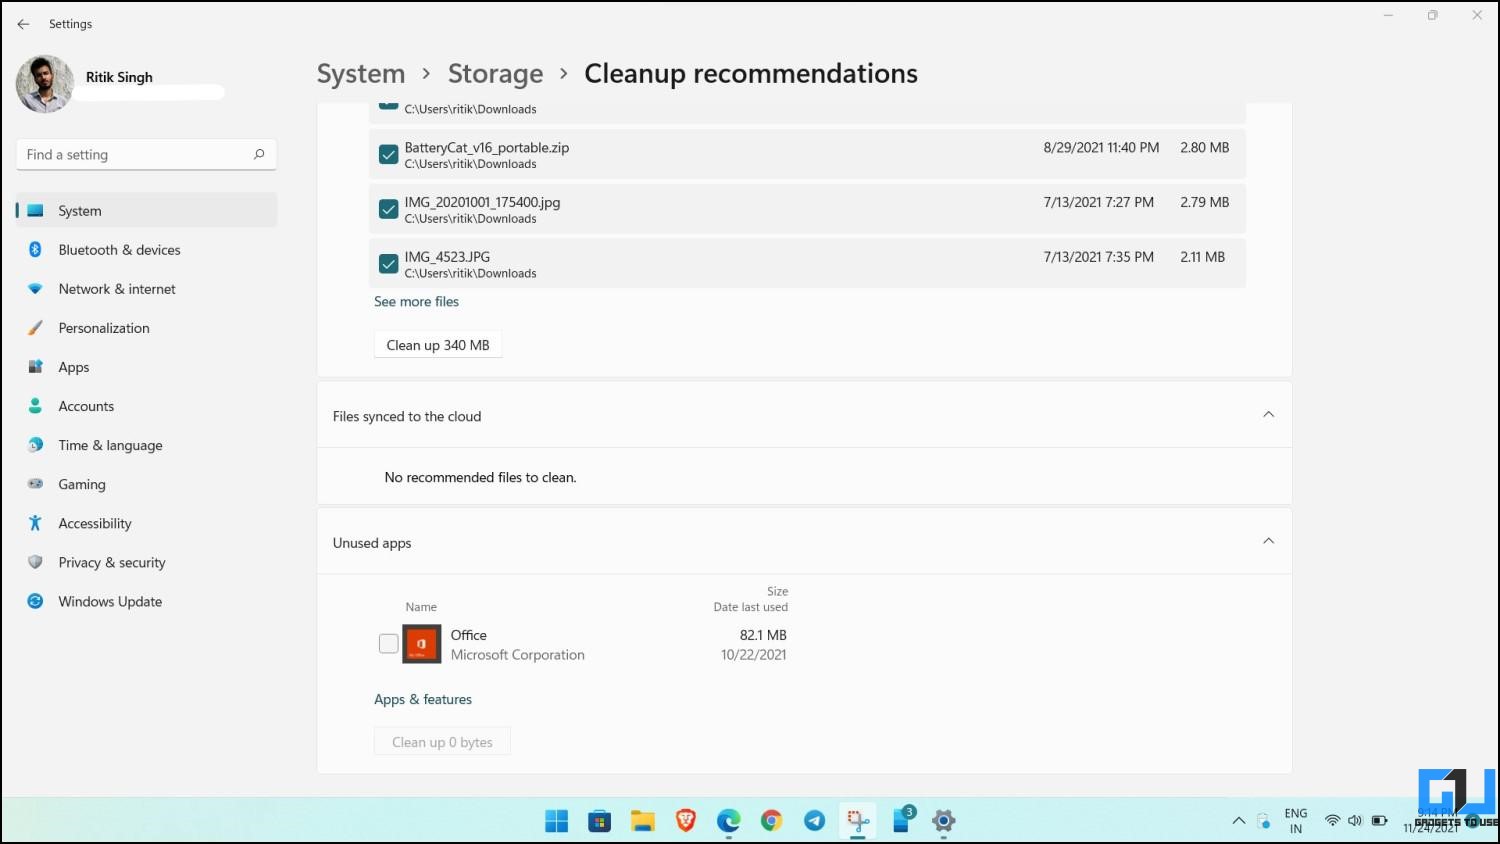
- Further, check and delete files synced to the cloud and unused apps on your PC.
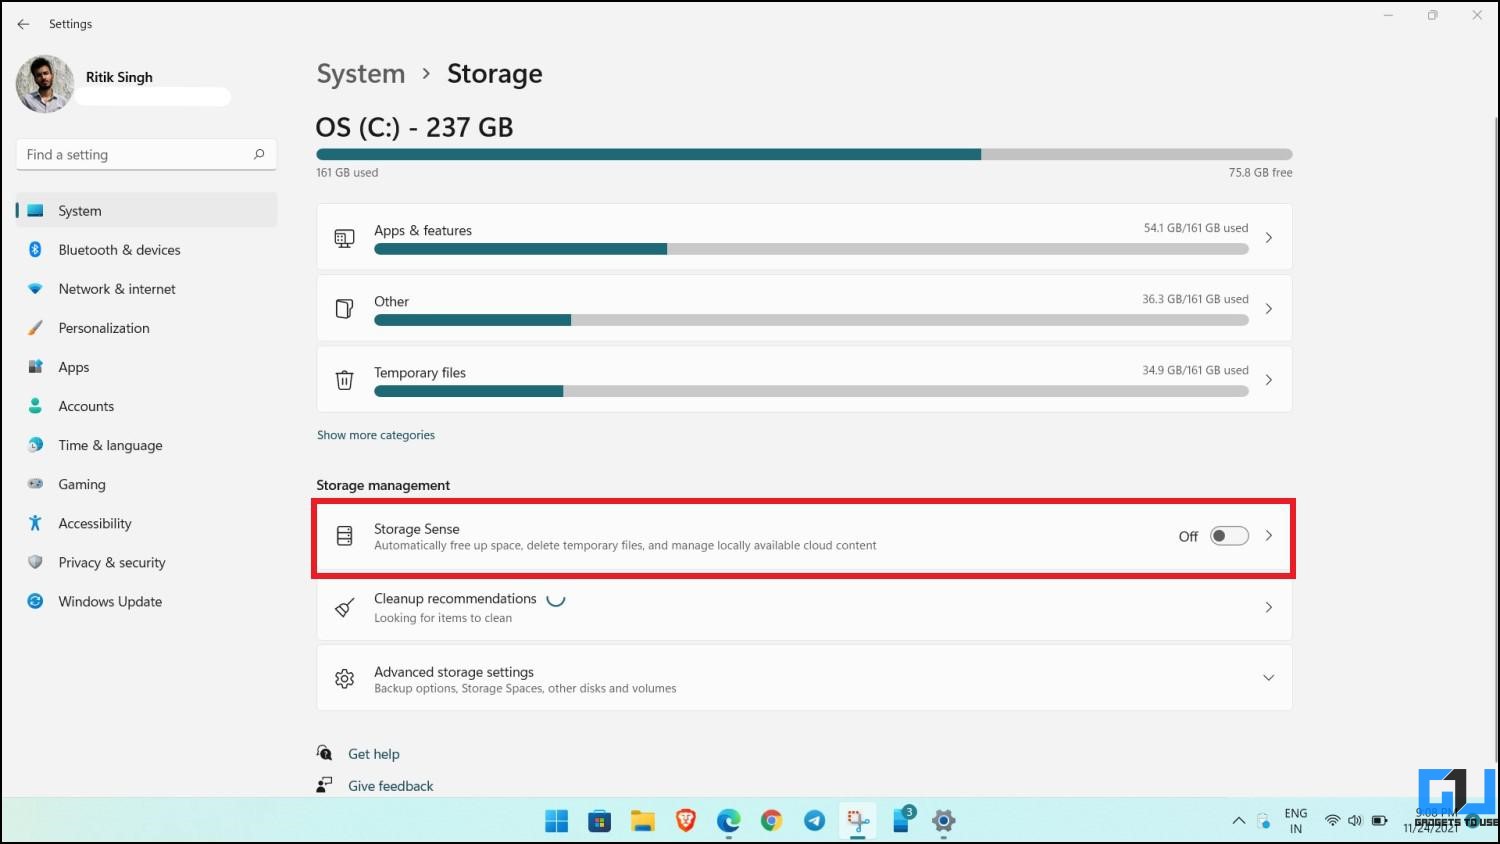
Method 2- Enable Automatic Cleanup & Storage Sense on Windows 11
Storage Sense is a modern cleanup utility that was first introduced on Windows 10. You can enable Storage Sense on Windows 11 to ensure automatic cleaning of the temporary system and app files whenever required.
- Open Settings on your Windows 11 PC.
- Select System from the sidebar at the left. Click on Storage.
- Now, tap Storage Sense.
- Check the box for Keep Windows running smoothly by automatically cleaning up temporary system and app files.
- Next, turn on the toggle for Storage Sense under Automatic User Content Cleanup.
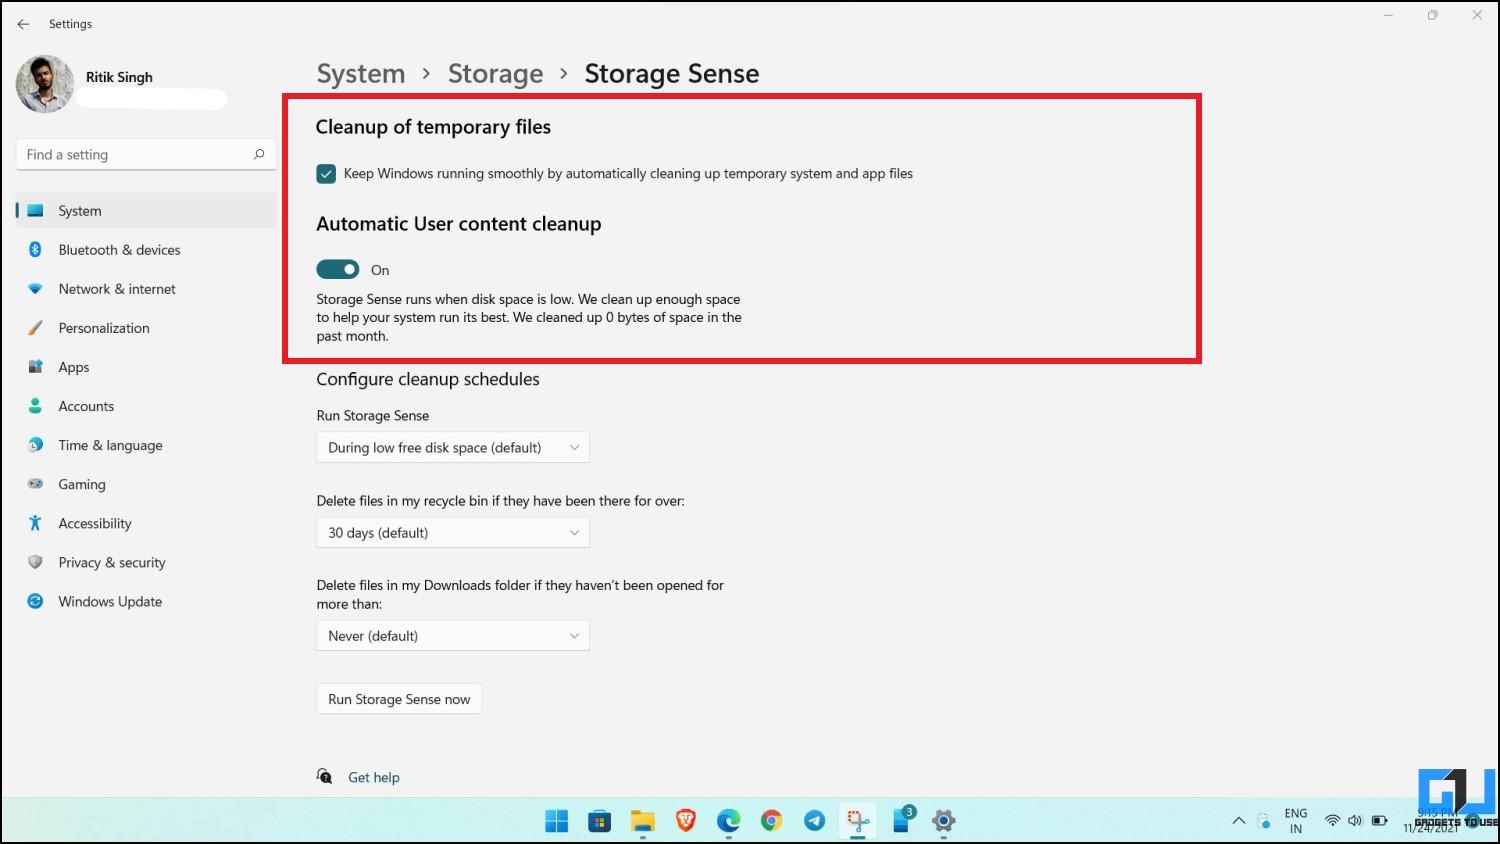
- Configure the cleanup schedule to run storage sense and delete files from recycle bin and downloads. Keep the latter to “Never” if you don’t want Windows to auto-delete the downloaded files.
- You can also tap Run Storage Sense now to free up disk space.
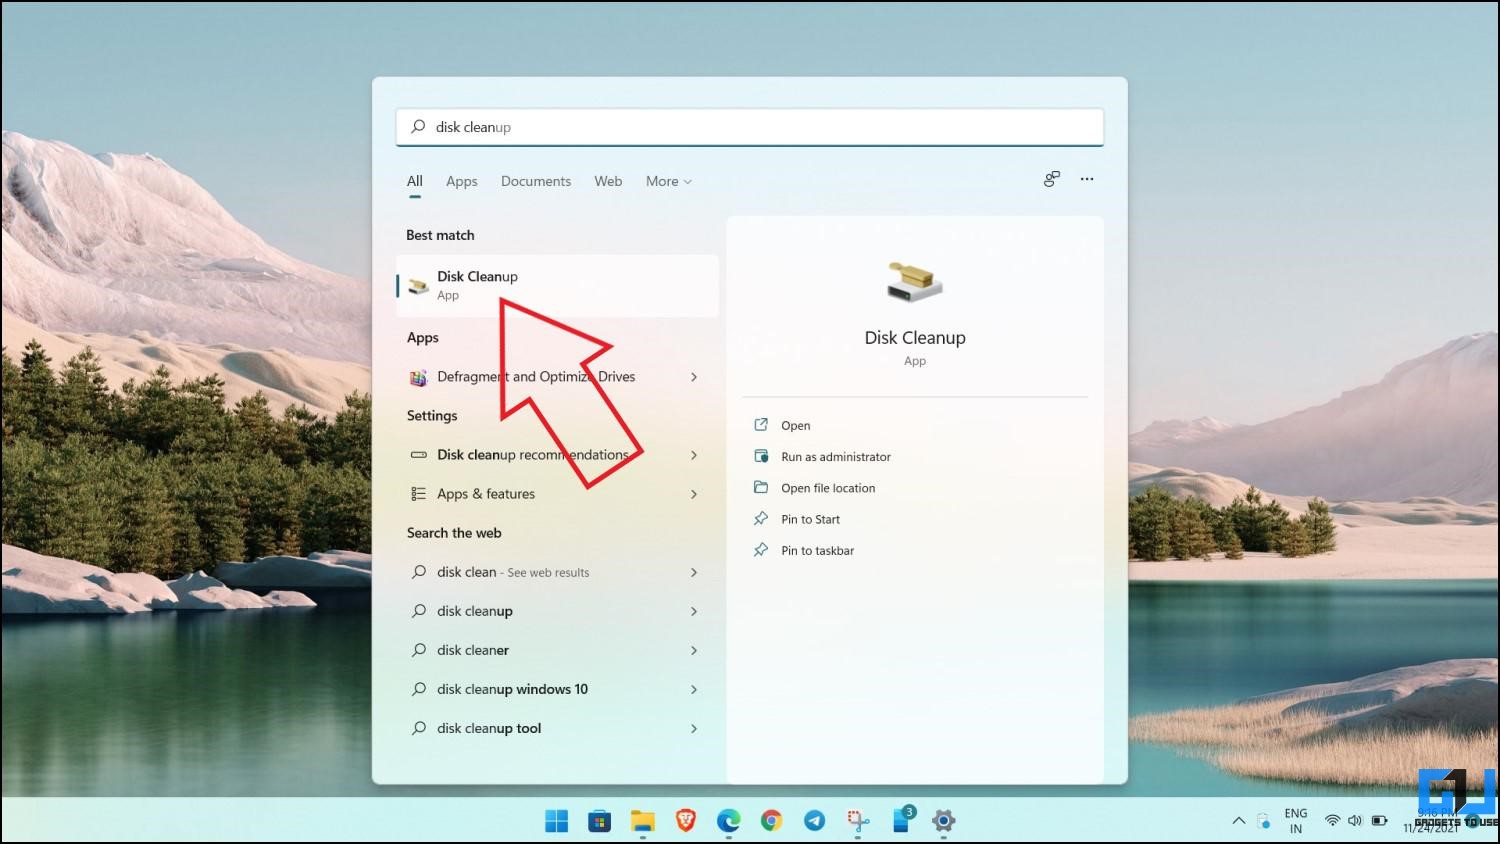
Method 3- Run the Windows Disk Cleanup Tool
All versions of Windows have a built-in Disk Cleanup tool that helps delete temporary and other unwanted files. This includes internet files, setup log files, delivery optimization files, cache, and more which consume a significant part of the storage. To use it:
- Open the Start menu on your Windows 11 PC and search for “Disk Cleanup.”
- Click on the Disk Cleanup app from the search results.
- Select the drive which you want to clean from the drop-down menu and tap OK.

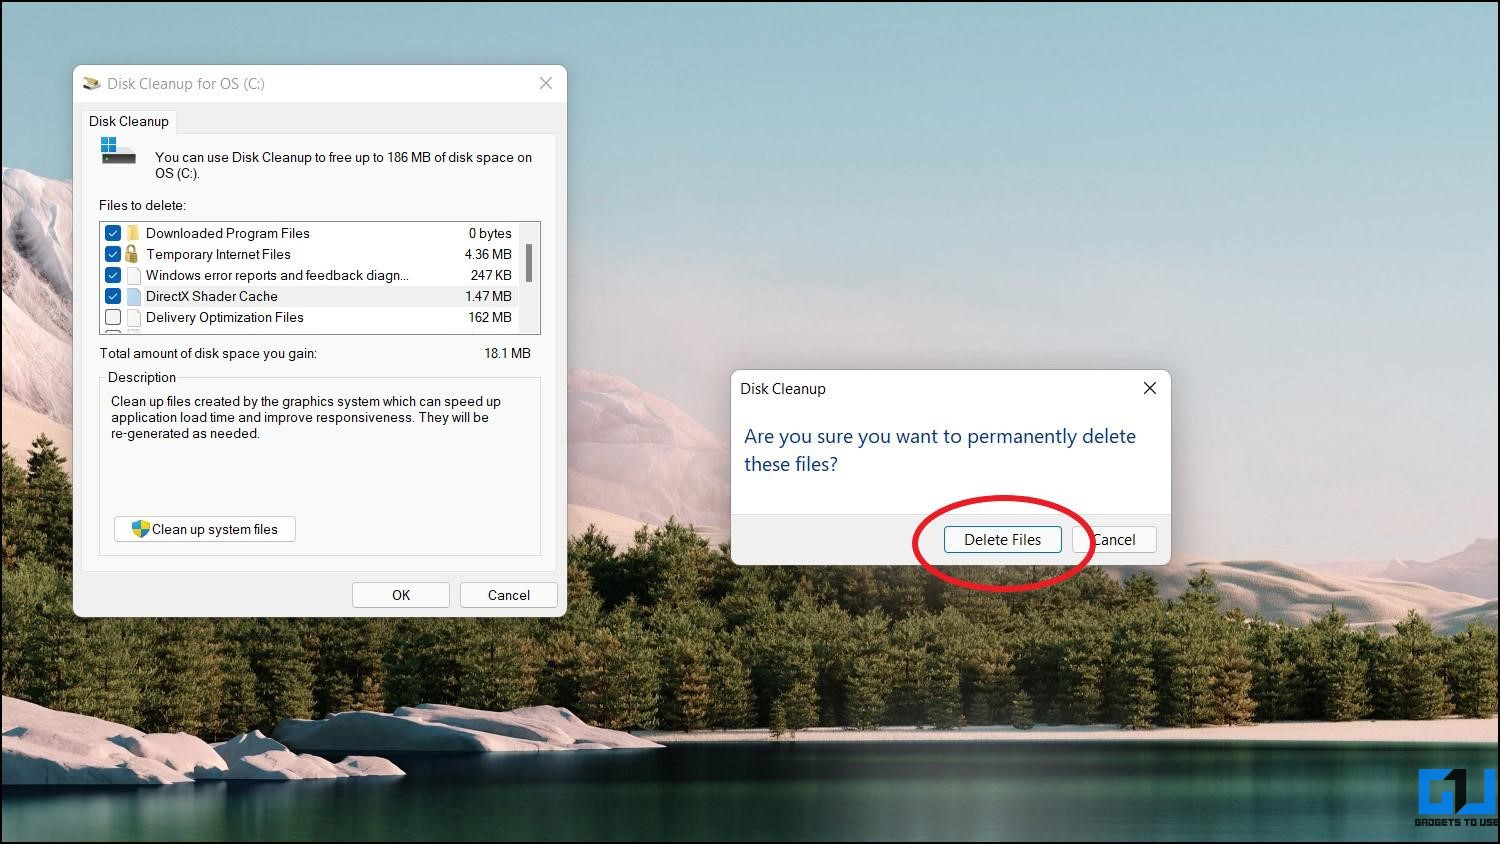
- Disk Cleanup will now show you files that can be removed.
- Select the files you want to delete. Then, click OK.
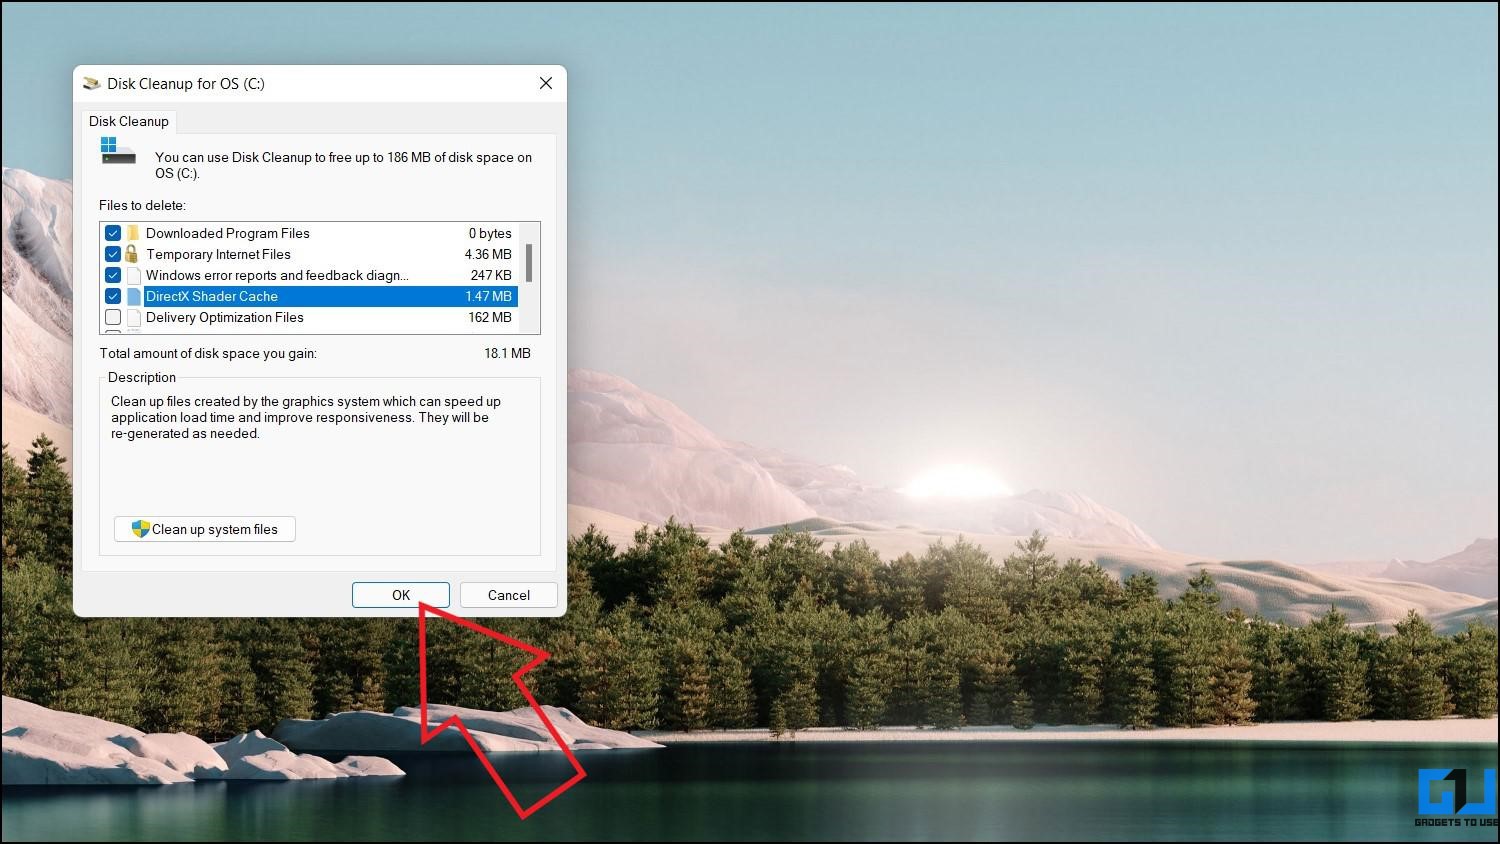
- Finally, click on Delete files to proceed.
- Furthermore, click Clean System Files.
- Then, select the drive again.
- Check and delete any files if required.
Method 4- Clean Up Temporary Files
The programs installed on your computer create temporary files every time you use them to perform a task. Usually, these files get deleted automatically. However, some may stay on your file system to consume unnecessary storage.
To clean temporary files on Windows 11, follow either of the three methods given below:
1. Delete Temporary Files in Windows 11 Settings
Noted in the first method, the Cleanup Recommendations allow you to clean temporary files on the computer, as shown below:
- Open Settings on your Windows 11 PC. You can do it either from the Start menu or by pressing Win + I on your keyboard.
- Select System from the sidebar at the left. Click on Storage.
- Here, click on Cleanup Recommendations.
- Click on Temporary Files to expand it.
- Select the files you want to delete and hit Clean up at the bottom.
2. Delete Temporary Files Using File Explorer
You can also view and delete temporary files right from the file explorer using the steps below.
- Launch Run by pressing Win + R.
- Once the window opens, type and enter %temp%.
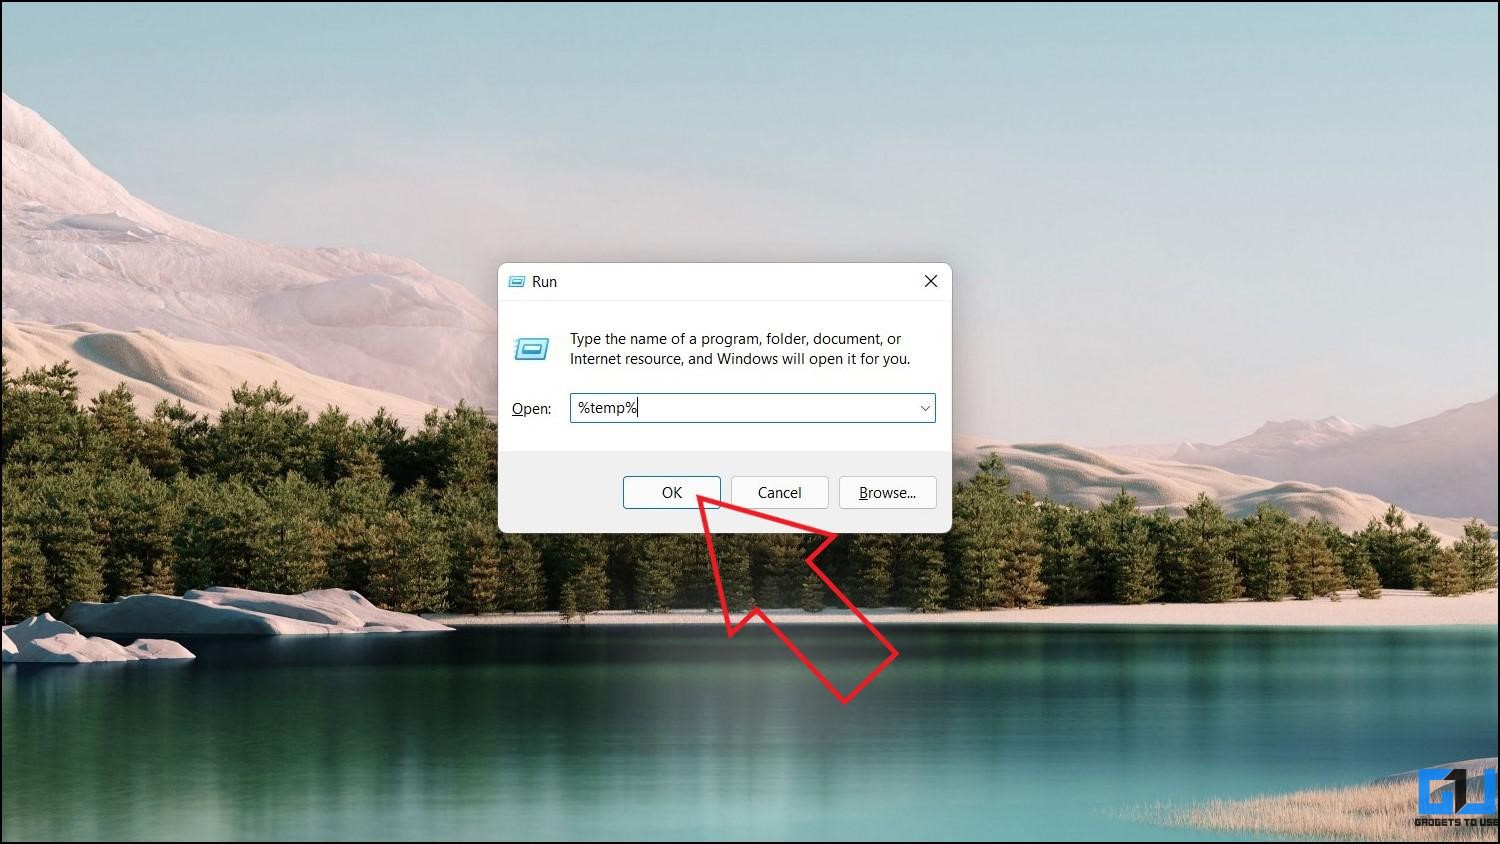
- It will take you to the folder containing all the temporary files on your Windows machine.
- Press CTRL + A to select all the files. Then, hit Delete.
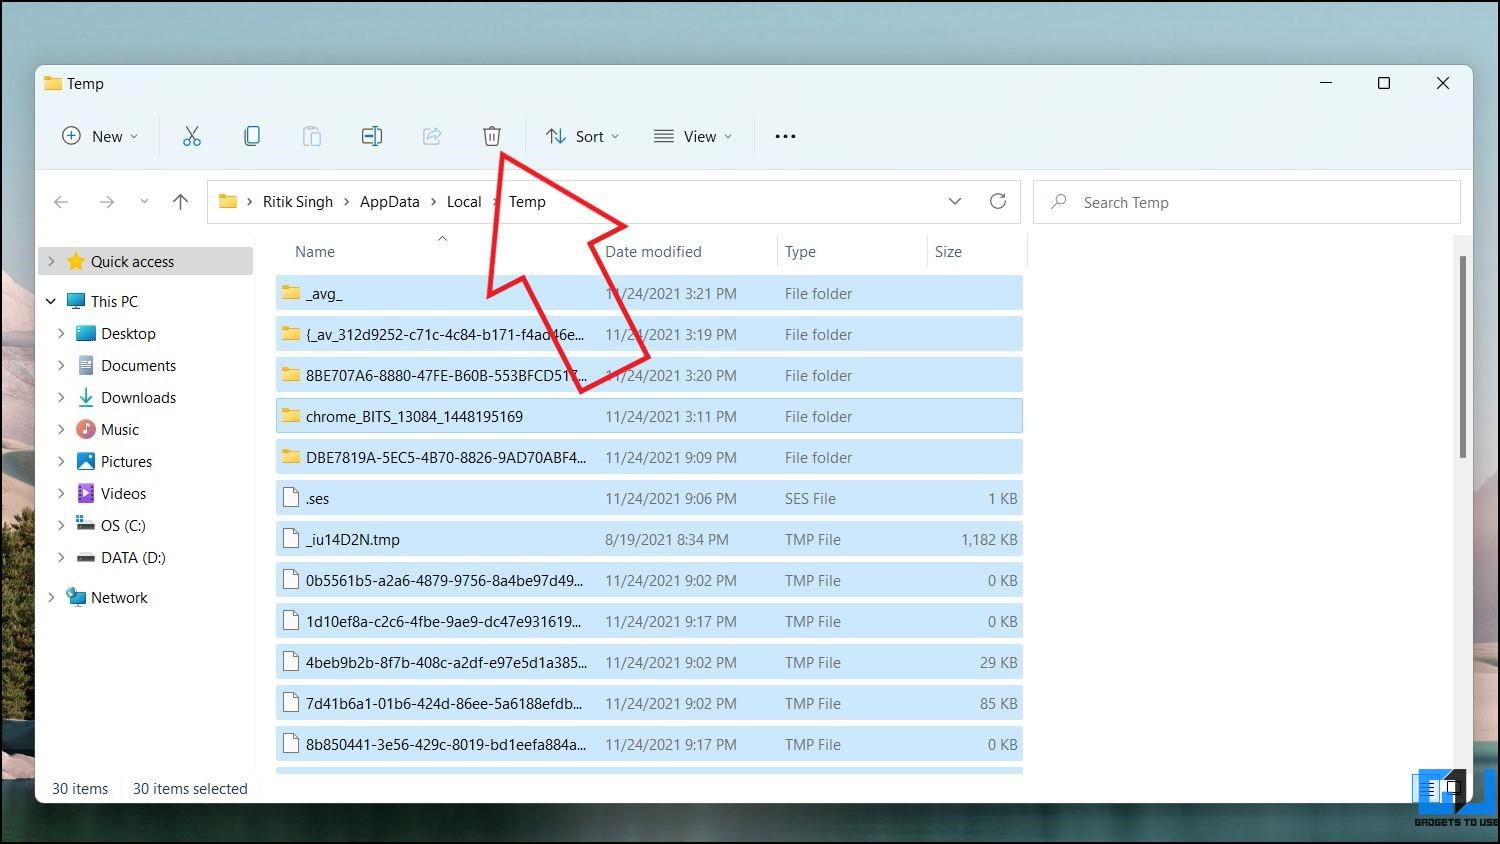
- Confirm the prompt if asked to grant administrator permission.
3. Delete Temporary Files Using Command Prompt
Lastly, Command Prompt offers a handy way to clear the temporary clutter. Below is how you can use it:
- Open the Start menu and search for cmd.
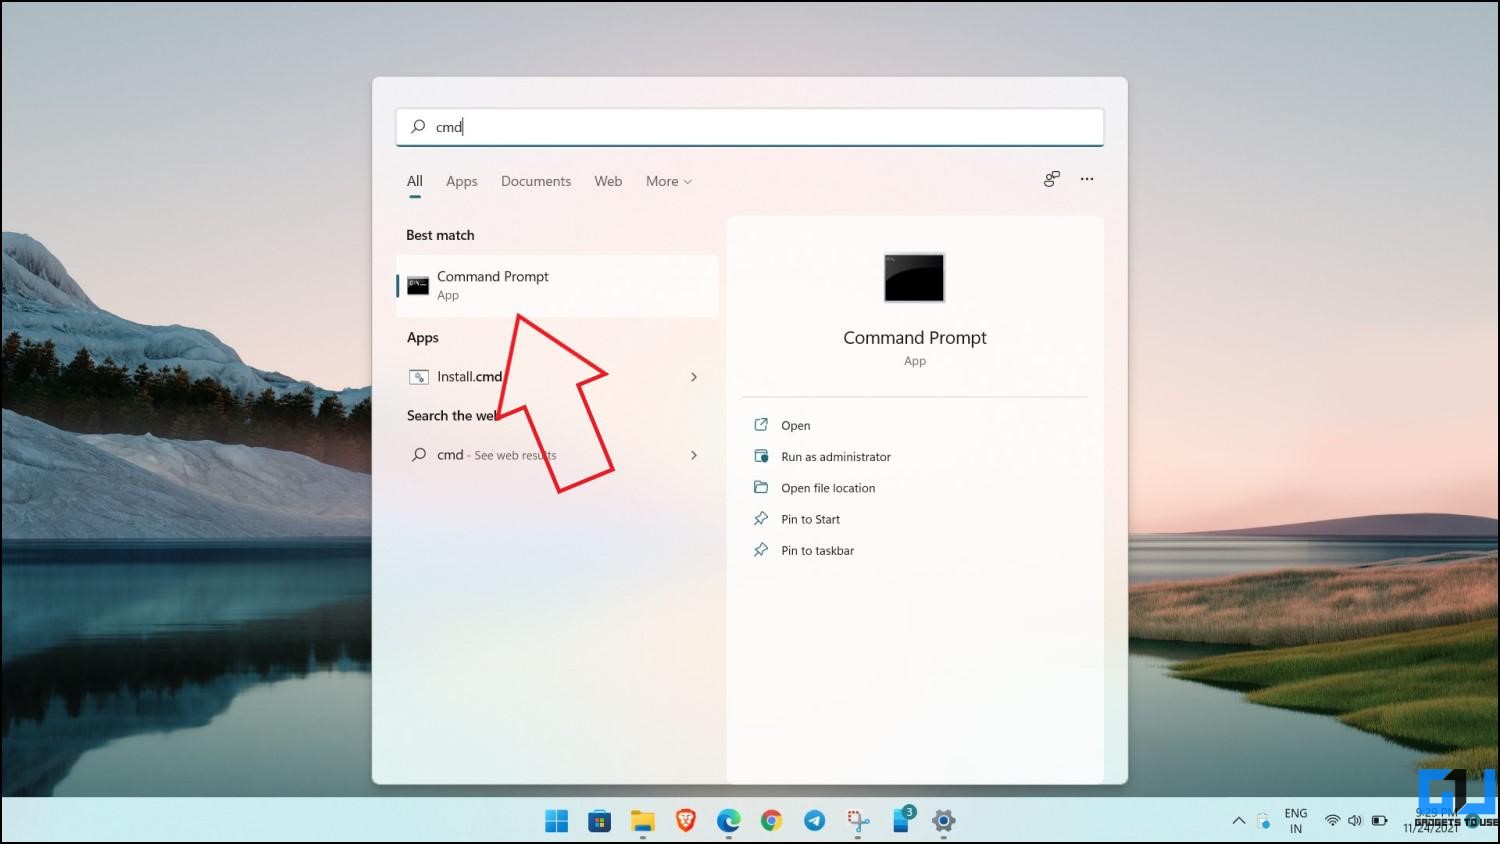
- Right-click on Command Prompt and select Run as administrator.

- Click on Yes when prompted to grant the permission.
- In the command prompt window, type del /q/f/s %TEMP%\* and press Enter.
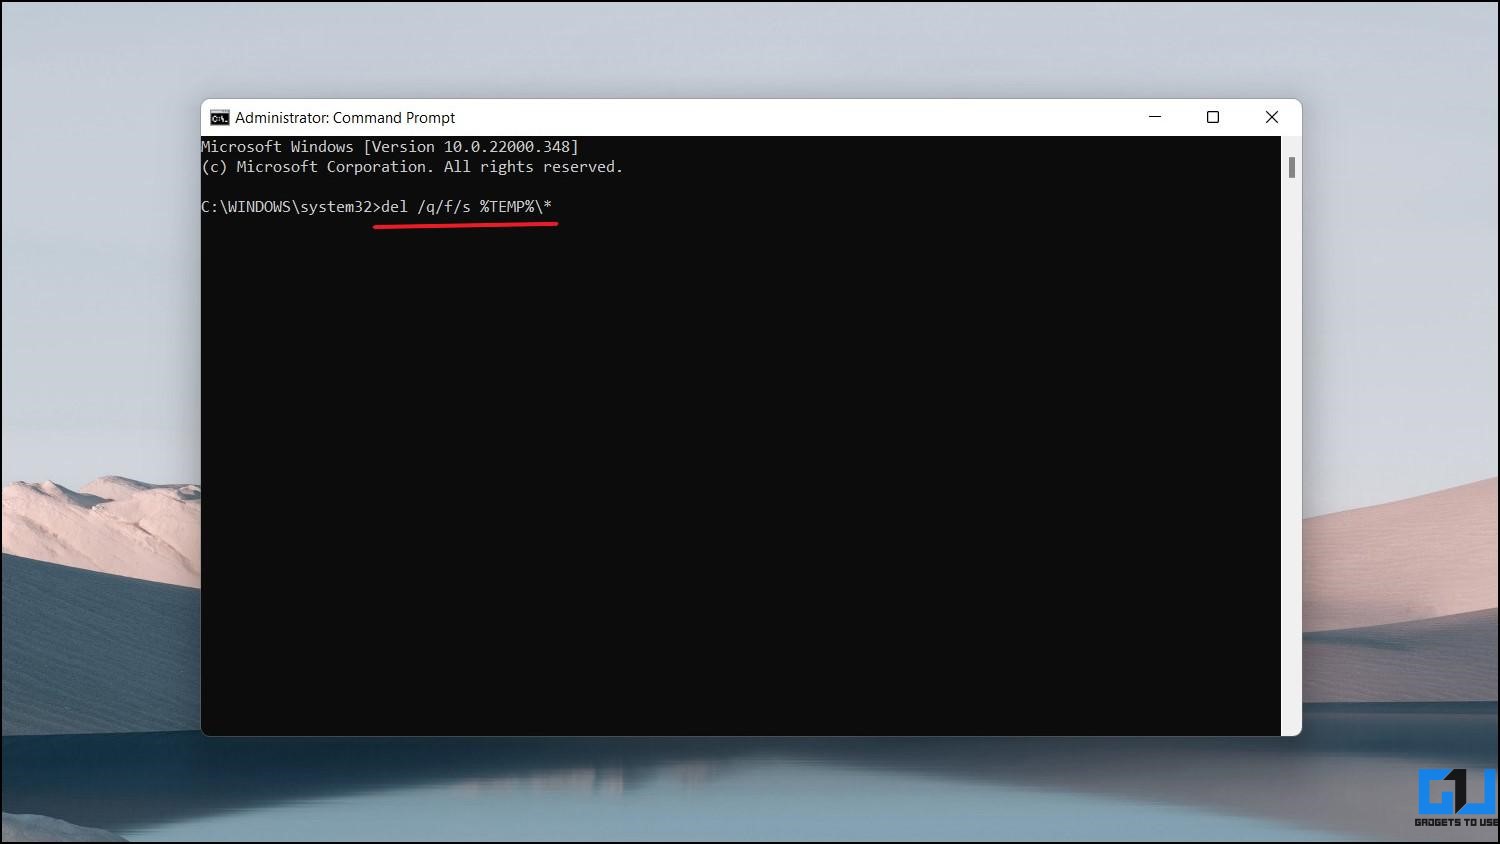
- That’s it; it will now delete the temporary files on your Windows 11 PC.
Method 5- Third-Party Windows Cleanup Tools like CCleaner
Several third-party tools allow cleaning temporary junk files, software leftovers, and other unwanted files from their Windows machines. CCleaner is one such popular software that helps you fine-tune and optimize your PC.
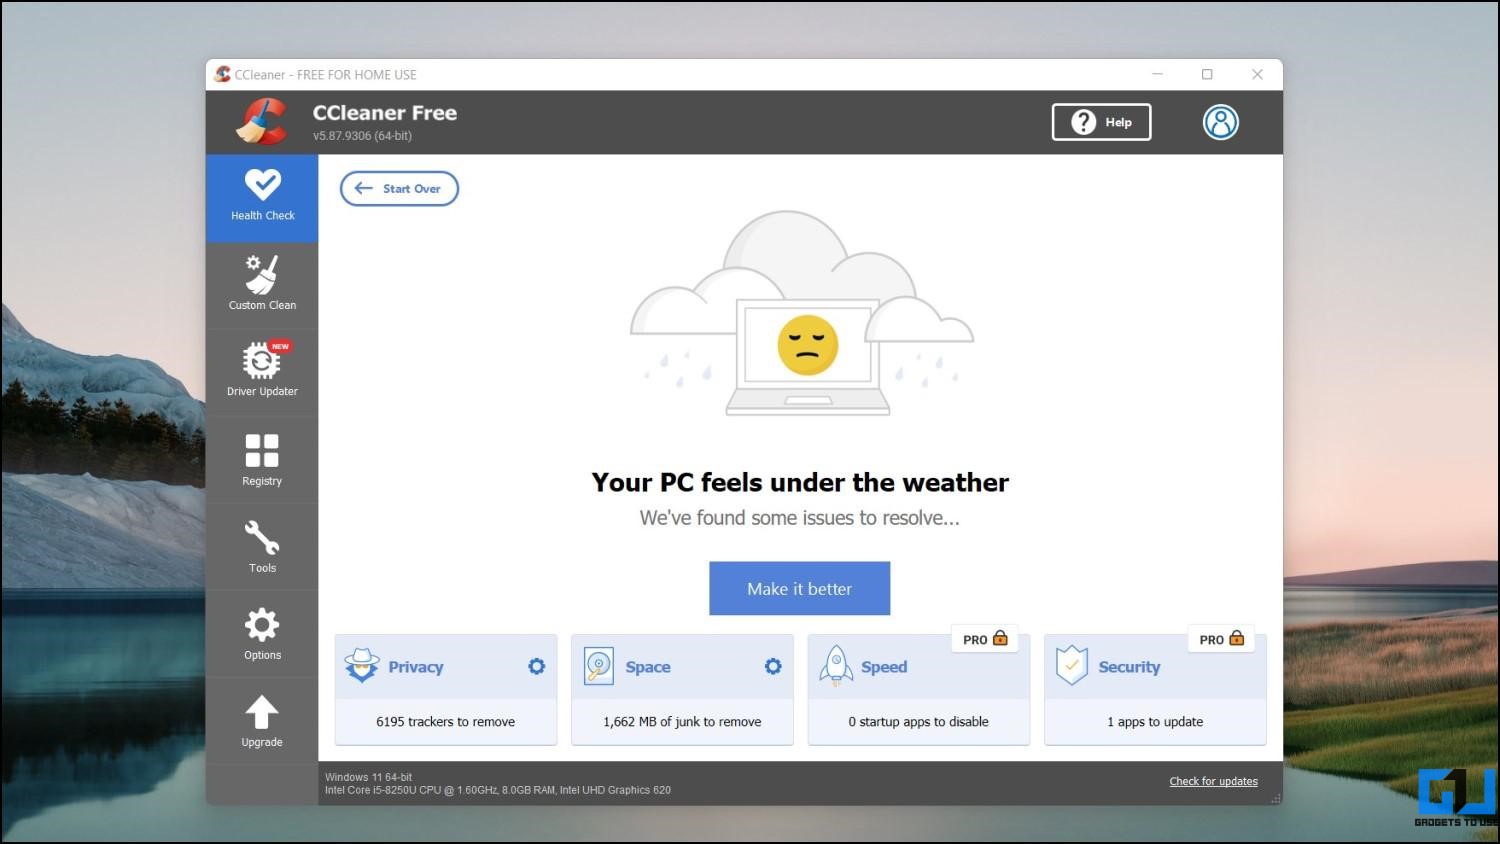
All you need to do is install the free version of CCleaner, run a scan, and delete the junk files. The free version should be enough for most users. However, for in-depth cleaning, you can try the free trial of the professional version.
You can also use other alternatives like Wise Disk Cleaner, IObit Advanced SystemCare, AVG PC TuneUp, and more.
Other Tips to Clean Space on Windows 11
- Empty the Recycle Bin: Right-click the recycle bin icon and tap Empty Recycle Bin.
- Delete Old Windows Backups: Open File Explorer and head to the drive where the OS is installed. Find the “Windows.old” folder and delete it to remove backups from old Windows.
- Uninstall the Unused Applications: Go to Settings > Apps > Apps and features and remove the apps you don’t need.
- Clear the Browser Data and Cache: Follow the steps given in our guide to clear the cache on Windows PC.
Related | 7 Ways to Make Windows 11 Faster and Improve Performance
Wrapping Up
These were some quick and easy methods to clean junk files on Windows 11. I hope this helps you delete unwanted cache and temporary files from your computer with ease. The built-in Cleanup recommendations and Storage Sense would be enough for most users, but those who want to save every bit of space can move on to other methods. Feel free to reach out for any doubts or queries.
You can also follow us for instant tech news at Google News or for tips and tricks, smartphones & gadgets reviews, join GadgetsToUse Telegram Group or for the latest review videos subscribe GadgetsToUse Youtube Channel.