Quick Answer
- Another official effective workaround from Microsoft to fix the File Explorer issue in your Windows 11 system is to delete a registry key related to Irisservice and force restart the entire process.
- The first effective step in fixing this issue is to manually terminate the File Explorer process and restart it again to restore its normal functioning.
- Windows Powershell is another effective utility tool that can help you to fix the File Explorer issue in Windows 11.
If you are a Windows 11 user, you must have often faced crashes or freezes while using the File Explorer app. This is one of the most common problems faced by Windows users. In this article, we will address this issue and walk you through the top 7 ways to fix it in Windows 11. Meanwhile, you can also check out how to fix Snipping Tool not working in Windows 11.
Also, Read | Top 5 Ways to Clean Junk Files on Windows 11 PC
Ways to Fix File Explorer Not Responding in Windows 11
Terminate the File Explorer Manually and Restart it
The first effective step in fixing this issue is to manually terminate the File Explorer process and restart it again to restore its normal functioning. Follow these quick steps to do the same.
- Press the Windows key, search for the Task Manager app and Run it as an administrator.
- Under the Process tab, scroll down to locate Windows Explorer process. Select this process and click on the Restart button at the bottom to restart this service.
- That’s it. You’ve successfully restarted the Windows explorer to fix it.
Remove File Explorer History and Temporary Files
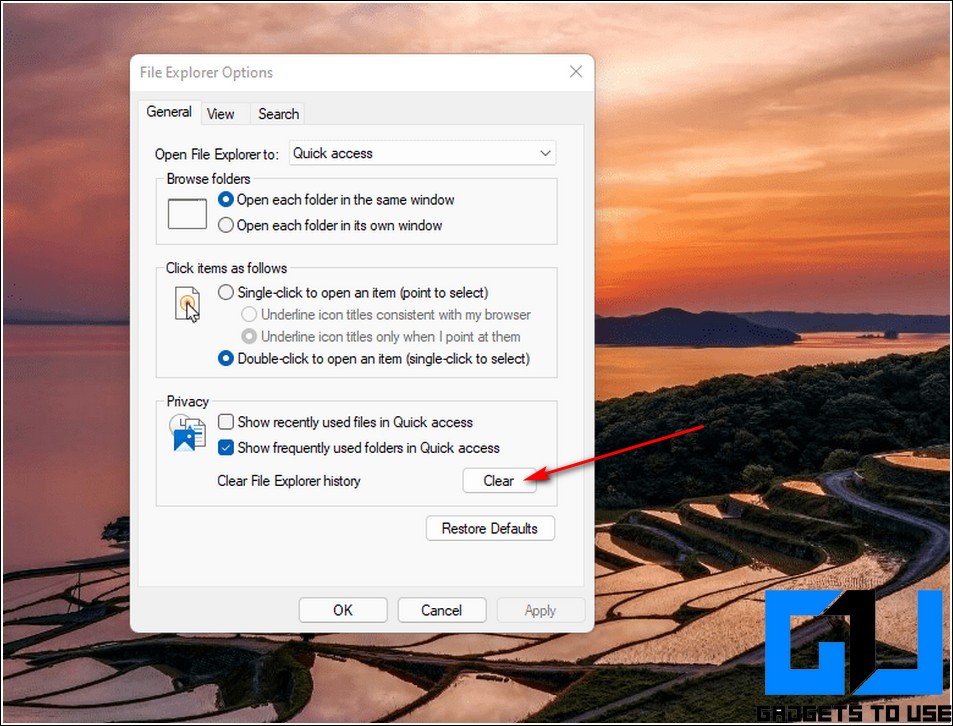
Sometimes, the installation of certain apps and third-party software changes the default configuration or behavior of the Windows Explorer app. This can lead to the malfunctioning of Windows Explorer. A similar situation can also originate in Windows 11 due to the excessive accumulation of caches and temporary files. To fix this issue, you need to manually remove such caches and temporary files from the File Explorer. Follow these steps for an easy fix.
- Press the Windows key and search for the File Explorer Options to open it.
- Under the Privacy tab, click on the Clear button in front of the Clear File Explorer history option.
- Click on the Ok button to finalize changes in Windows 11.
- Congrats. You’ve successfully removed temporary files from the File Explorer app.
Use System File Checker to Check for Corruption
If you are often facing issues with the File Explorer app, it is possible that the app present in your system has been corrupted. Luckily, Windows 11 comes with a bunch of pre-installed utility tools to fix such scenarios. One such tool is System File Checker which diagnoses the system and restores the corrupted files to their working state. Follow these easy steps to run this utility tool to fix the File Explorer in Windows 11.
- Press the Windows key, search for the Command Prompt app and click on Run as Administrator.
- Inside the CMD window, type ‘ sfc /scannow ‘ and hit the enter button.
- This process shall scan the entire Windows for corrupt files and fixes them automatically.
- You need to wait for a few minutes for this process to complete and then restart your Windows 11 system.
Use Command Prompt to fix File Explorer Crash
Another official effective workaround from Microsoft to fix the File Explorer issue in your Windows 11 system is to delete a registry key related to Irisservice and force restart the entire process. You can perform this task easily with the help of the command prompt application to fix the ongoing issues with your File Explorer app. Follow these steps for an easy fix.
- Press the Windows key, search for the Command Prompt app and click on Run as Administrator.
- Inside the CMD window, copy this command and hit enter.
reg delete HKCU\SOFTWARE\Microsoft\Windows\CurrentVersion\IrisService /f && shutdown -r -t 0
- After the execution of this command, your Windows 11 system shall restart and your File Explorer issues must have been fixed.
Repair your System using Windows Powershell
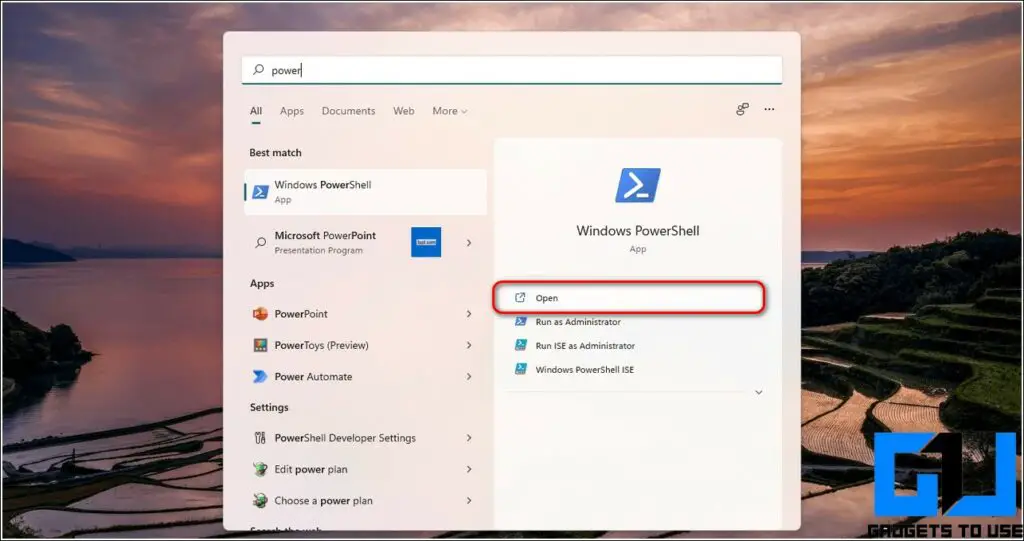
Windows Powershell is another effective utility tool that can help you to fix the File Explorer issue in Windows 11. Follow these steps to do the same.
- Press the Windows key and search for the Powershell app to open it.
- In the Powershell window, type the following command.
Repair -WindowsImage -Online -RestoreHealth
- Press the enter key to execute the command and wait for a few minutes to get it completed.
- Restart your system to fix the issue.
- That’s it. You’ve successfully fixed the File Explorer issue in Windows 11.
Restart Your System
If you are still facing issues after trying all the above fixes, then you need to give a restart to your system to fix the File Explorer in Windows 11. Follow these quick steps for an easy fix.
- Press the Windows key button and click on the Power button in the bottom right corner of the screen.
- Click on the Restart button to restart your Windows 11 system.
Bonus Tip: Check Windows 11 for Updates
If you are facing File Explorer issues on your Windows 11 system, then it might be due to the presence of an existing bug. Microsoft releases time to time update for Windows 11 systems to address and fix any reported or existing bugs. Follow these easy steps to check for any new updates for your system and install it.
- Press the Windows key and search for the Settings app to open it.
- In the left sidebar, scroll down to locate Windows Update and click on it.
- Click on the Check for Updates button to allow the system to check for online updates.
- Click on the Download button to download and install the available updates for your Windows 11 system.
Wrapping Up
We hope that you’ve now successfully learned to fix the File Explorer issue in your Windows 11 system. If this troubleshooting guide has helped you to fix your problem, then hit the Like button and share this article among your friends to assist them with these common issues. As always, stay tuned for more troubleshooting guides.
You can also follow us for instant tech news at Google News or for tips and tricks, smartphones & gadgets reviews, join GadgetsToUse Telegram Group, or for the latest review videos subscribe GadgetsToUse Youtube Channel.


