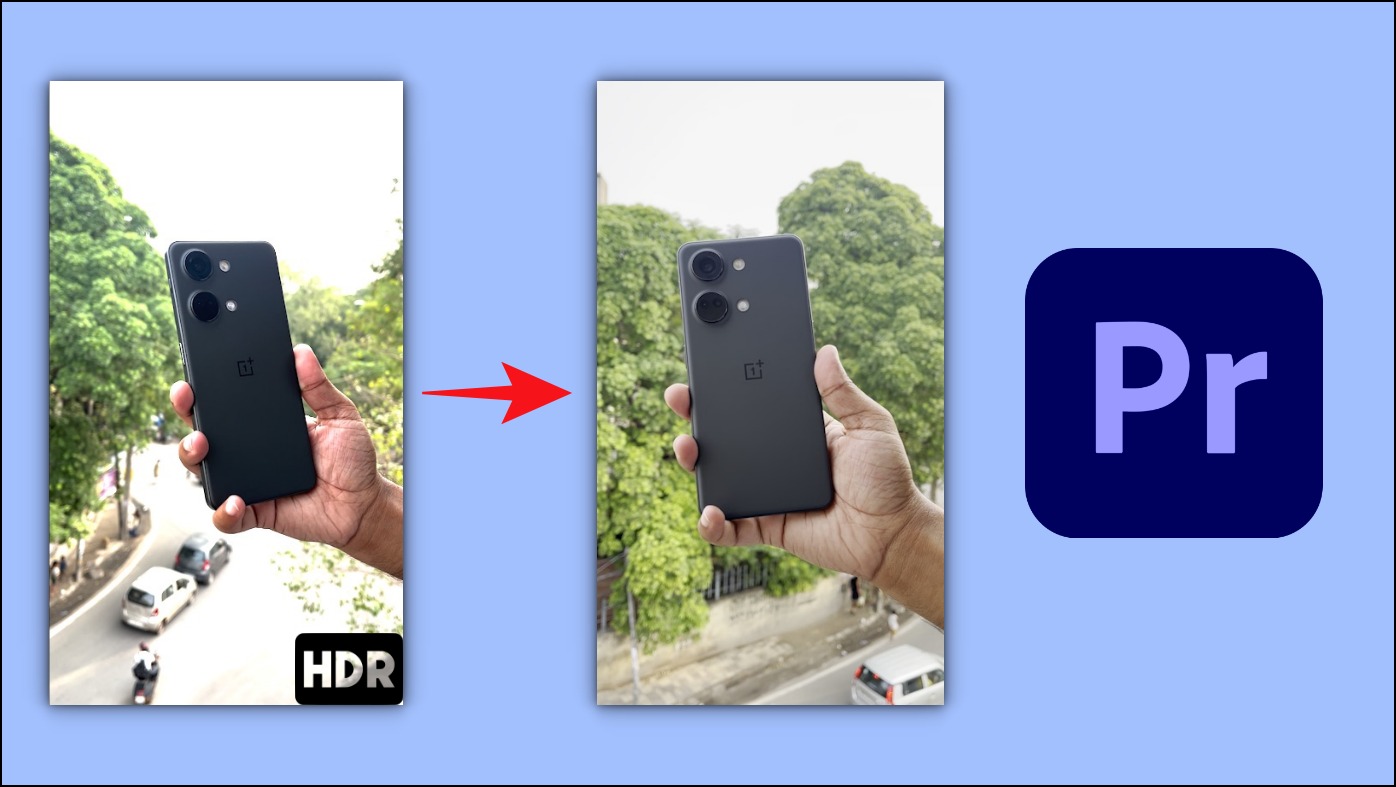
When editing videos recorded from iPhone in Premiere Pro, the footage may appear overexposed or blown out during editing or after exporting. The color will completely differ from the original file, and the video may look extra bright and saturated. Do not worry; with simple workarounds, you still edit the video in its original exposure and color settings in Premiere Pro. Here’s how to fix iPhone video footage appearing overexposed in Adobe Premiere Pro.
How to Fix iPhone Footage Overexposed/ Blown Out in Premiere Pro
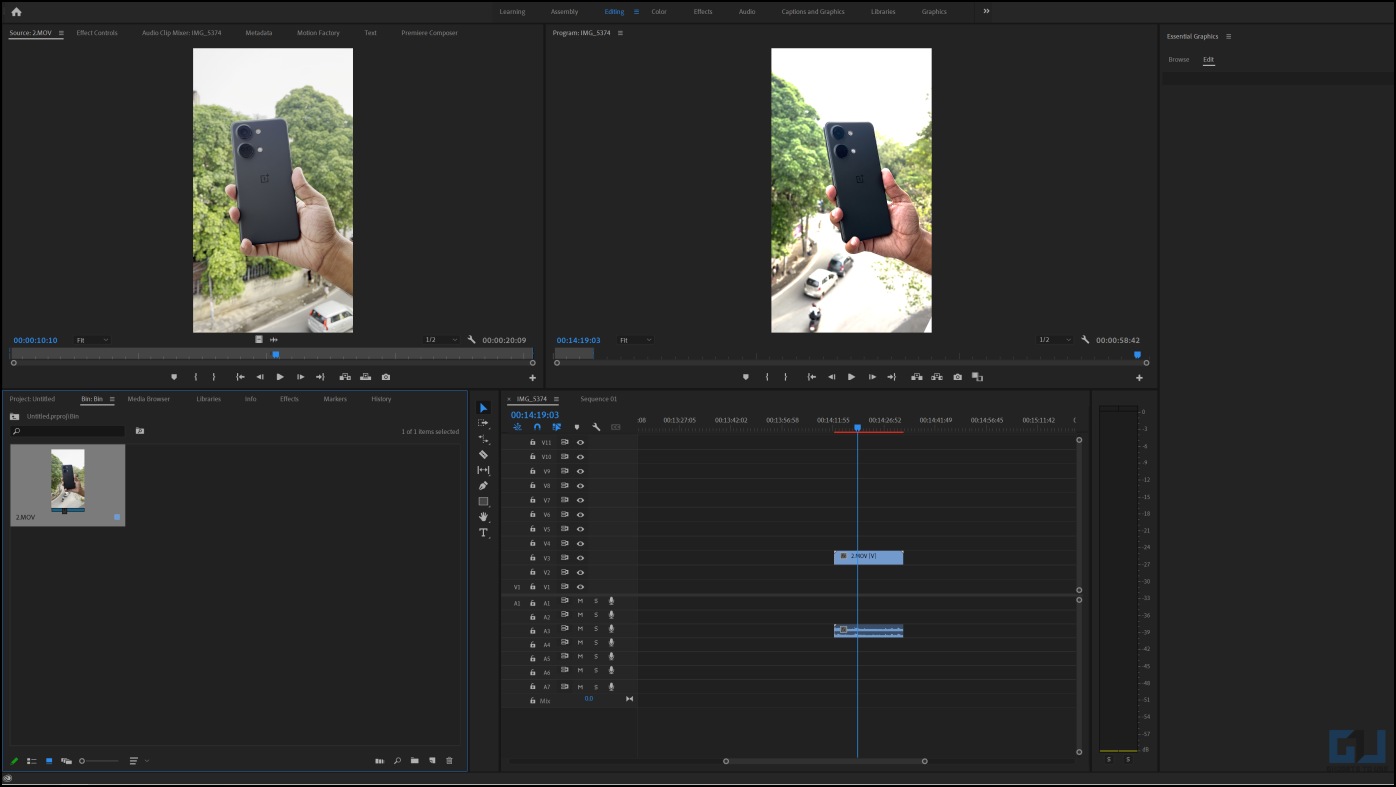
Many influencers and creators use iPhones to record vlogs and videos to edit them on Premiere Pro. However, many have recently faced overexposure issues when importing these videos into the editing software.
This generally happens with newer models (iPhones 12, iPhone 13, and iPhone 14-series) due to HDR video. Premiere Pro cannot handle the high dynamic range color space, causing issues when adding iPhone footage directly into the software.
As a result, you end up with footage that looks great on your iPhone but is completely overexposed or blown out when brought to the editing table. Before we start with the solutions, check the major reasons you may face issues with these videos on Premiere Pro.
Why Does Premiere Pro Over-Expose iPhone Footage?
- Premiere Pro is having issues with iPhone’s HEVC (H.265) codec.
- Premiere Pro is not working properly with iPhone MOV videos.
- The video was recorded in High-Efficiency Mode.
- HDR Video was enabled in the iPhone camera settings.
Method 1- Change How Premiere Pro Interprets the Footage
HDR Videos recorded on iPhones generally use the Rec 2100 HLG color space, which causes exposure and color interpretation problems in Premiere Pro. The easiest way to fix it without re-recording the video is to change how Premiere Pro interprets the footage, as shown below:
1. Open Premiere Pro on your computer and import the footage.
2. Select all the videos recorded on iPhone in the project window.
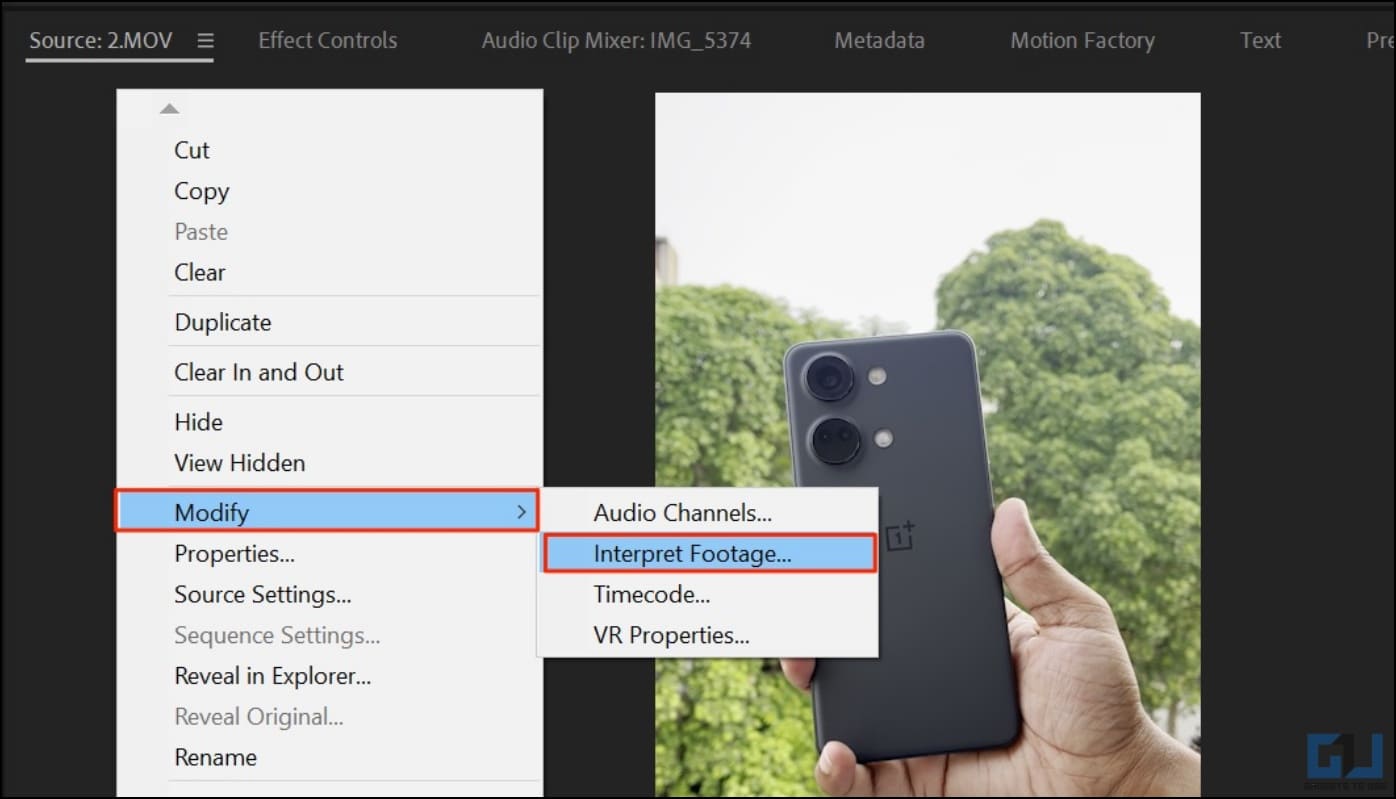
3. Control-click (or right-click) the files and select Modify > Interpret Footage.
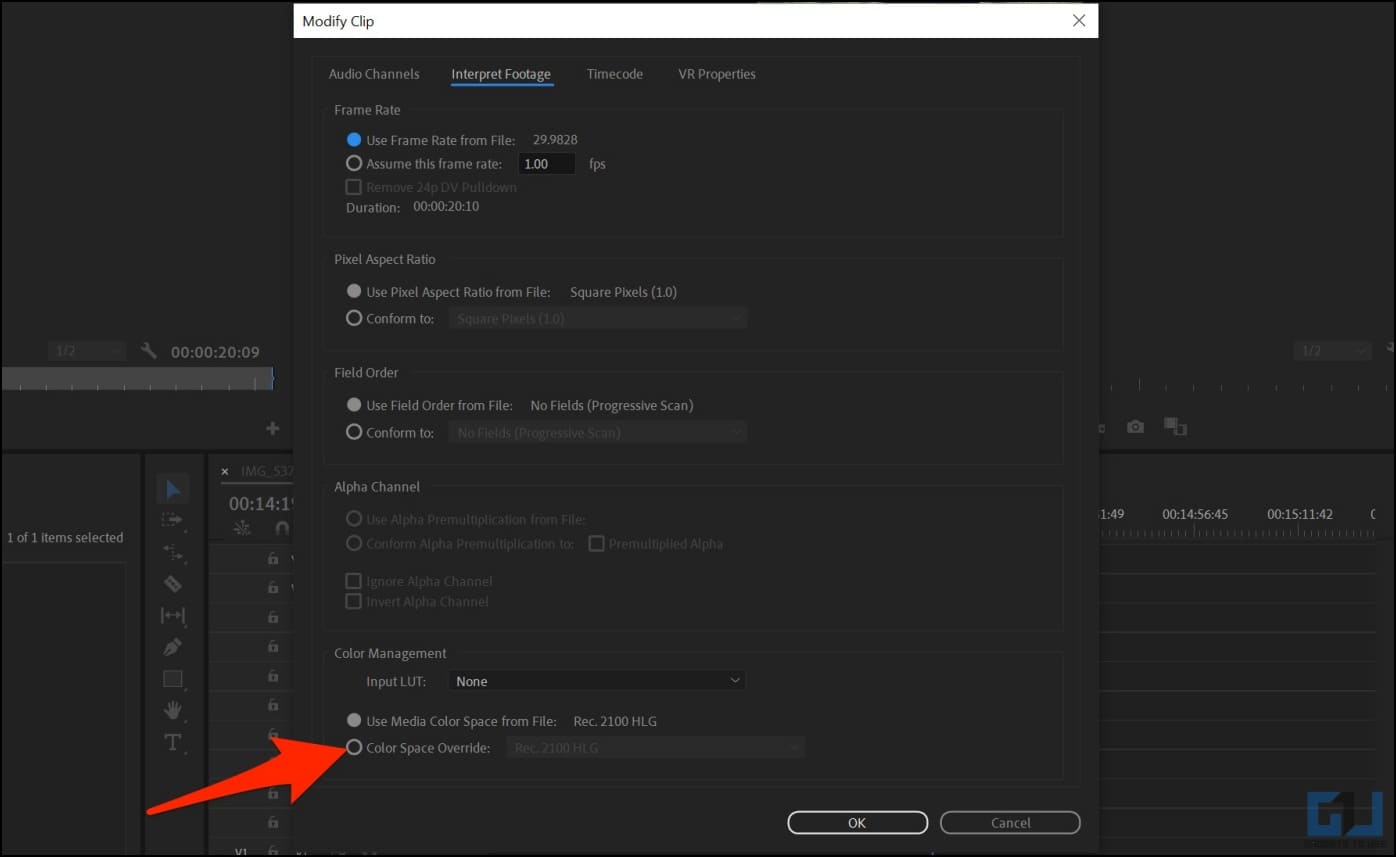
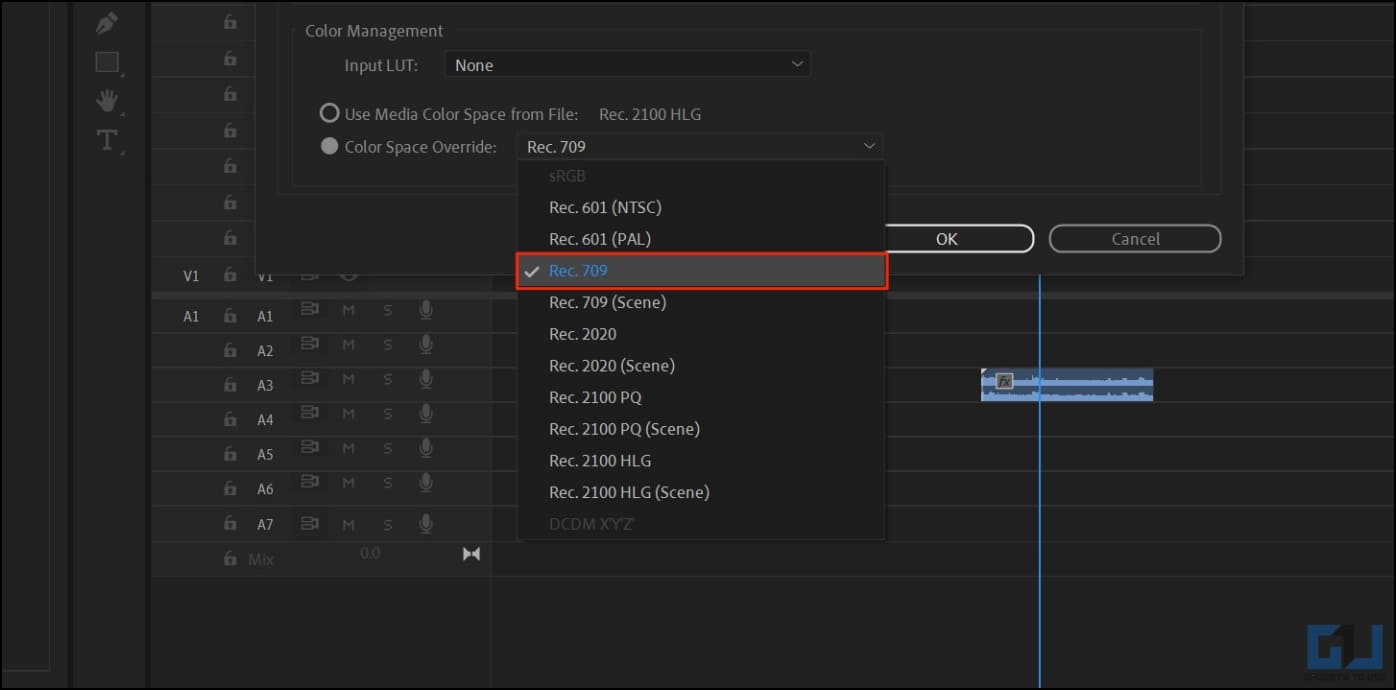
4. Once the Modify clip window opens, select Color Space Override at the bottom.
5. Click the drop-down menu next to it and choose Rec. 2020.
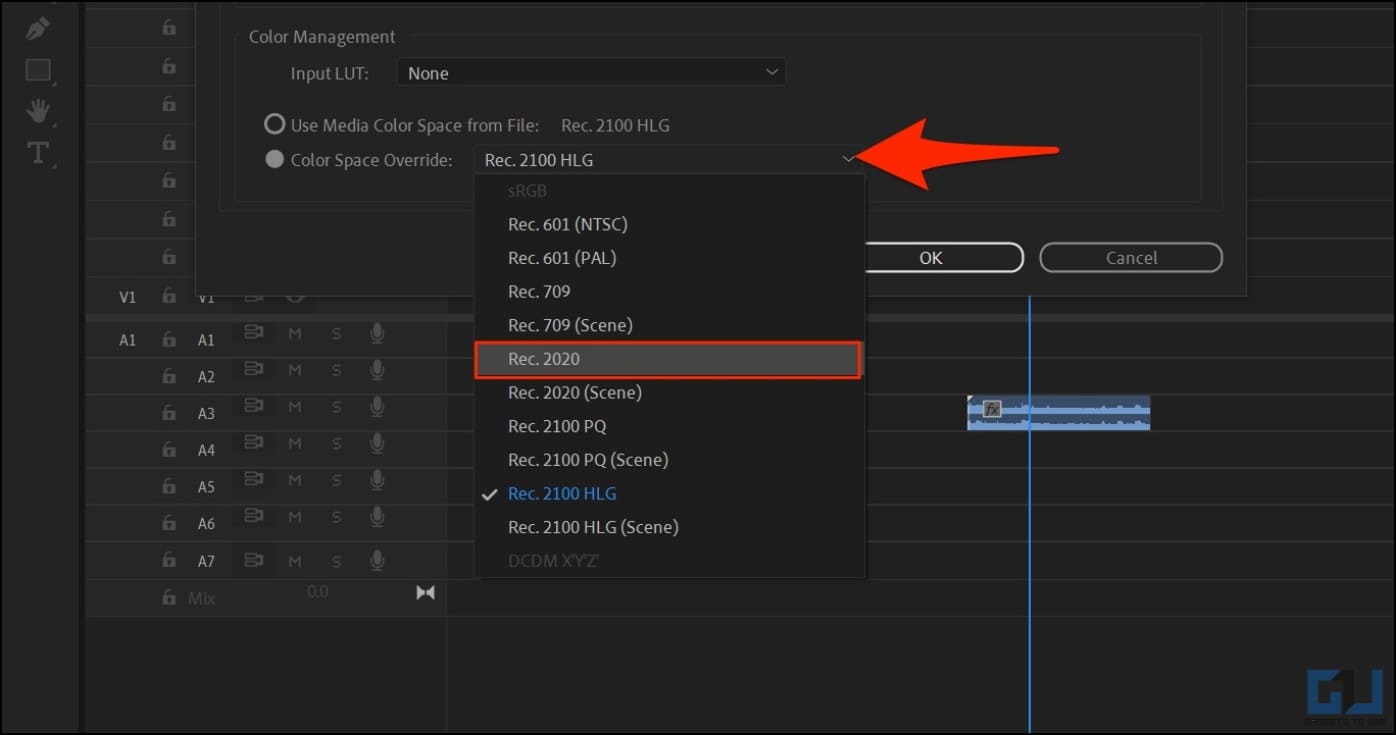
If it does not work properly or the footage still appears overblown, change the color space to Rec. 709.
Method 2- Fix Blown Out iPhone HLG Video with Auto Tone Mapping
The 2023 Premiere Pro comes with automatic tone matching for HDR media. Once enabled, it makes it easy to work with different types of footage and color spaces in the same sequence, including iPhone HLG. Here’s how to enable it:
1. Click on Sequence in Menubar and select Sequence Settings.
2. In the Sequence Settings window, check the box for Auto Tone Map Media.
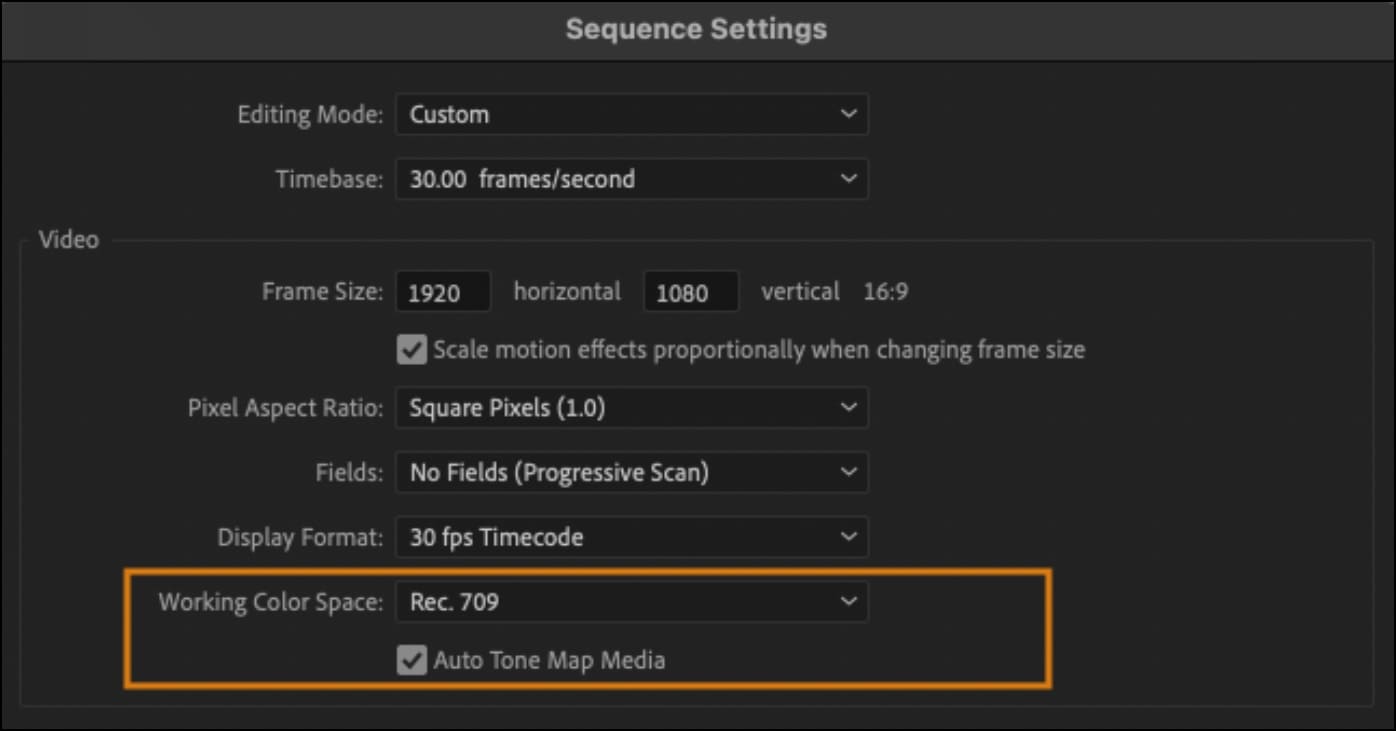
3. Click on OK and check the footage.
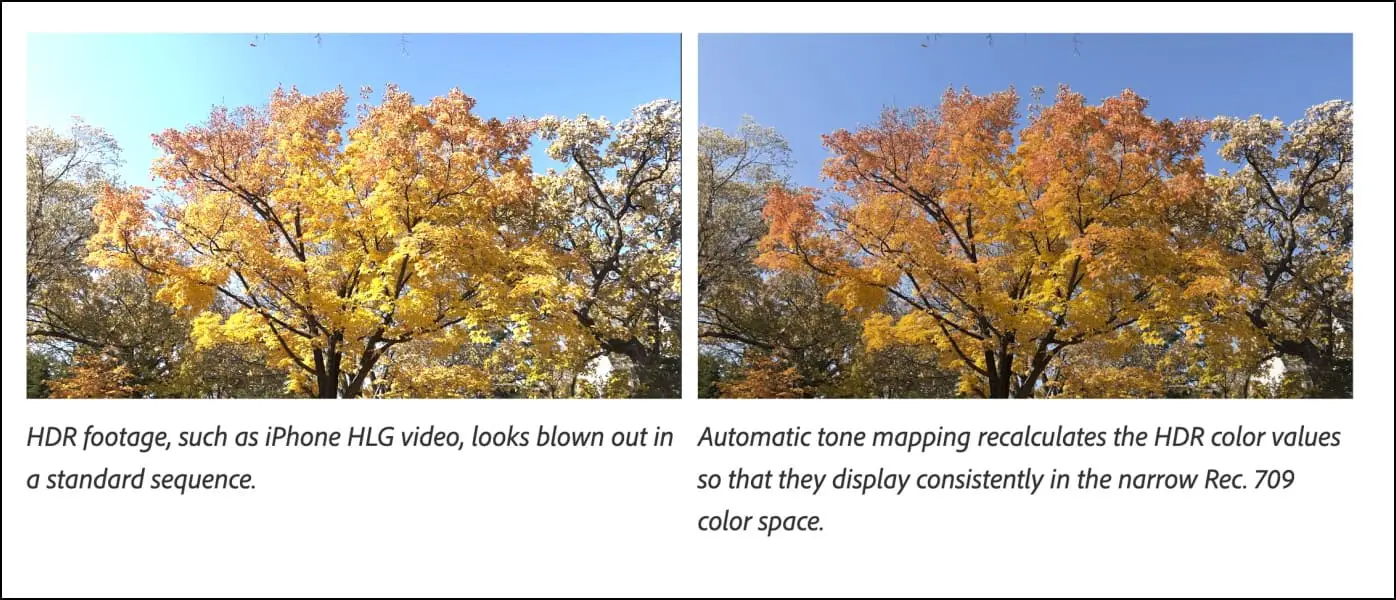
It may look overblown in the media panel, but it will appear fine once you drop those videos into the timeline. You can use this method in conjunction with the one given above.
Method 3- Turn Off High Efficiency & HDR Video on iPhone
An effective solution to avoid running into issues when editing in Premiere Pro is to disable HDR video in iPhone settings. Here’s how you can turn off HDR video and High-Efficiency modes on your iPhone:
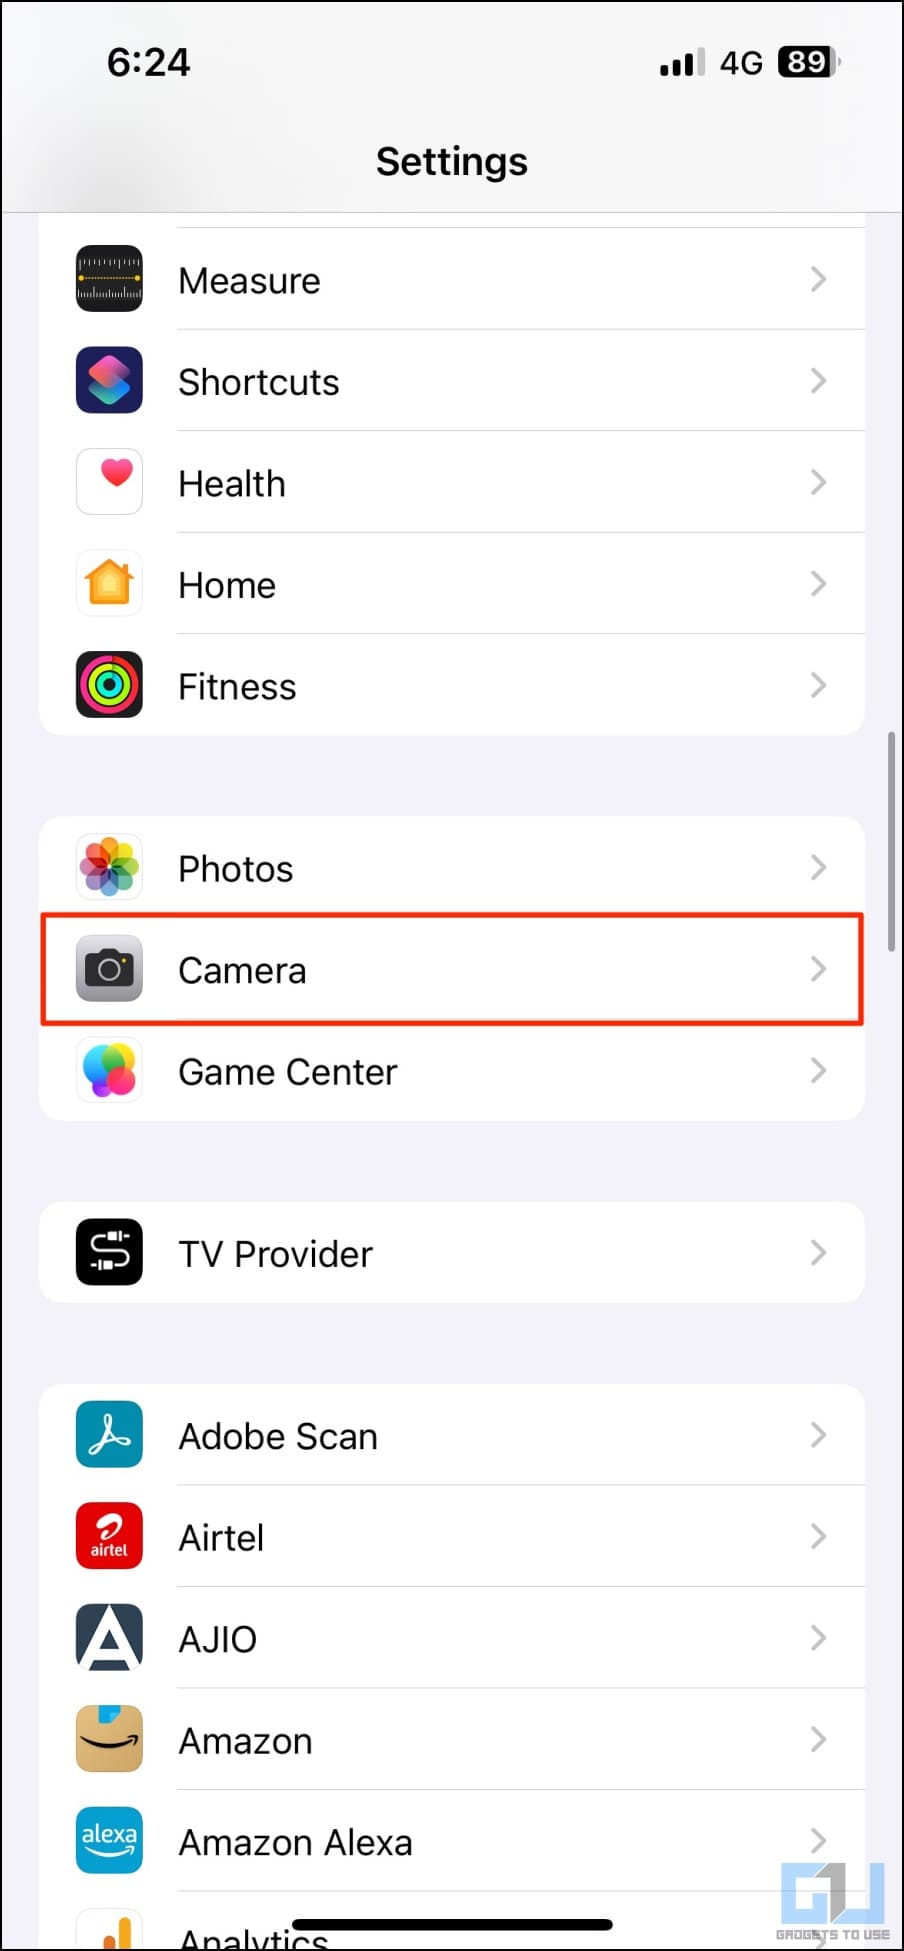
1. Open Settings on your iPhone.
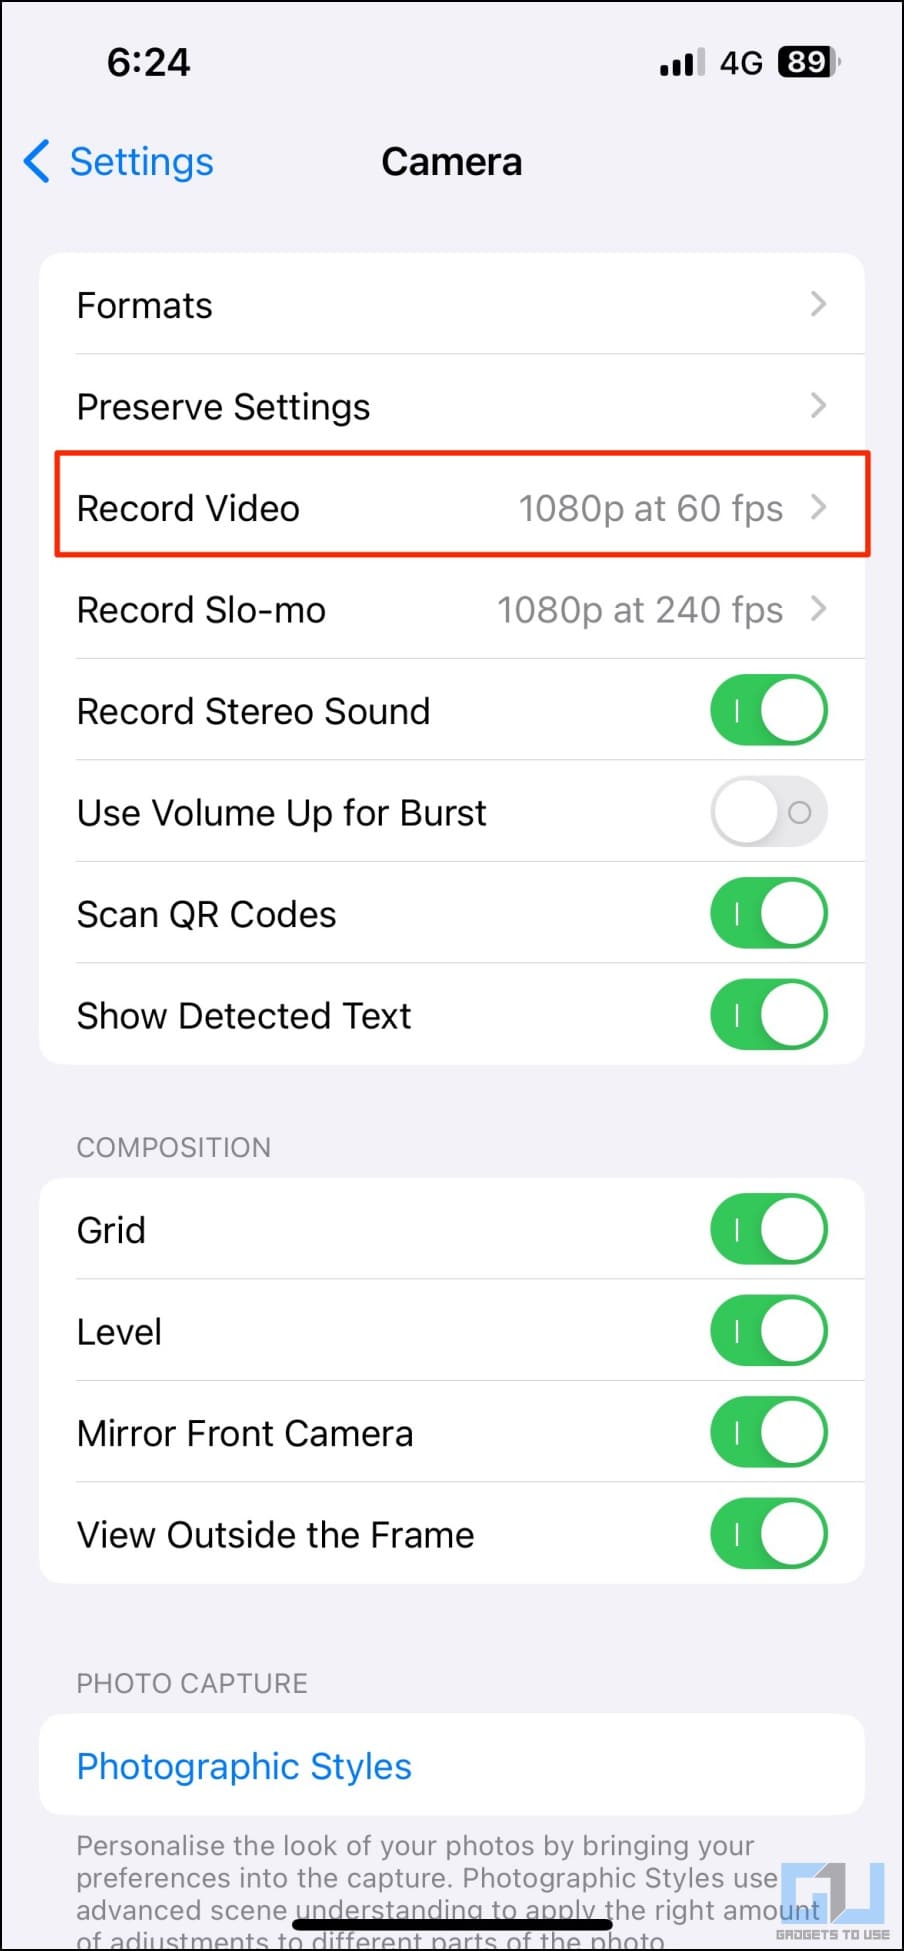
2. Scroll down and click on Camera.
3. Here, tap the Record Video option.
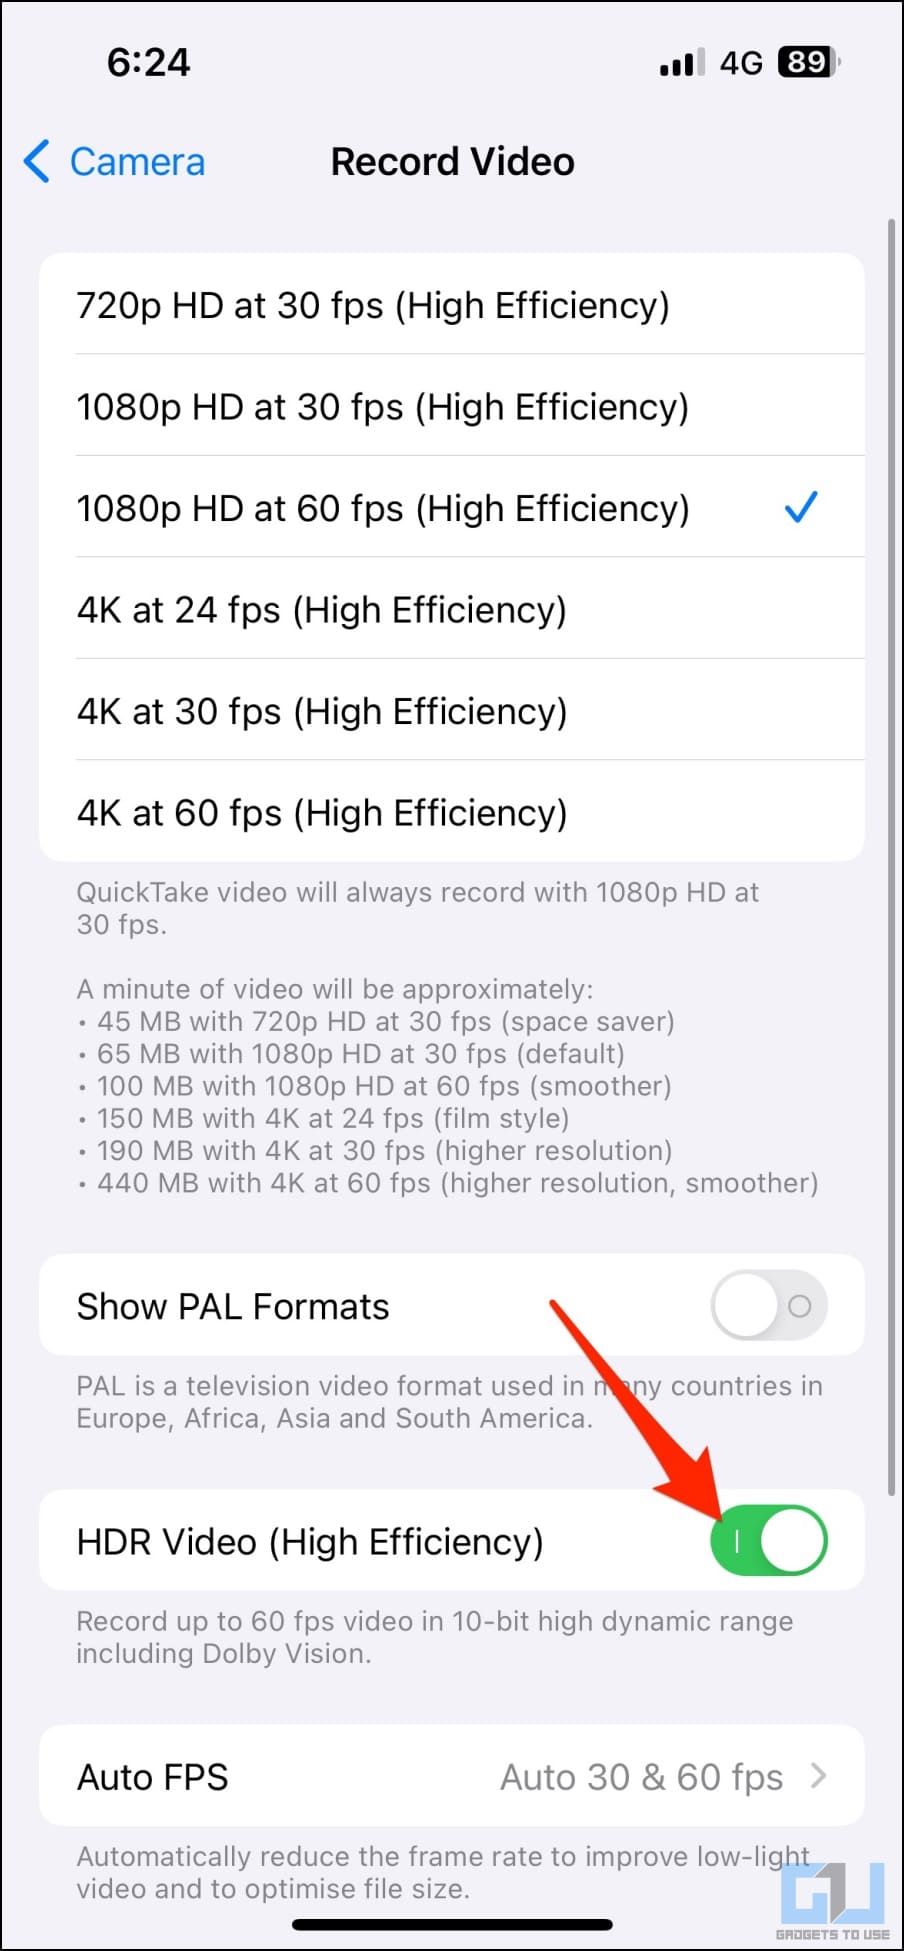
4. Turn off the toggle for HDR Video.
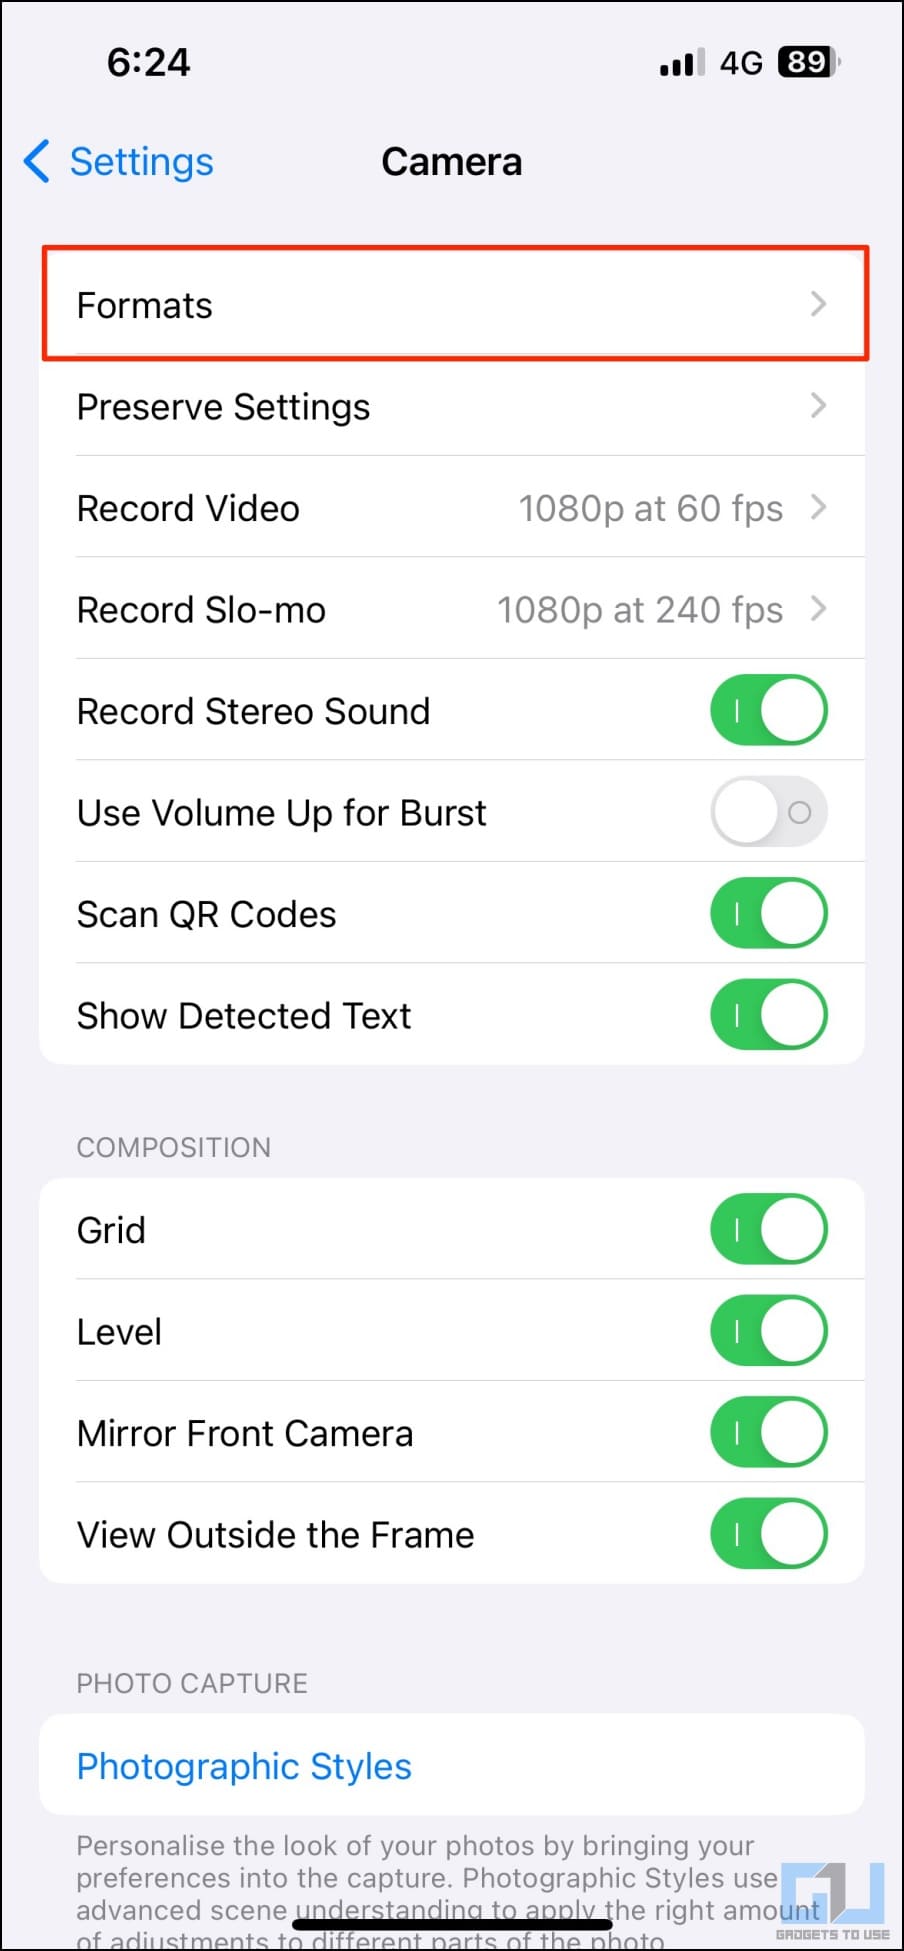
5. Furthermore, go back and click on Formats.
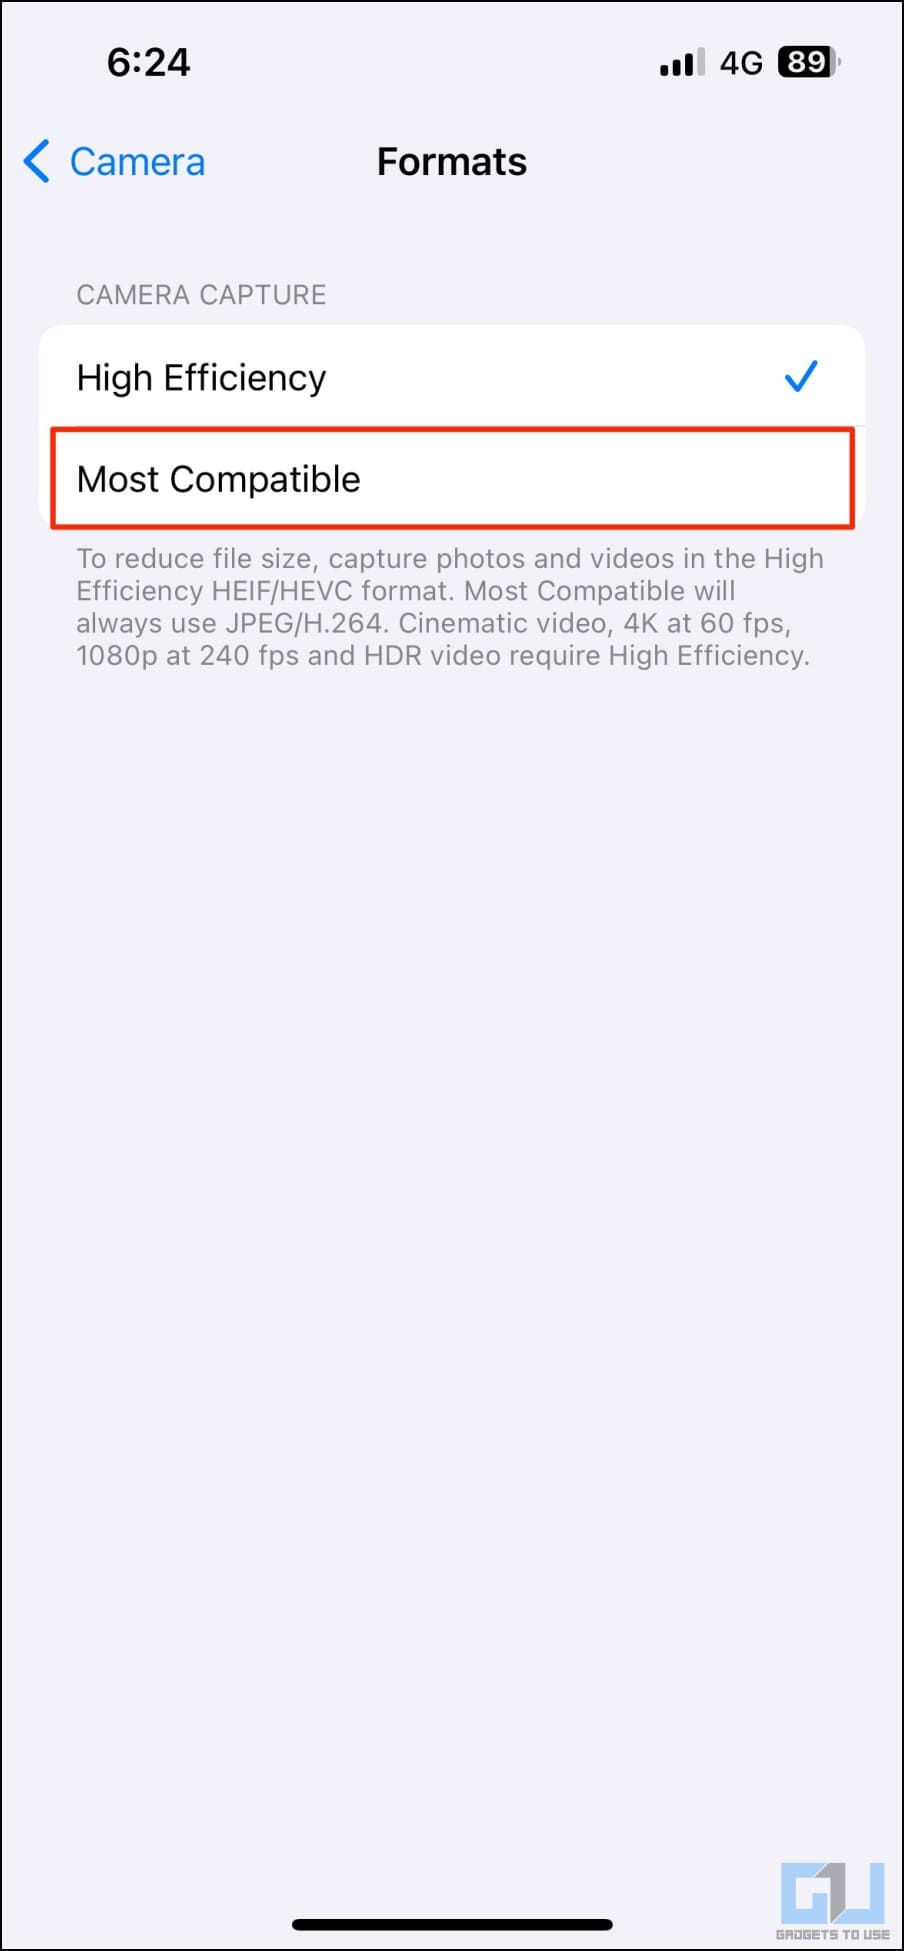
6. Change it from High Efficiency to Most Compatible to ensure the best compatibility across video editing software, albeit at the cost of file size.
That’s it. From now on, any video you record on your iPhone will appear without overexposure or saturation issues in Premiere Pro.
Method 4- Convert Video in iMovie (or Any Video Converter)
If the interpret footage fix doesn’t work, and you don’t want to record the video again, do not worry. A simple conversion in any video editing software like iMovie will make the video usable again in Premiere Pro. Here’s how to do it:
1. Transfer the videos from your iPhone to your Mac via AirDrop or USB cable.
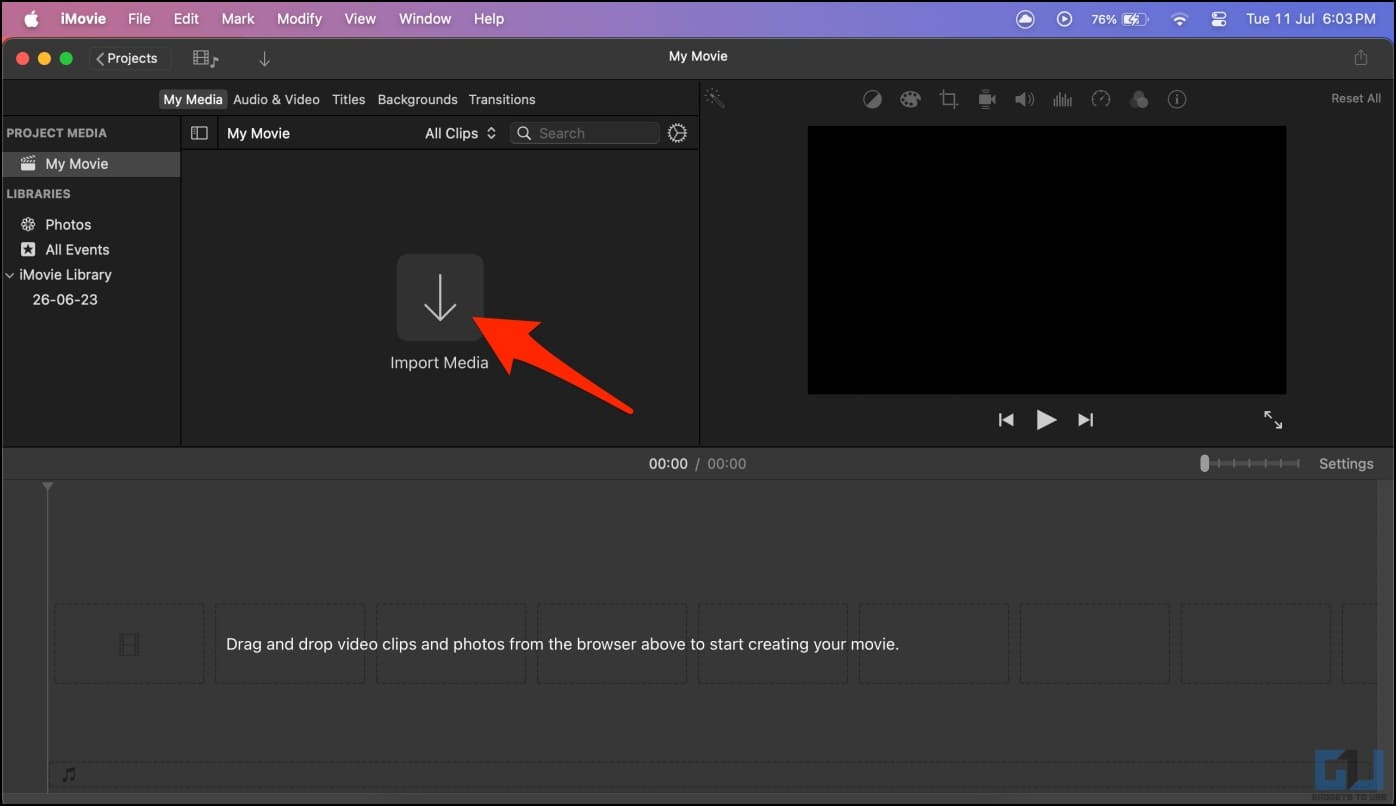
2. Open iMovie on your Mac. Click on Import Media and select the videos.
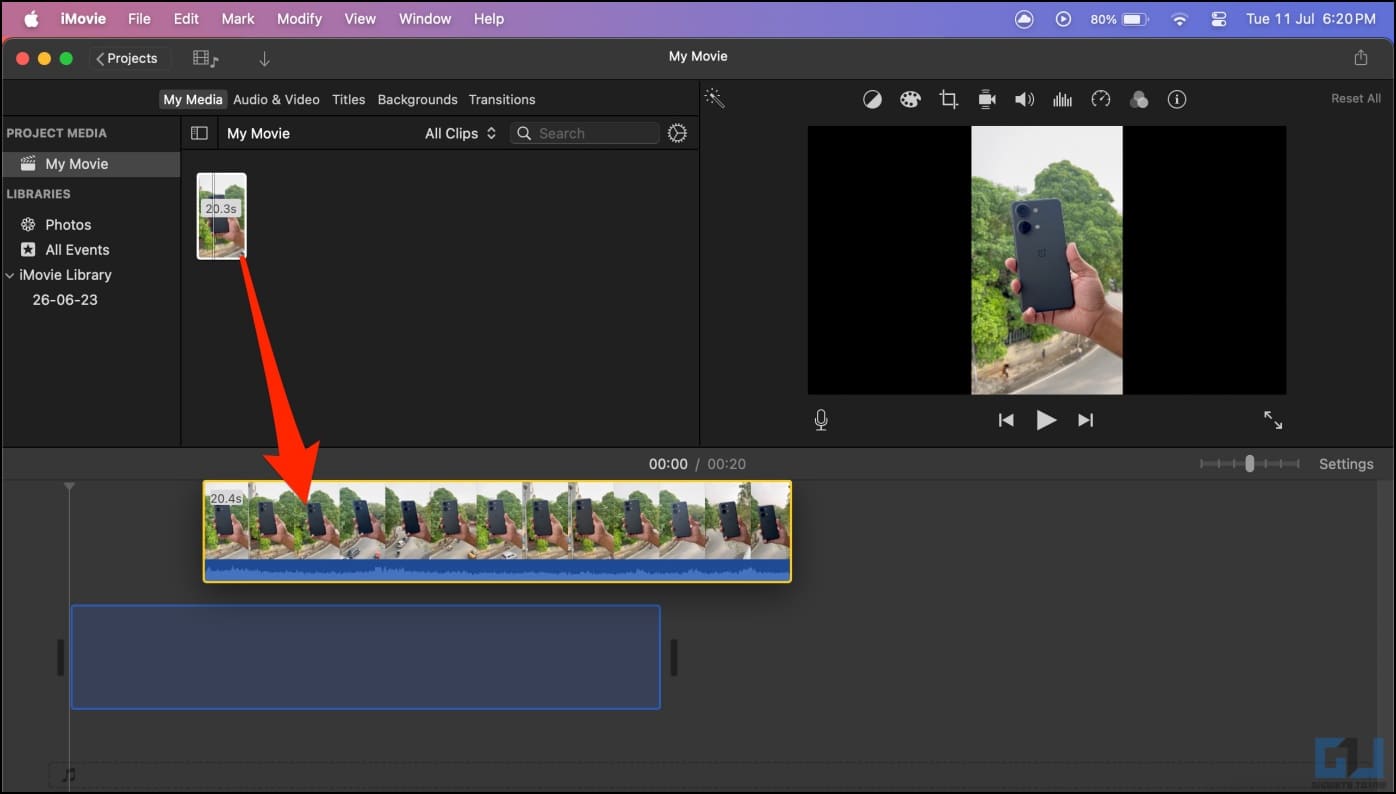
3. Once imported, drag and drop the video into the timeline. Crop or rotate if required.
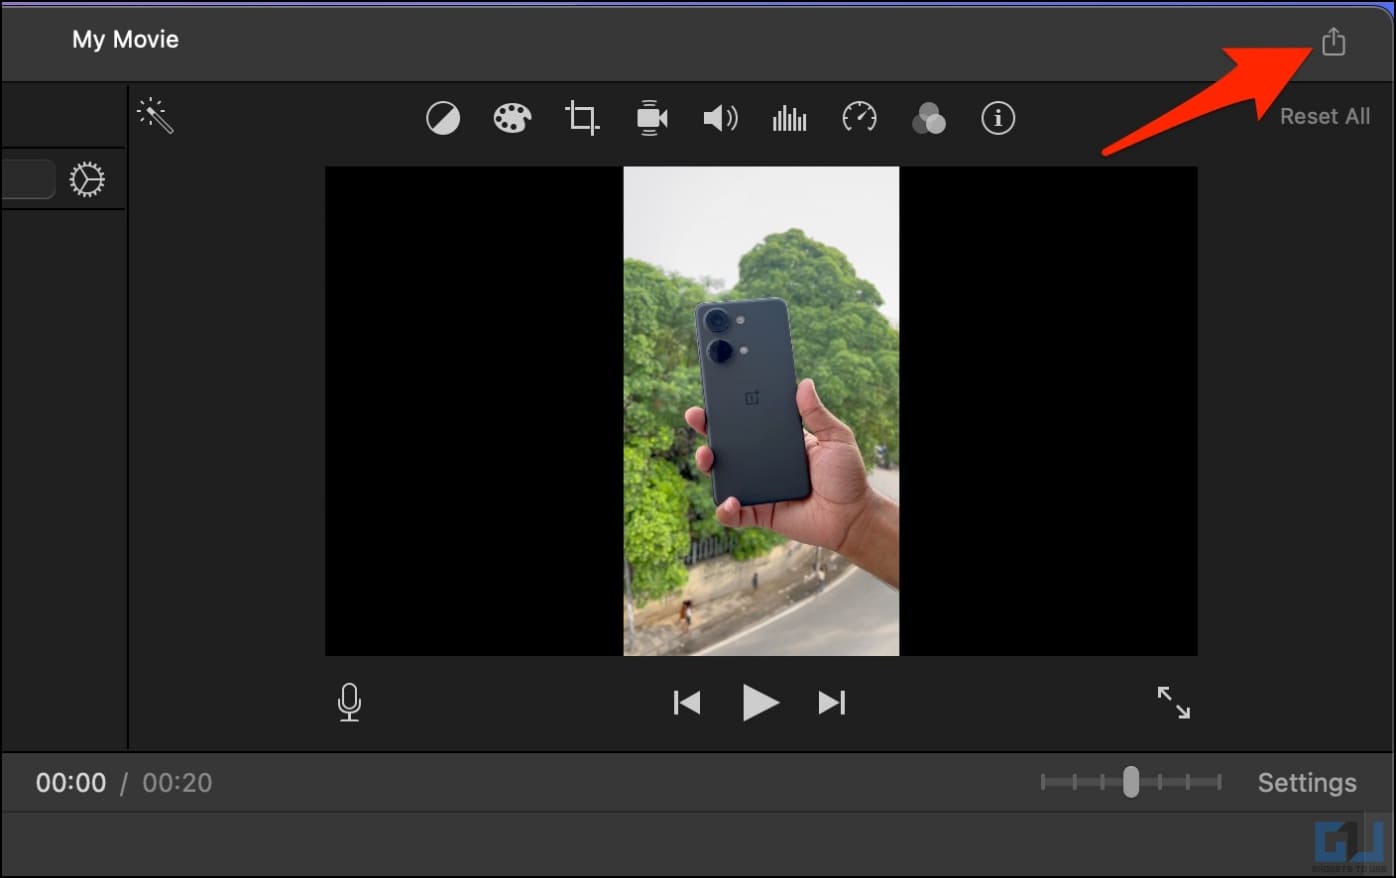
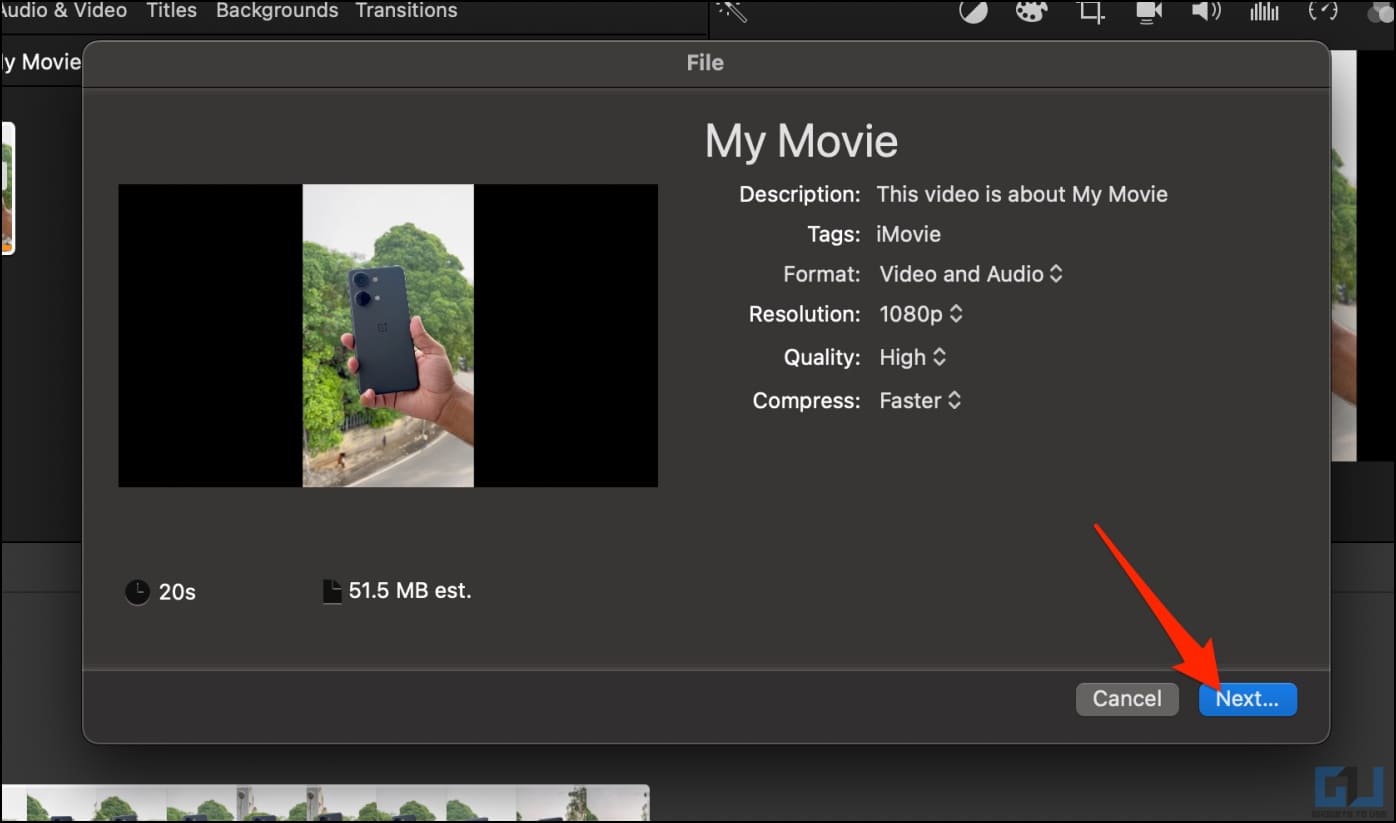
4. Tap the Share button in the top right corner.
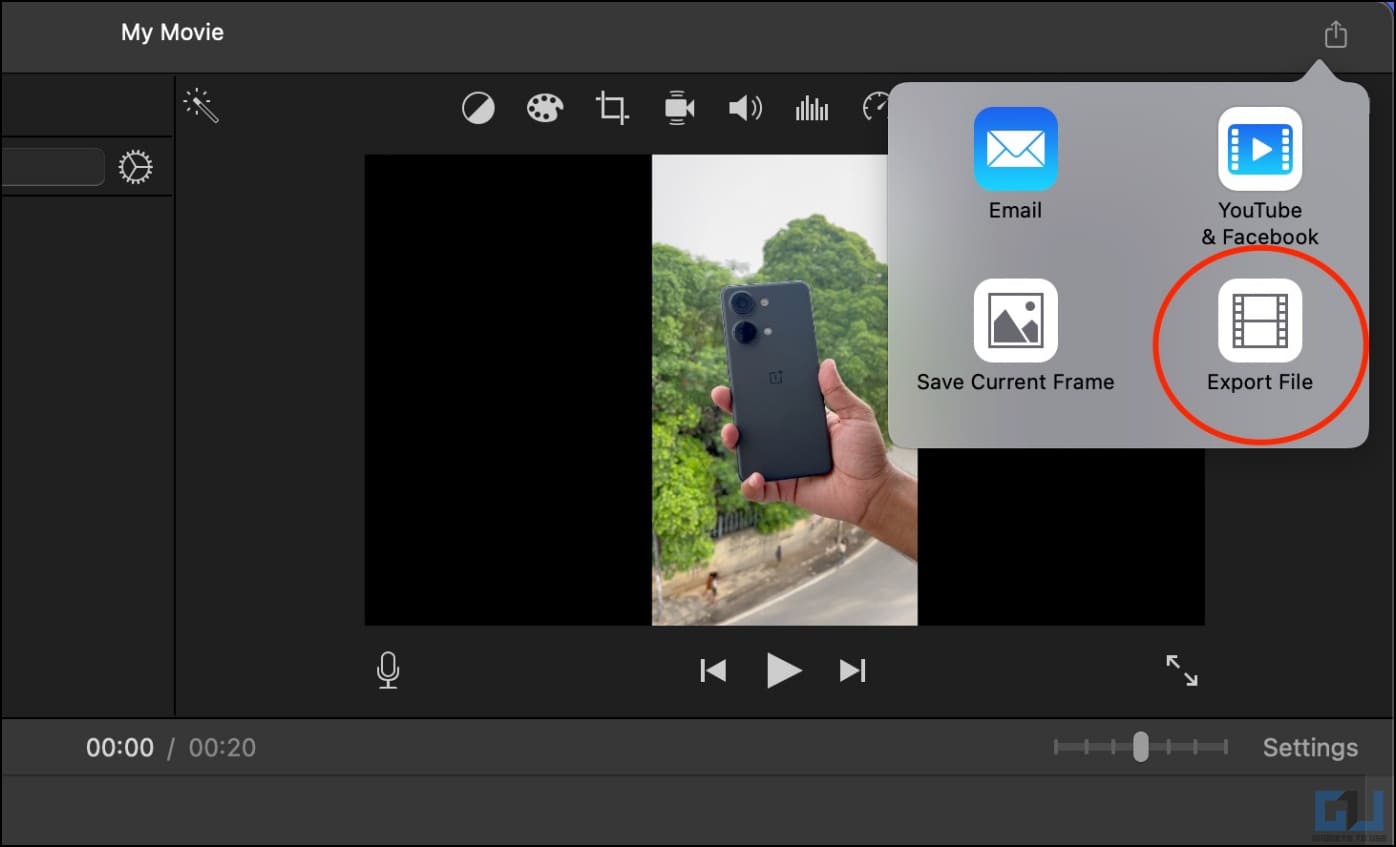
5. Click on Export File.
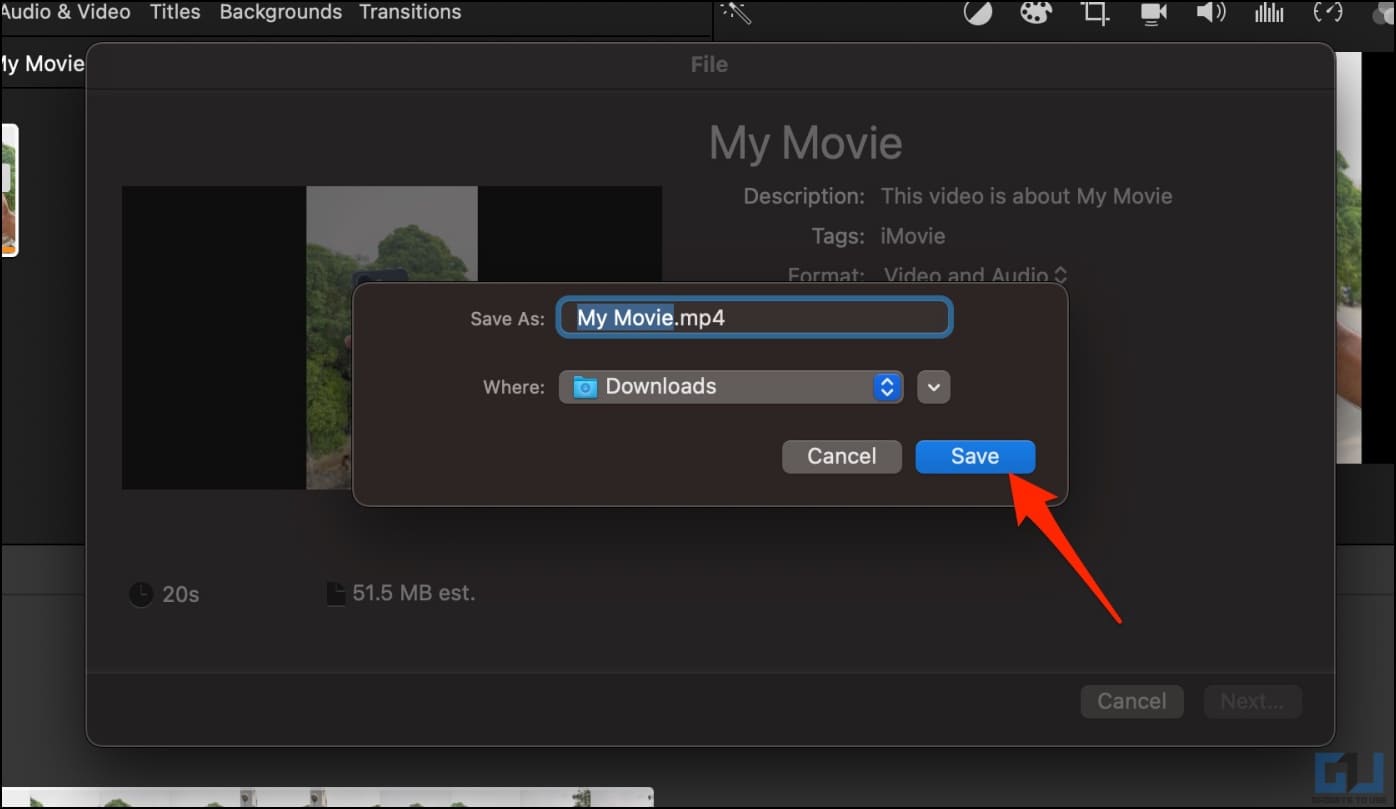
6. Choose your preferences and select Next > Save.
Wait for it to process and export the video.
The resulting footage can now be used in Premiere Pro without any issues whatsoever.
Method 5- Convert Video Using Handbrake
Alternatively, you can convert the video into a more compatible codec using HandBrake. This free, open-source video transcoder software is available on Mac, Linux, and Windows. Follow the steps below to use it:
1. Download Handbrake on your Windows or Mac computer.
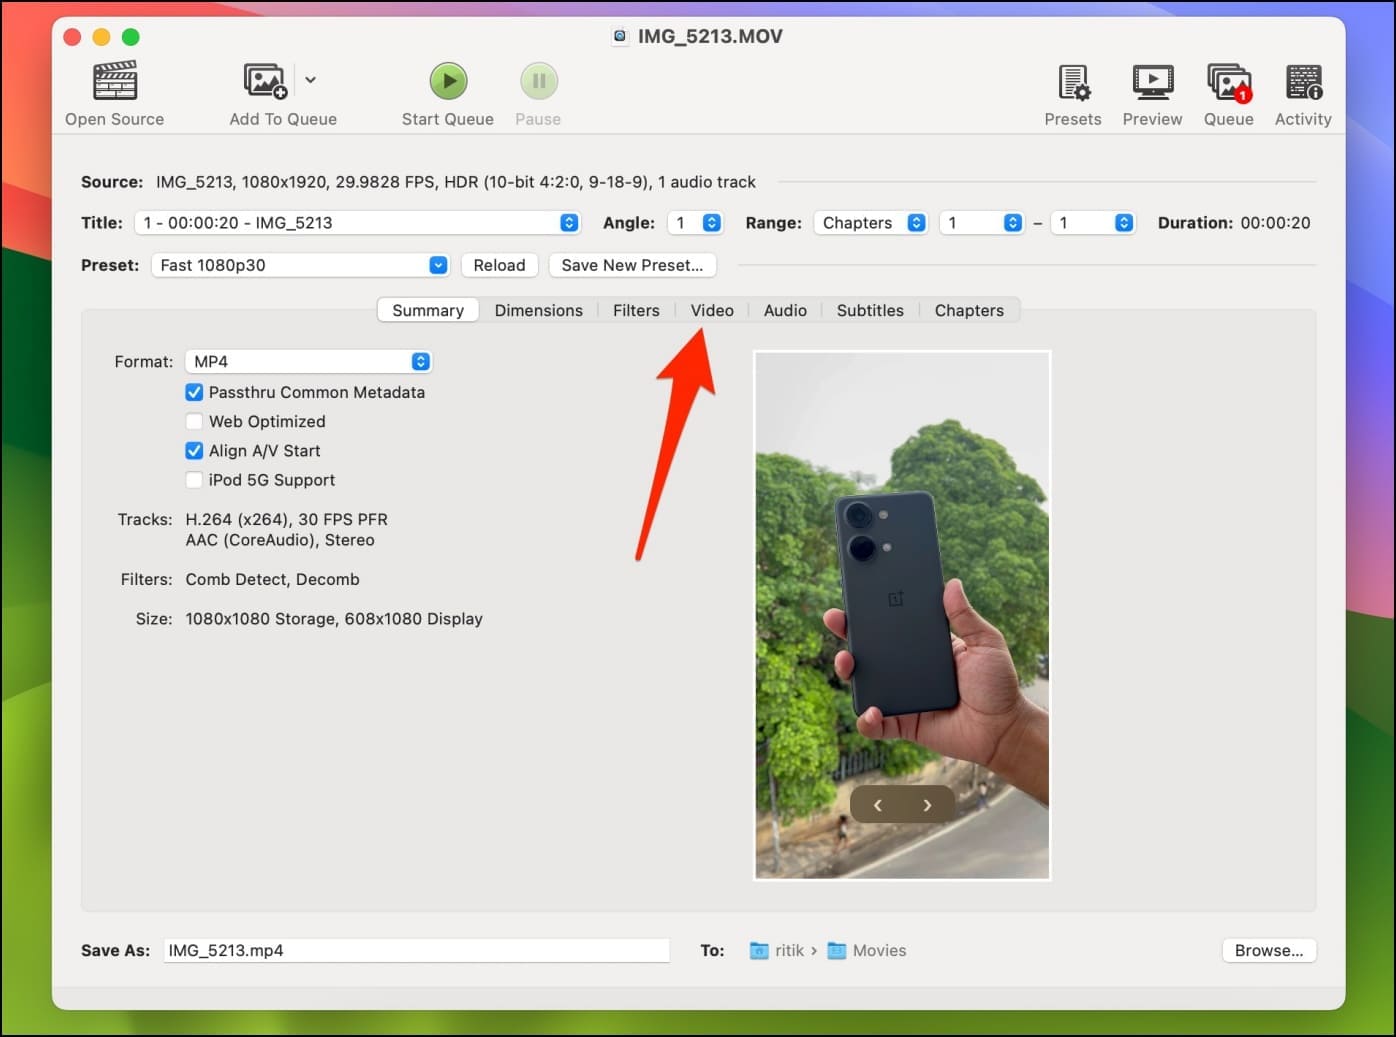
2. Once installed, open HandBrake and drag the video file or import it manually.

3. Next, switch to the Video tab.
4. Here, tap the drop-down menu next to Video Codec and change it to H.264.
5. Change other settings if required or leave them as it is.
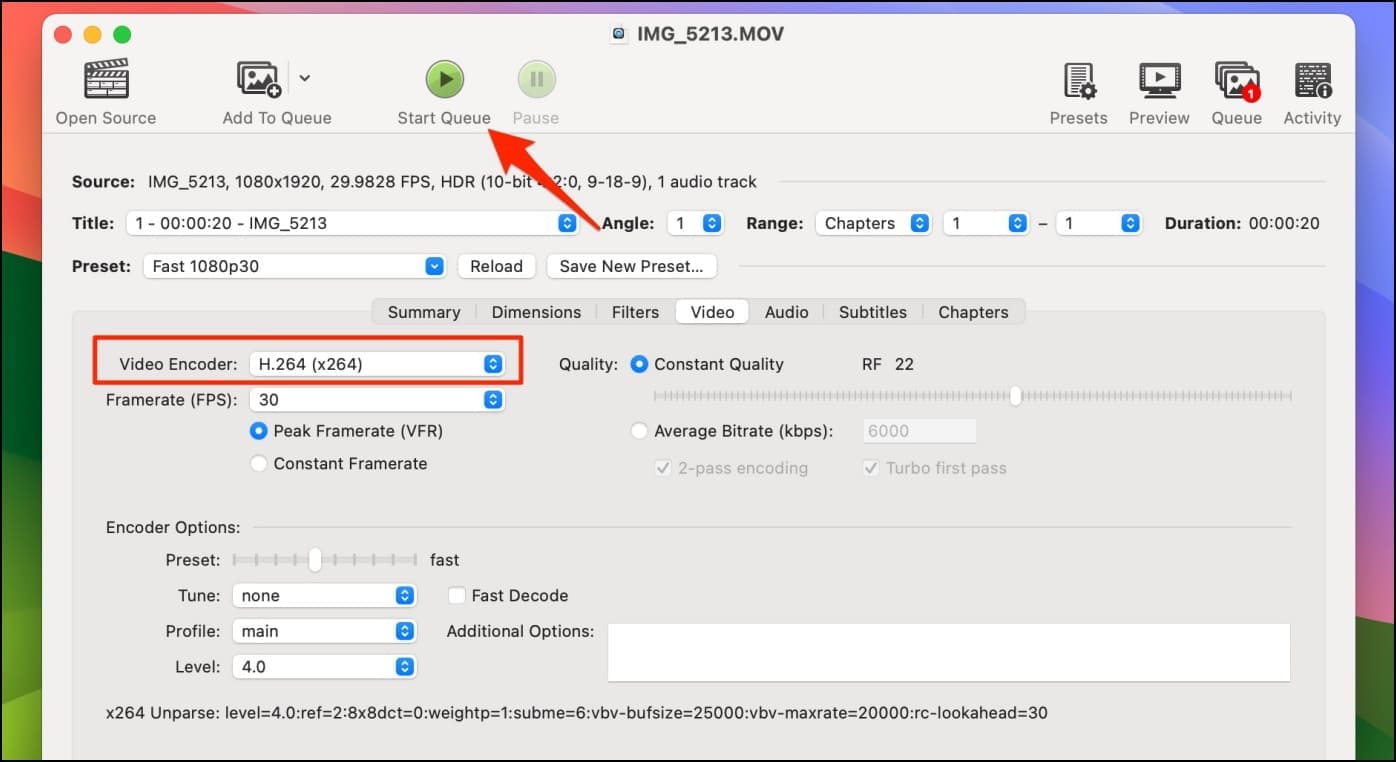
6. Finally, click the green-colored Start Encode button.
Once the video is converted, you can import it to Premiere Pro without any color or exposure issues.
Method 6- Share Video via Photos App
Try sharing the HDR video from the Photos app instead of uploading it directly via Google Drive or transferring it via USB. For instance, select the clips in the Photos app, and share them via Drive or any other application.
Your iPhone will take its own sweet time to prepare and process the videos before they’re transferred. But this will save you from the issues in Premiere Pro.
Method 7- Use an Older Version of Adobe Premiere Pro
Another option to avoid overexposure or blown color problems with iPhone videos is to use an older version of Premiere Pro. Users have reported that 2021 and earlier versions of Premiere Pro do not have this issue.
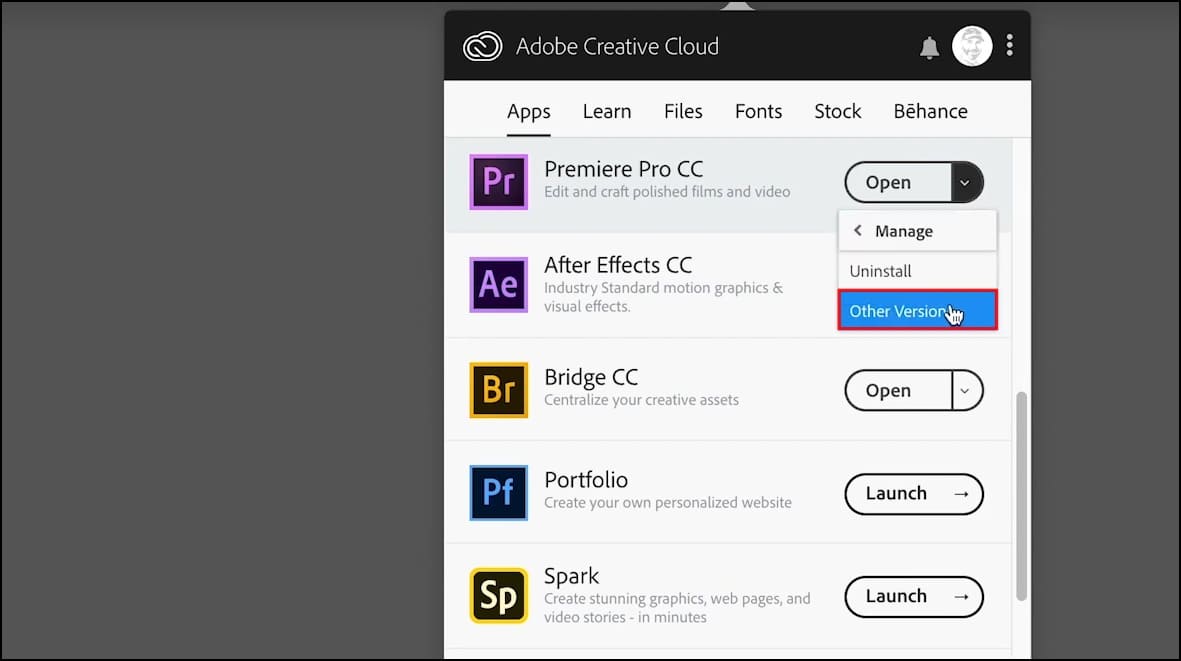
1. Open the Creative Cloud app on your computer.
2. Scroll down in the Apps window.
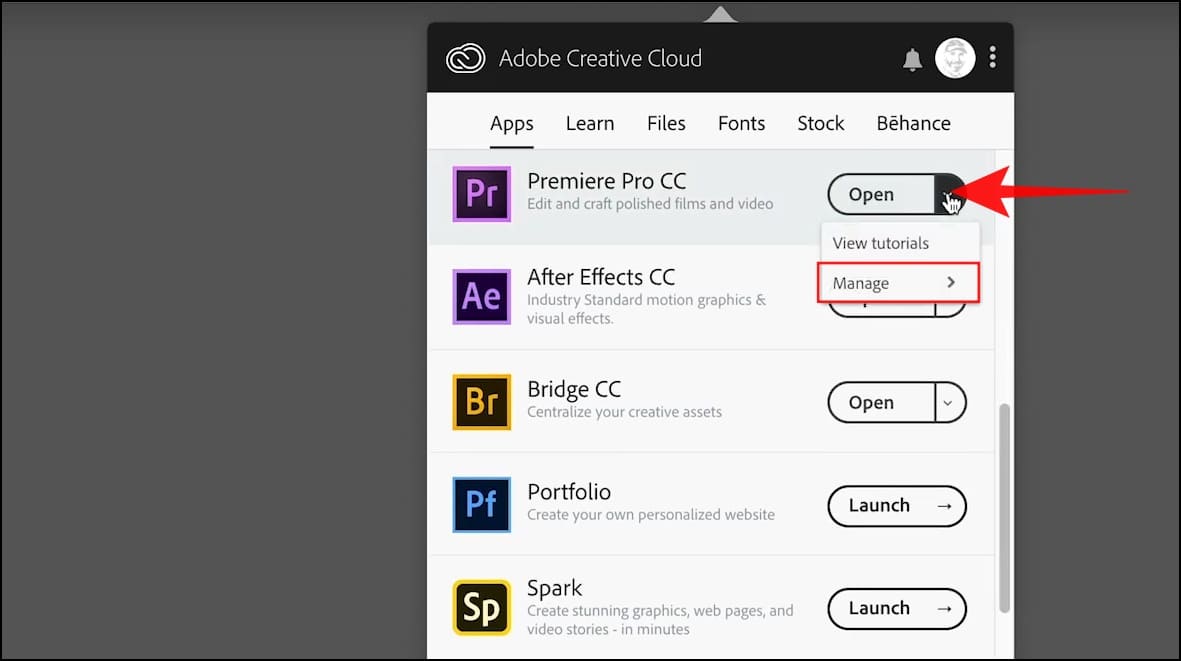
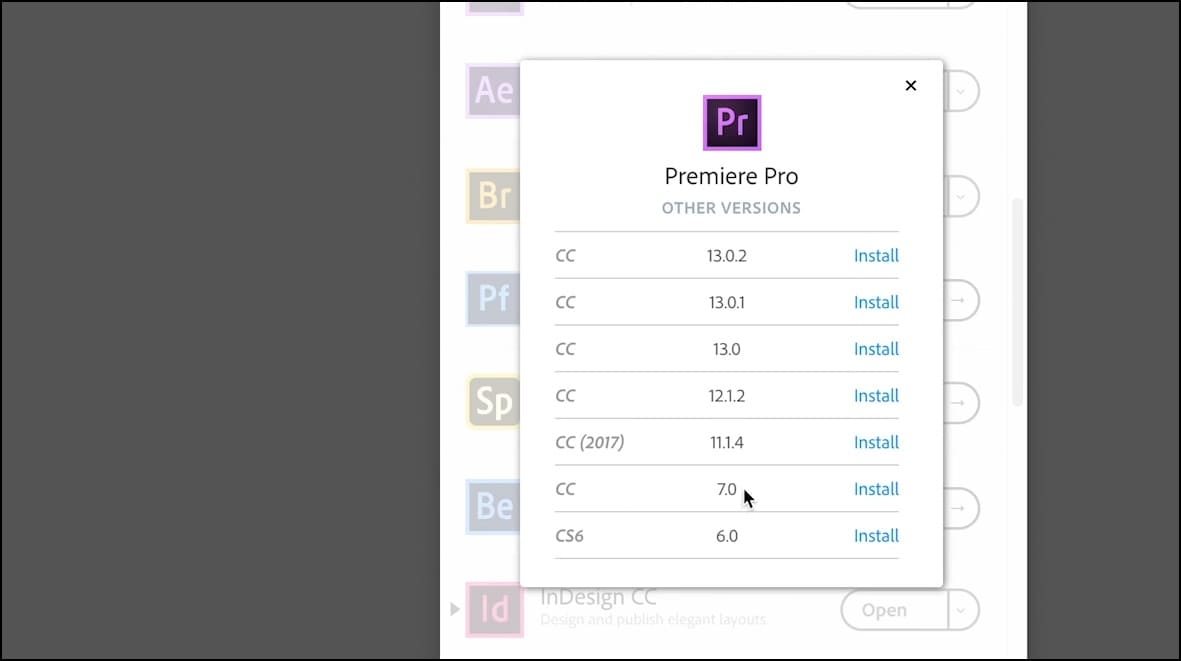
3. Tap the drop-down menu next to Premiere Pro. Choose Manage > Other Versions.
4. Tap Install for an older version of Premiere Pro.
Wrapping Up
This is how you can fix iPhone footage appearing overexposed or blown out when editing in Adobe Premiere Pro. I hope the above guide helps you fix iPhone HDR video issues with video editing without re-recording them on any Windows or Mac computer. Stay tuned for more such tips, tricks, and how-tos.
You might be interested in:
- How to Change Hey Siri to Just Siri on iPhone and iPad
- 8 Ways to Fix iPhone Calls Keep Dropping on Mac
- How to Turn On or Off Auto FPS in iPhone Camera: What is it?
- 2 Ways to Use Continuity Camera on Mac and iPhone
You can also follow us for instant tech news at Google News or for tips and tricks, smartphones & gadgets reviews, join GadgetsToUse Telegram Group or for the latest review videos subscribe GadgetsToUse Youtube Channel.