Quick Answer
- When you install and use an app on your Windows system, all its cache files get stored in a specific folder called the temporary folder.
- Scroll down to the bottom to locate the Location History option and click on the Clear button to remove it from your device.
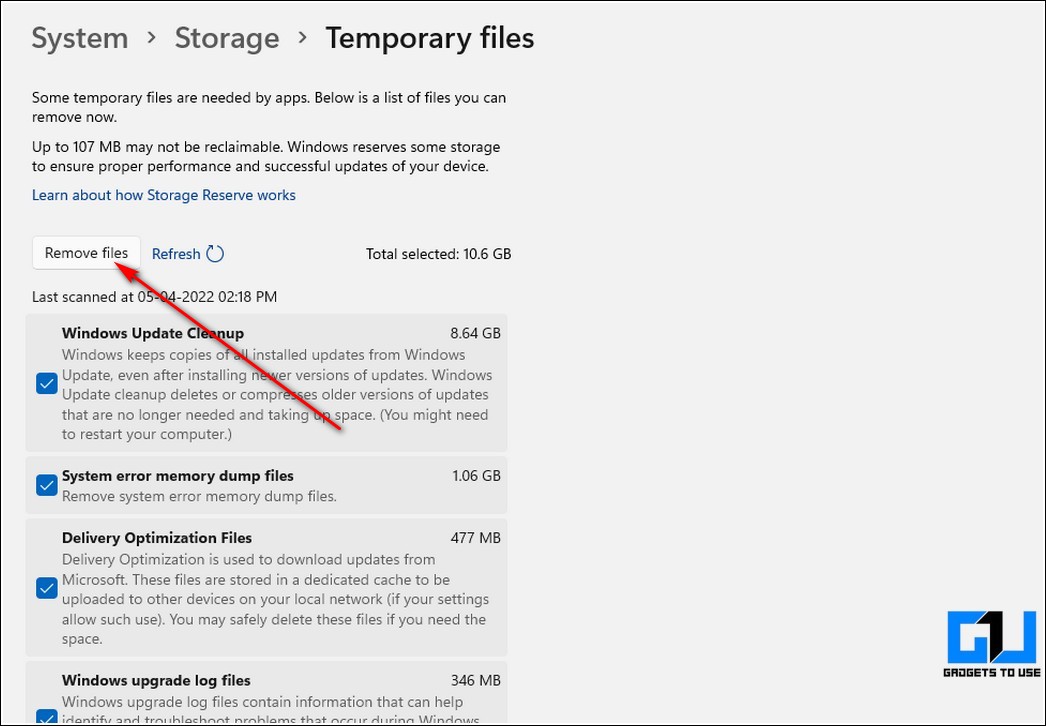
- Further, click on the Remove Files button to delete and clear all temporary cache files in Windows 11.
Cache files play a vital role in providing a smooth and seamless user experience. However, excessive accumulation of such files consumes crucial system resources and slows it down. In this guide, you will learn about the 12 effective methods to clear all such cache files in Windows 11. You can also learn how to disable startup apps on Windows 11.
Also, Read | Top 5 Ways to Enable Dark Mode in Windows 11 Native Apps
Why Should You Clear Cache Files?
Cache files are the temporary files that are used by apps or systems to provide instant accessibility and a seamless user experience. When these files accumulate over time on the device, they start to create issues and problems while using it. Luckily, you can manually clear all such files in Windows 11. Clearing all such files on your system can:
1. Release unnecessarily occupied Disk Space.
2. Prevent Bugs and Errors.
3. Increases system performance and efficiency.
With that being said, let’s have a look at the 12 effective methods to clear cache files in Windows 11.
Top Ways to Clear Cache Files in Windows 11
Use Settings App to Clear Temporary Cache Files
1. Press the Windows key and search for the Settings app to open it.

2. Expand the System option in the left sidebar and click on Storage to configure it.
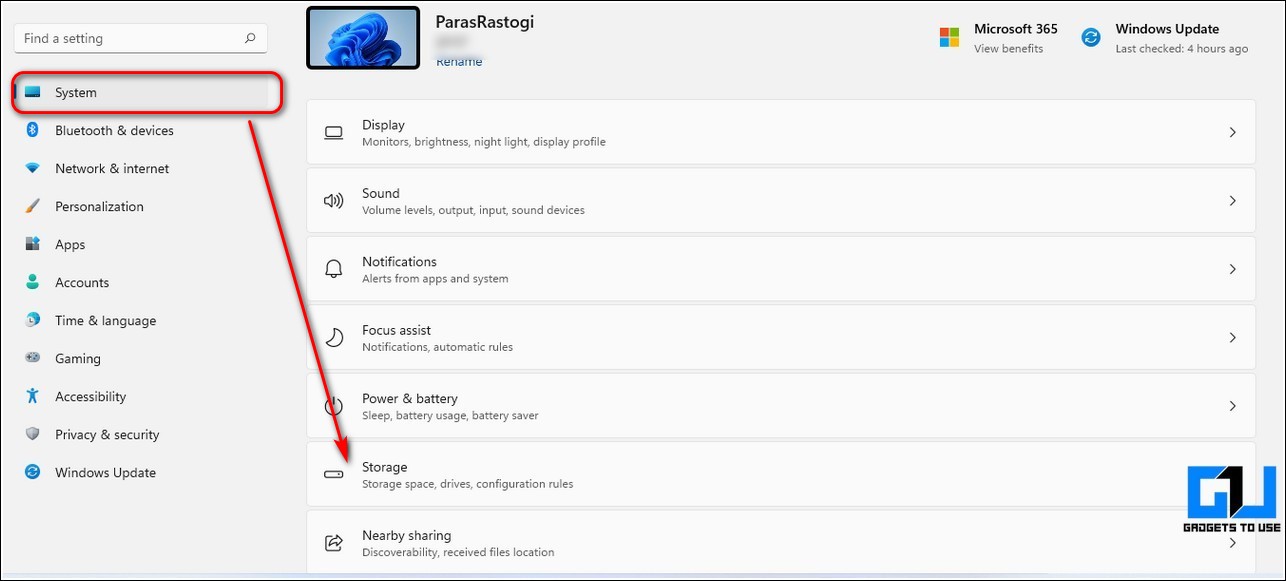
3. On the next page, click on the Temporary Files option.

4. Further, click on the Remove Files button to delete and clear all temporary cache files in Windows 11.
Remove Your Web Browser’s Cache
Like other applications, web browsers such as Google Chrome, Mozilla Firefox, etc. also use cache files and cookies for instant accessibility and navigation. When these files accumulate over time, they tend to slow down the browser as well as the system on which they are installed. Follow these easy steps to remove browser cache files and cookies.
Launch Disk Cleanup Tool to Clear Disk-related Cache
Windows 11 offers an in-built tool known as the Disk Cleanup App to clear and free up disk space on a computer’s hard drive. Follow these steps to clear disk-related cache files using this tool.
1. Press the Windows key and search for the Disk Cleanup app to open it.
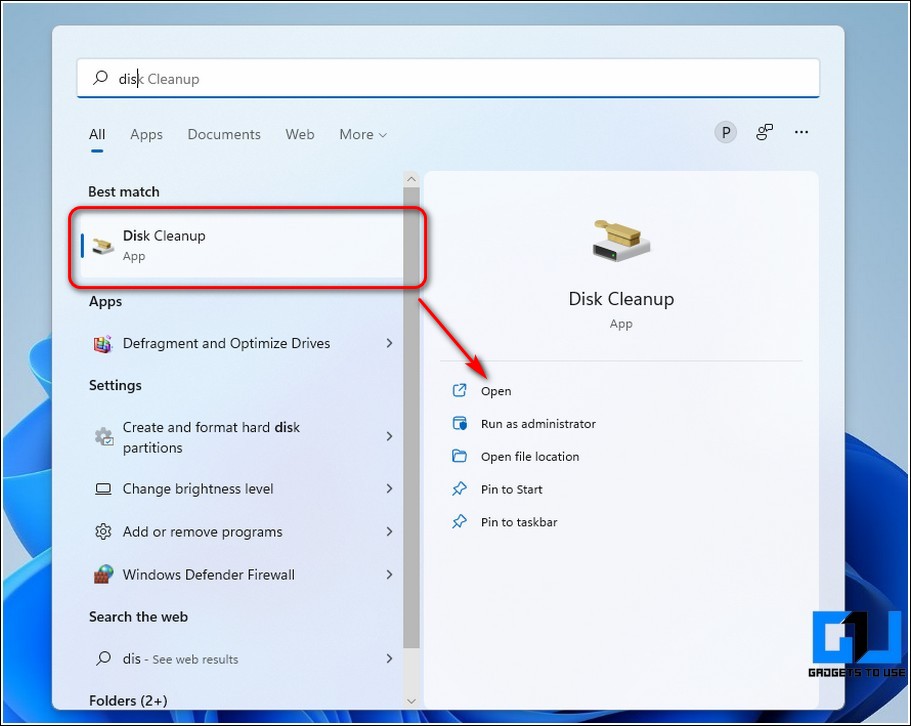
2. Choose your desired drive inside the drive selection window to launch the cleanup process on it and press the OK button.

3. Wait for a few seconds to let the system compute the amount of space that can be released using this tool.
4. Click on the OK button to remove all the temporary disk-related files on Windows 11.

Clear Location Cache Files
Windows 11 also allows you to remove the stored location history on your device. Follow these steps for an easy fix.
1. Press the Windows key and search for the Location Privacy Settings to open it.
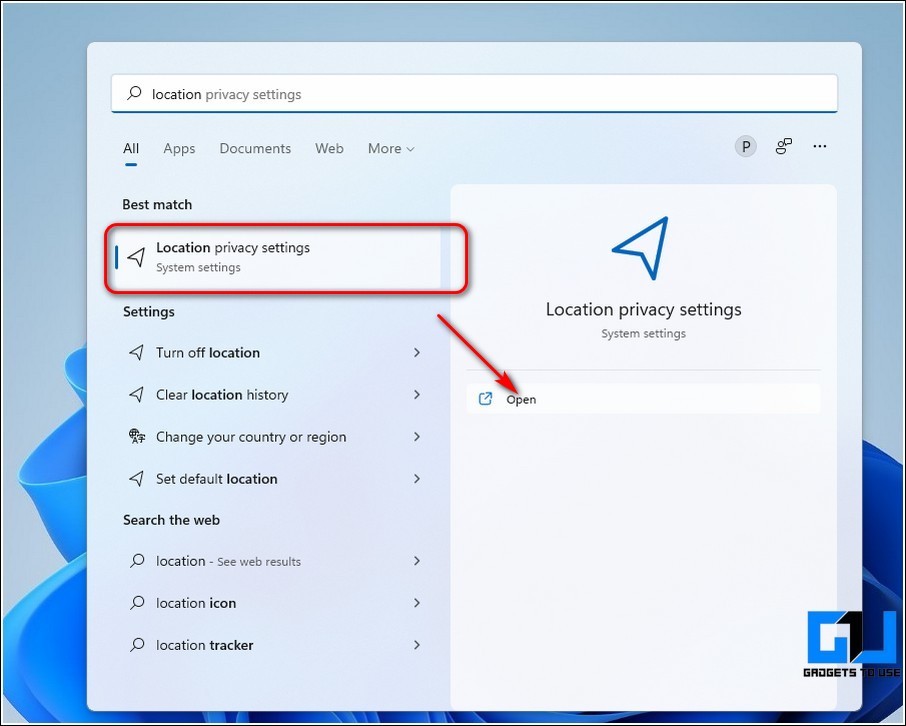
2. Scroll down to the bottom to locate the Location History option and click on the Clear button to remove it from your device.

Flush Out Cache Related to Installed Apps
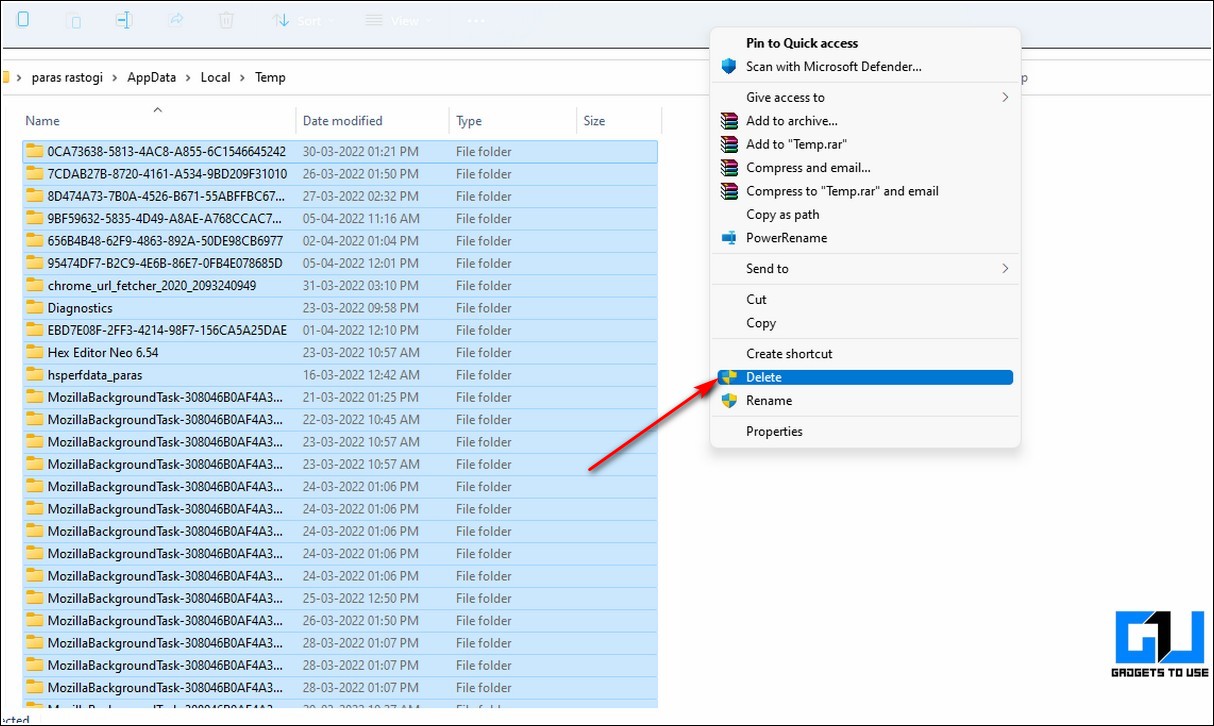
When you install and use an app on your Windows system, all its cache files get stored in a specific folder called the temporary folder. You can access this folder manually to remove them and free unnecessarily occupied disk space.
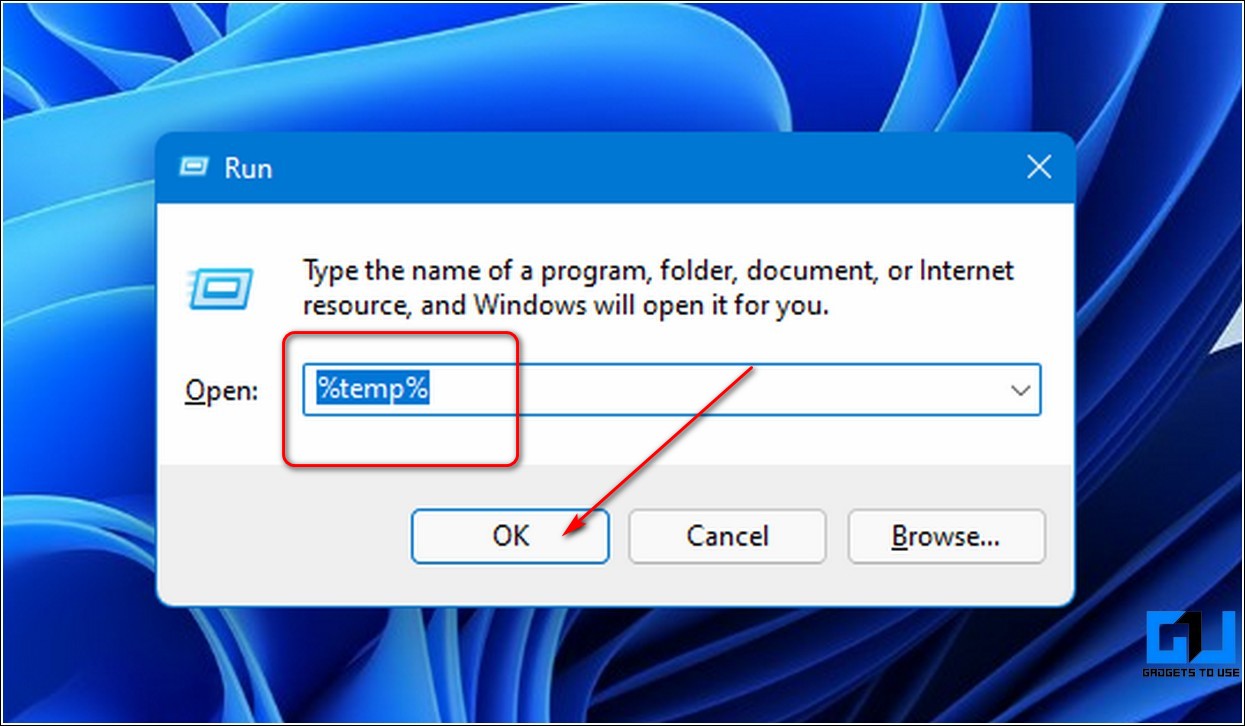
1. Open the Run window by simultaneously pressing Windows key+R.
2. Type %temp% in the field and hit the enter key.
3. You can now view the temporary folder containing lots of cache files. Delete all these files by selecting them all and pressing the delete key. Alternatively, you can select them all by pressing the Ctrl+A hotkey and right-click to press the Delete option.
Clear Temporary DNS Cache
The DNS caches consist of all the domain names of websites that you’ve visited in the past to quickly load them up on future visits. These files get accumulated in large quantities inside the system and often start producing errors while opening other web pages. To prevent this from happening, you need to clear all the temporary DNS caches on your Windows 11 system.
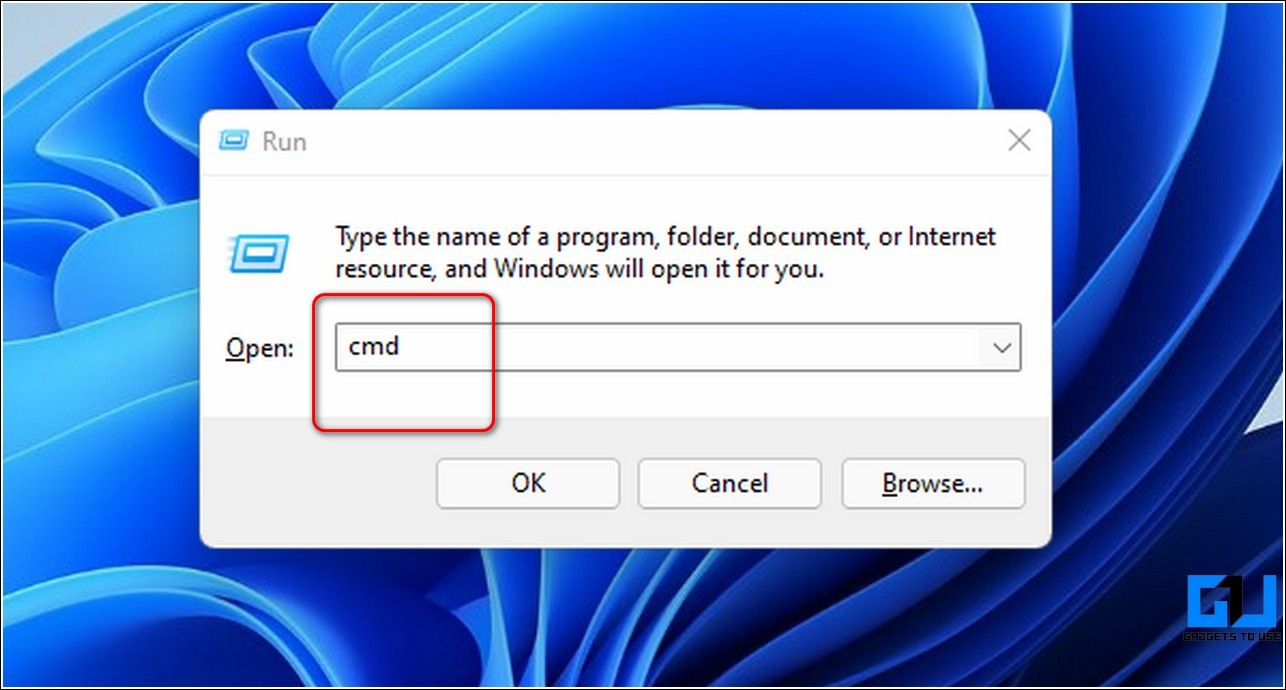
1. Open the Run window on your system by simultaneously pressing the Windows key+R.
2. Type cmd in the window and hit the enter key to launch the Command Prompt.
3. Next, type the following command to flush out all the DNS cache files and hit the enter key.
ipconfig/flushdns
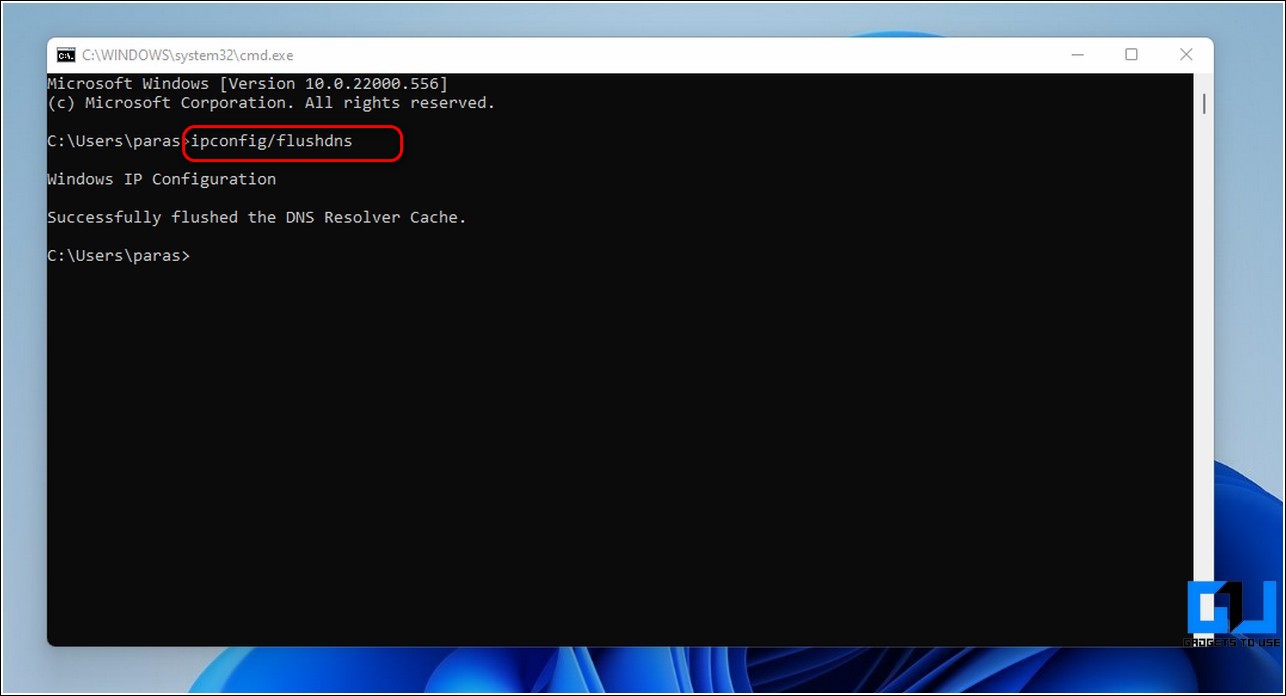
Congrats. You’ve successfully removed all temporary DNS caches from your Windows 11 system.
Reset Microsoft Store App Cache Files
Similar to other installed applications, Microsoft Store also uses cache files to provide a swift experience to its users. However, excessive accumulation of these cache files often consumes crucial system resources and creates issues while downloading other apps from the Store. Follow these simple steps to remove Microsoft Store cache files from Windows 11.
Clear Activity History on Windows 11
Microsoft uses the Activity history on your system to provide a personalized experience while using its apps and services. To prevent your Windows 11 system from doing so and to conserve more system resources, you can manually clear your activity history from time to time.
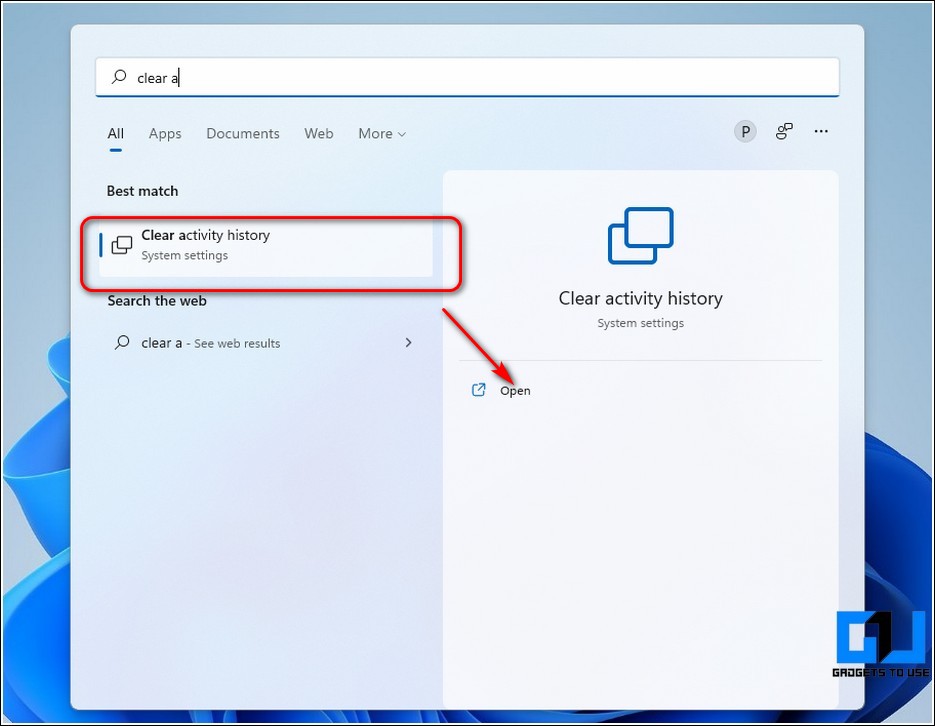
1. Press the Windows key and search for the Clear Activity History keyword to open the associated system settings.
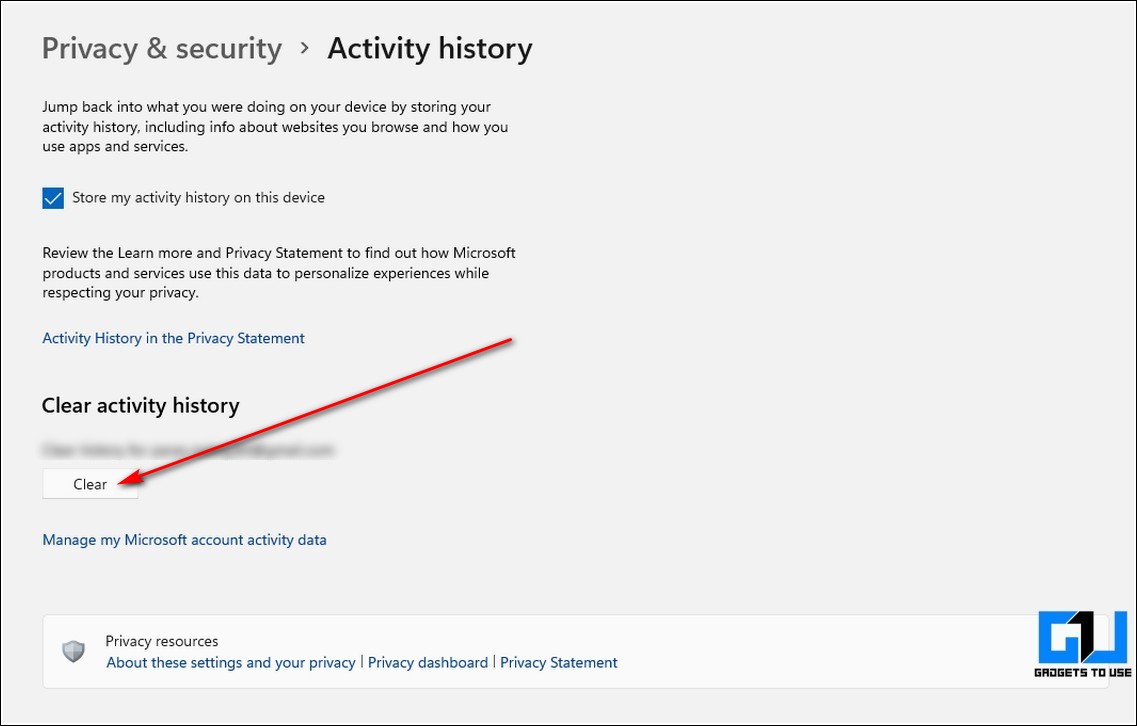
2. Scroll down to the bottom and click on the Clear button to remove all the stored activity history.
Remove File Explorer App History
The file explorer app on your Windows 11 system also stores some cache files to provide quick navigation to its users. Fortunately, you can remove them too by following these easy steps.
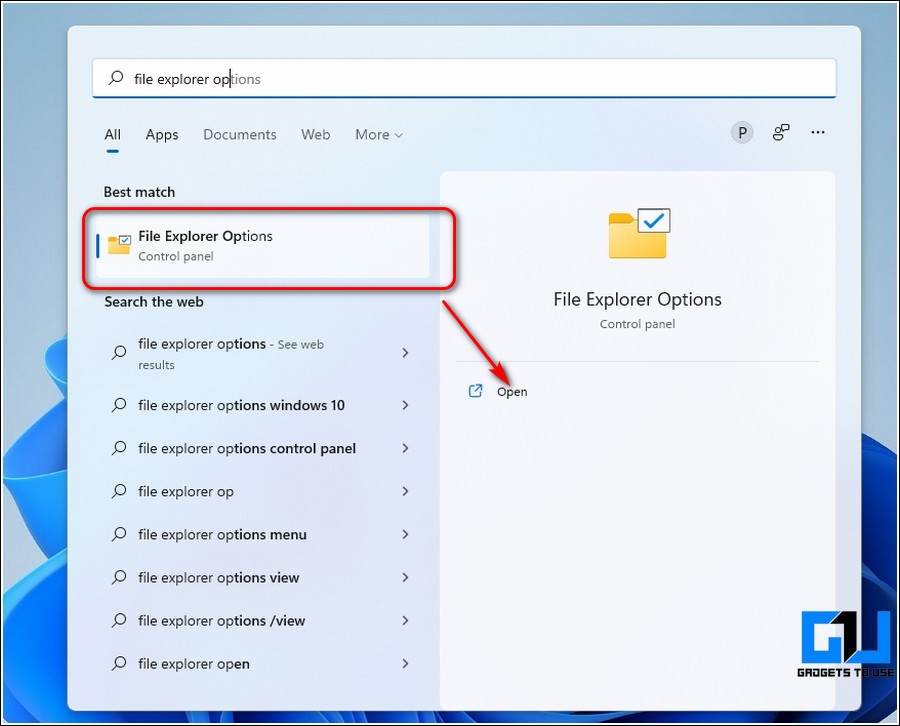
1. Press the Windows key and search for the File Explorer options to open its settings.
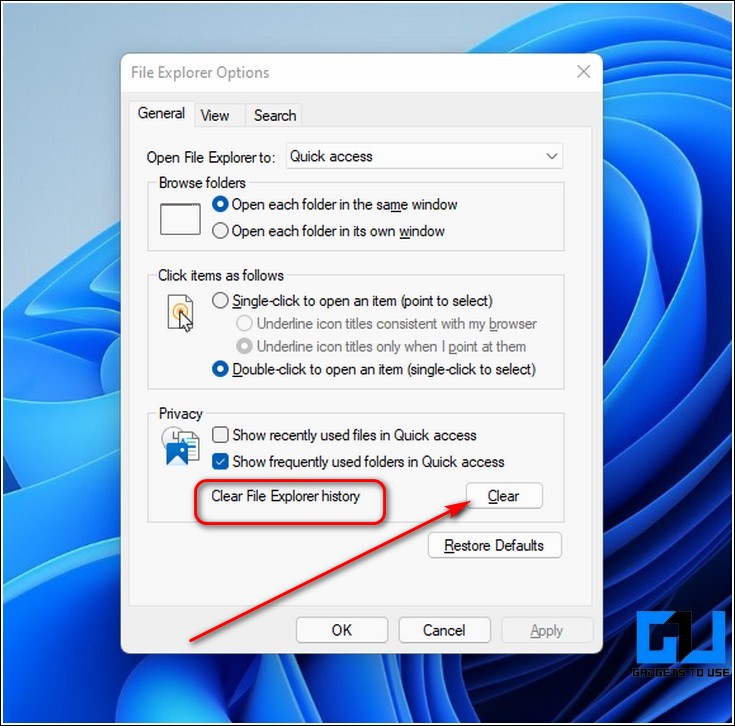
2. Click on the General tab and locate the Clear file explorer history option under the Privacy section.
3. Further, click on the Clear button to remove it.
Clear Out Temporary Clipboard Data
Just like cache files, you can also remove temporary clipboard data stored on your system. Follow these steps to achieve the same.
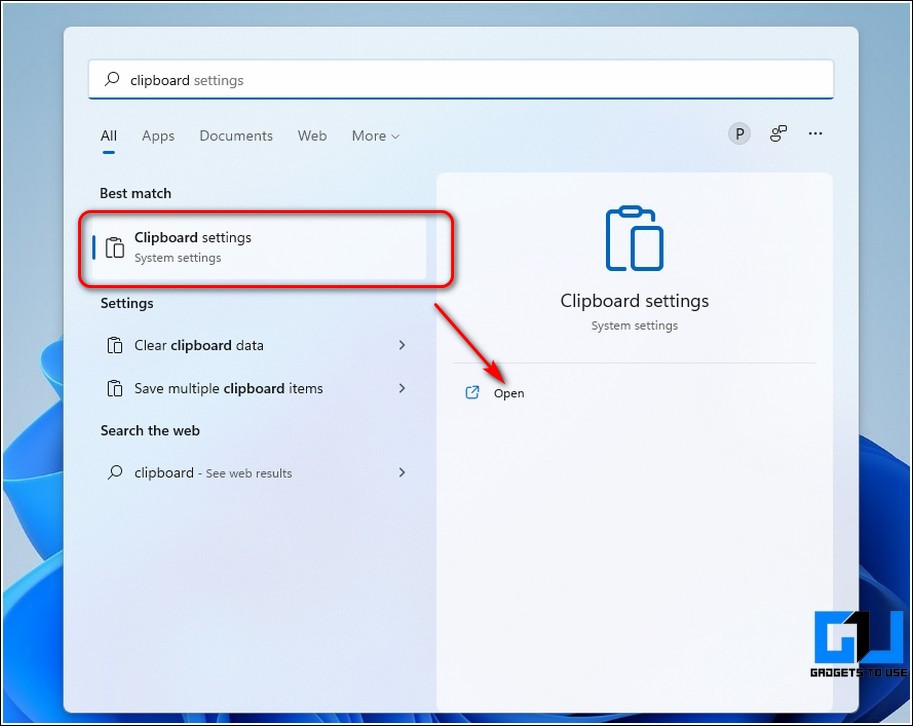
1. Press the Windows key and search for the Clipboard Settings to open it.
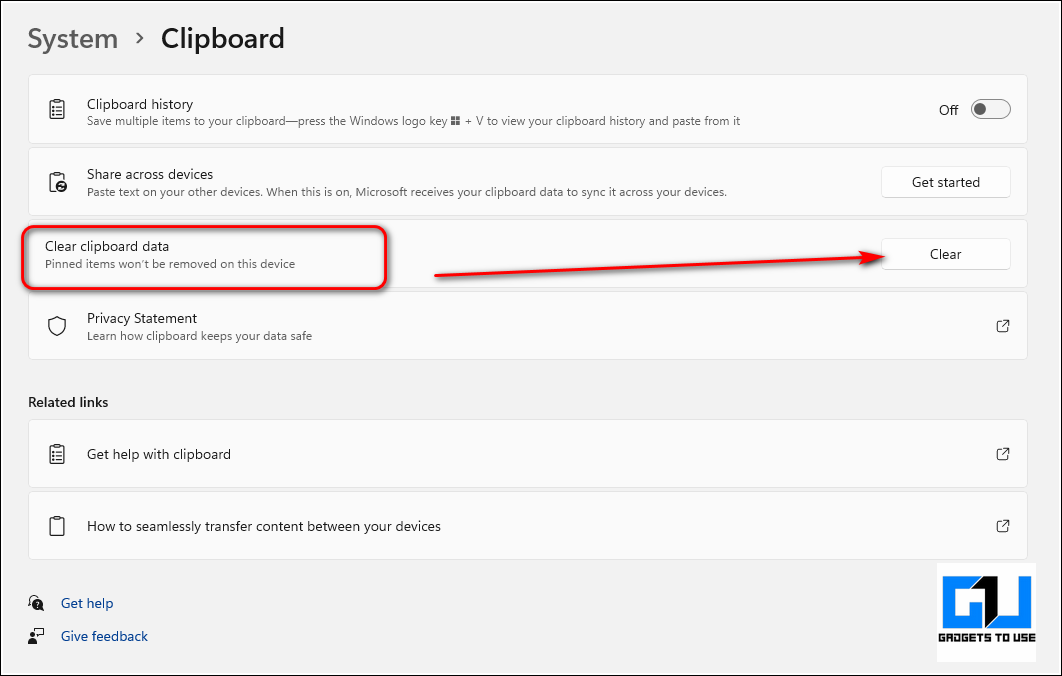
2. Further, click on the Clear button in front of the Clear Clipboard Data option to remove all temporary files.
Activate Storage Sense to Clear Unnecessary Temporary Files
You can also automate your system to free up space and delete temporary files in your system and recycle bin using its Storage Sense feature. Follow these quick steps to activate storage sense on Windows 11 and then empty your PC’s recycle bin automatically.
Bonus Tip: Use Free Third-Party Tools Like CleanAfterMe or CCleaner
You can also make use of effective free third-party tools such as CleanAfterMe or CCleaner to easily clean temporary caches and unnecessary registry files consuming your system resources.
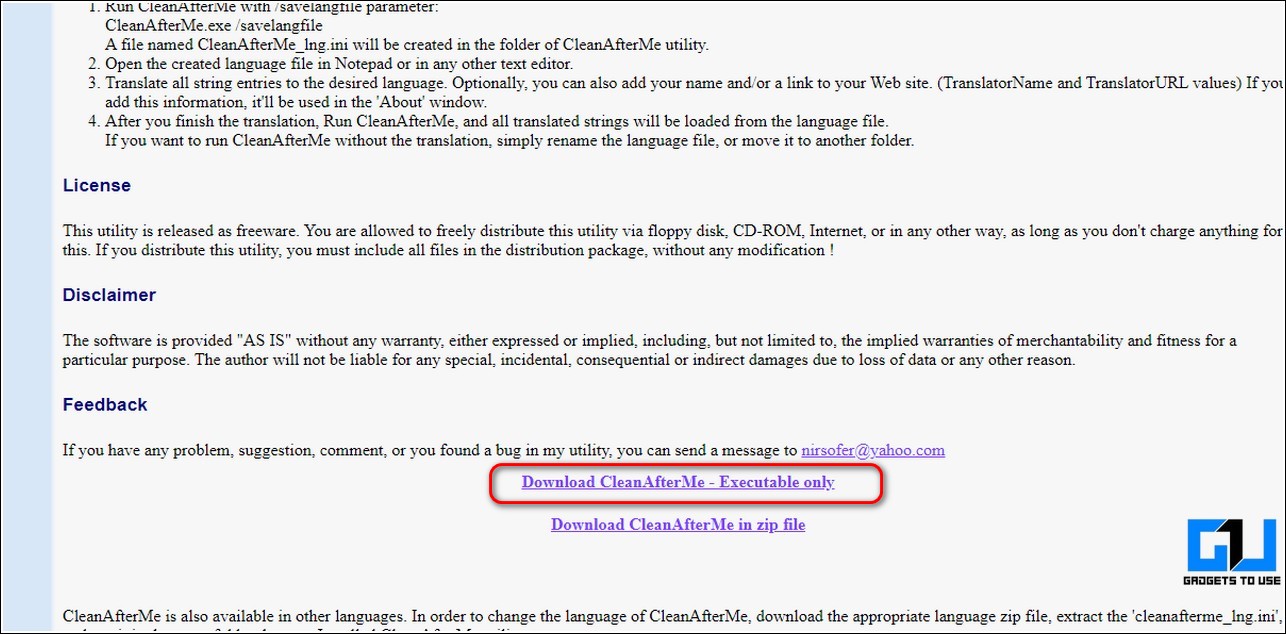
1. Open a new tab in your web browser and access the download page of the CleanAfterMe tool.
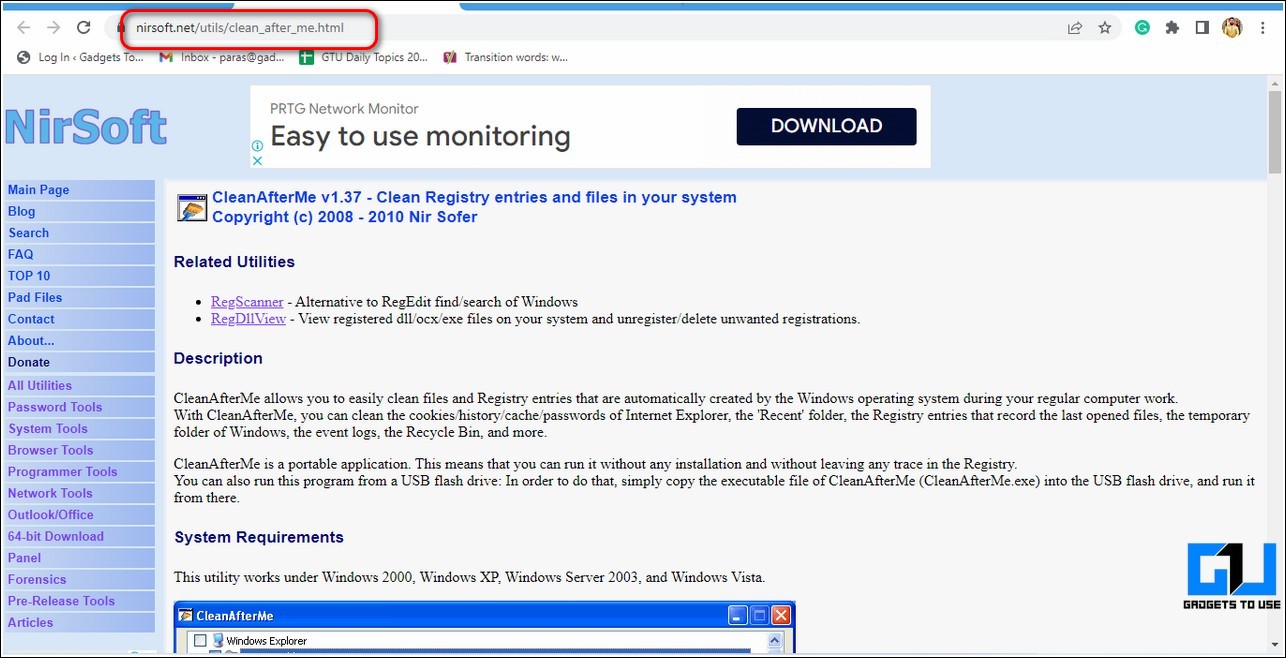
2. Scroll down to the bottom and click on the Download Clean After Me executable link.
3. Once you have downloaded the tool, double-click on it to open it.
4. Click on the Install Anyway button if prompted by Microsoft Store.

5. Next, check your desired toggles for different app and system-related cache files and click on the Clean Selected Items button at the bottom to remove them.

6. That’s it. You’ve successfully removed all temporary cache files using this third-party tool.
You can also clear your temporary cache files on Windows 11 using a popular similar alternative known as the CCleaner app. Using this app, you can easily eliminate different sorts of junk files within a few clicks.
Related | Top 5 Ways to Disable Microsoft Defender in Windows 11
Wrapping Up: Remove Caches to Speed Up
We hope that you’ve now successfully removed different cache files from your Windows 11 system using the above-listed methods. If this quick read has helped you to improve your Windows 11 performance, then hit the Like button and share this guide among your friends to assist them as well. Stay tuned for more Windows troubleshooting guides.
You can also follow us for instant tech news at Google News or for tips and tricks, smartphones & gadgets reviews, join GadgetsToUse Telegram Group, or for the latest review videos subscribe GadgetsToUse Youtube Channel.