Quick Answer
- If you can see the screenshot under Recent Files in the File Explorer, the screenshot is getting saved somewhere on your Windows computer.
- If you use your Microsoft Account as a sign-in method or OneDrive on your Windows PC, you should check whether your computer is saving your screenshots to OneDrive instead.
- Here, let’s see working methods to fix the screenshot not saving to the Screenshots folder on Windows 11 or 10.
Does pressing Windows + Print Screen combination not save the screenshot automatically on your Windows PC? Well, do not worry, there’s no problem with the Windows running on your computer. All you need to do is check a few things to fix this issue. Here, let’s see working methods to fix the screenshot not saving to the Screenshots folder on Windows 11 or 10.
Also, Read | Top 5 Ways to Enable Dark Mode in Windows 11 Native Apps
Fix Windows Not Saving Screenshot to Screenshots Folder
Windows allows auto-save the screenshot of the entire screen by pressing Windows + PrtScn together. However, if you are experiencing issues in auto-saving the screenshot on your Windows PC, follow these solutions below.
Method 1- Check the Screenshot Key Combination
On some Windows PCs, you need to press an additional button to capture and save a screenshot. Try pressing the Fn Key (Function key) + PrtScn, or you can use another combination, i.e., Fn Key + Windows Key + PrtScn, to capture a screenshot.
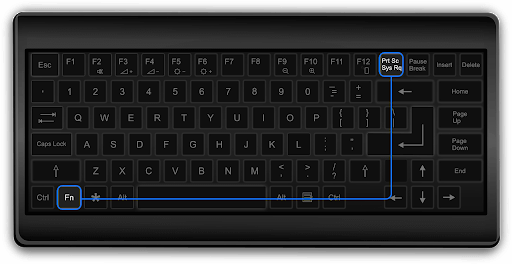
Your screenshot should appear in the Screenshots folder, under Pictures.
Also, Read | 6 Easy Ways to Take Screenshot on Any Windows Laptop
Method 2- Check Your Microsoft OneDrive
If you use your Microsoft Account as a sign-in method or OneDrive on your Windows PC, you should check whether your computer is saving your screenshots to OneDrive instead.
Generally, Windows displays a message when it saves the screenshot to OneDrive, but there are chances you might have accidentally disabled the notification. In that case, you can check whether your screenshots are getting saved in OneDrive or not as follows:
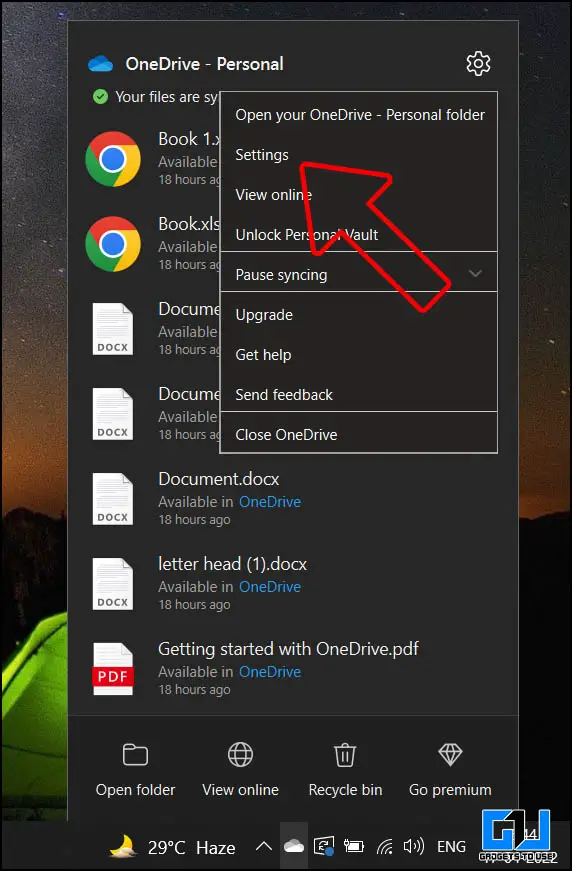
1. Right-click the OneDrive icon near the clock on your taskbar. Click More > Settings.
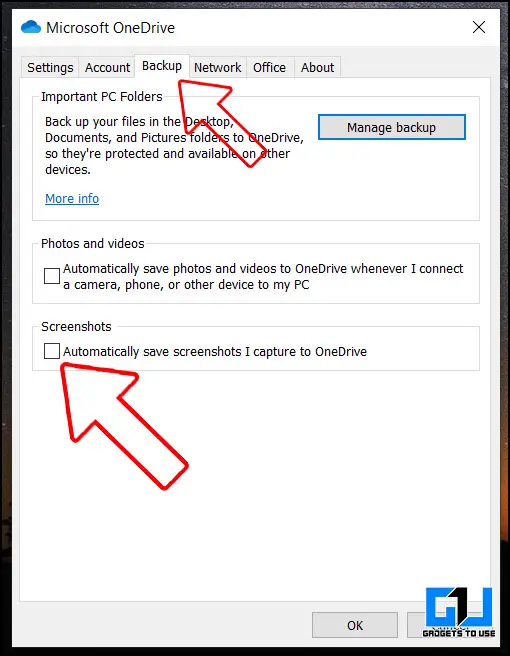
2. Switch to the Backup tab. Make sure the check box for “Automatically save screenshots I capture to OneDrive” is un-checked. In case it is selected, then un-select it.
Also, Read | 5 Ways to Fix Slow Printing Issue on Any Printer in Windows and Mac
Method 3- Check System Permissions of Screenshots Folder
If the above method didn’t work for you, there is a possibility that something is wrong with the screenshot folder. You can check and fix the issue as follows:
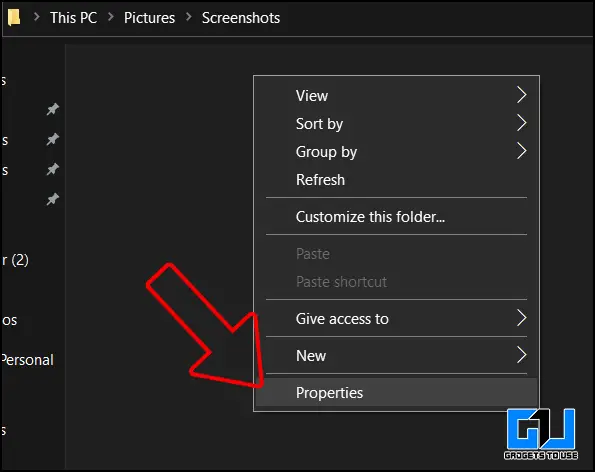
1. Go to the Screenshots folder on your Windows PC (File Explorer > Pictures > Screenshots).
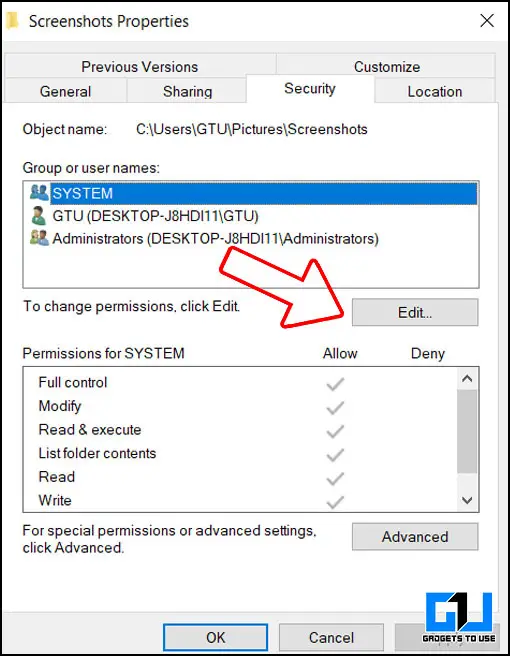
2. Right-click the folder and go to Properties.
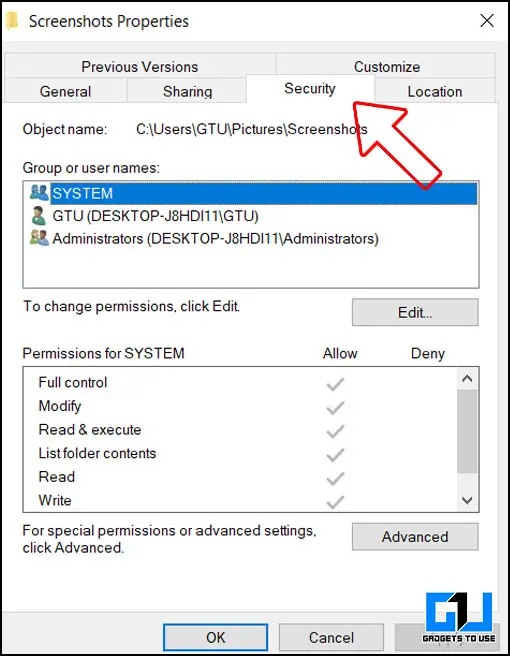
3. Switch to Security Tab and check if there’s a tick mark in front of Full Control.
4. If not, click on Edit and select the box in front of Full Control.
Also, Read | 15 Best Ways to Fix USB Not Detected on Windows 11
Method 4- Enable PrintScreen Key to Save Screenshot on Windows
If Windows is still not saving screenshots automatically, then you need to check whether your Print Screen key is not disabled. To do so, you need to follow these steps:
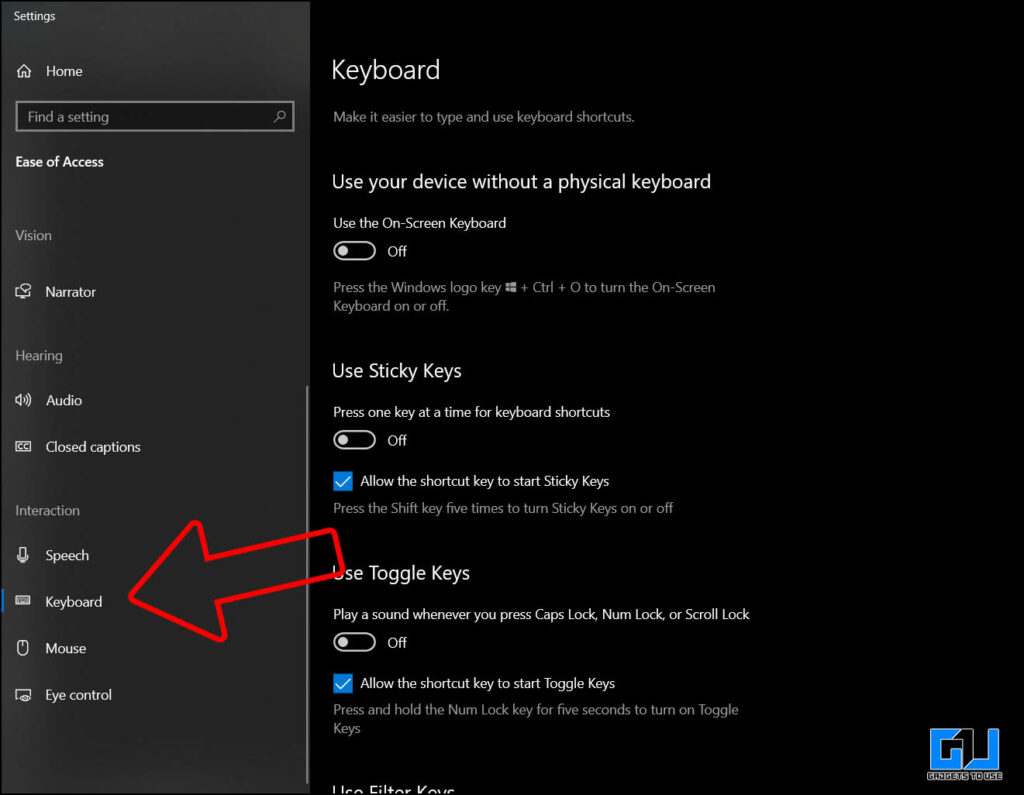
1. Press Window + U on your Windows computer to launch the Ease of Access menu.
2. Go to the Keyboard from the left pane bar under the Interactions category.
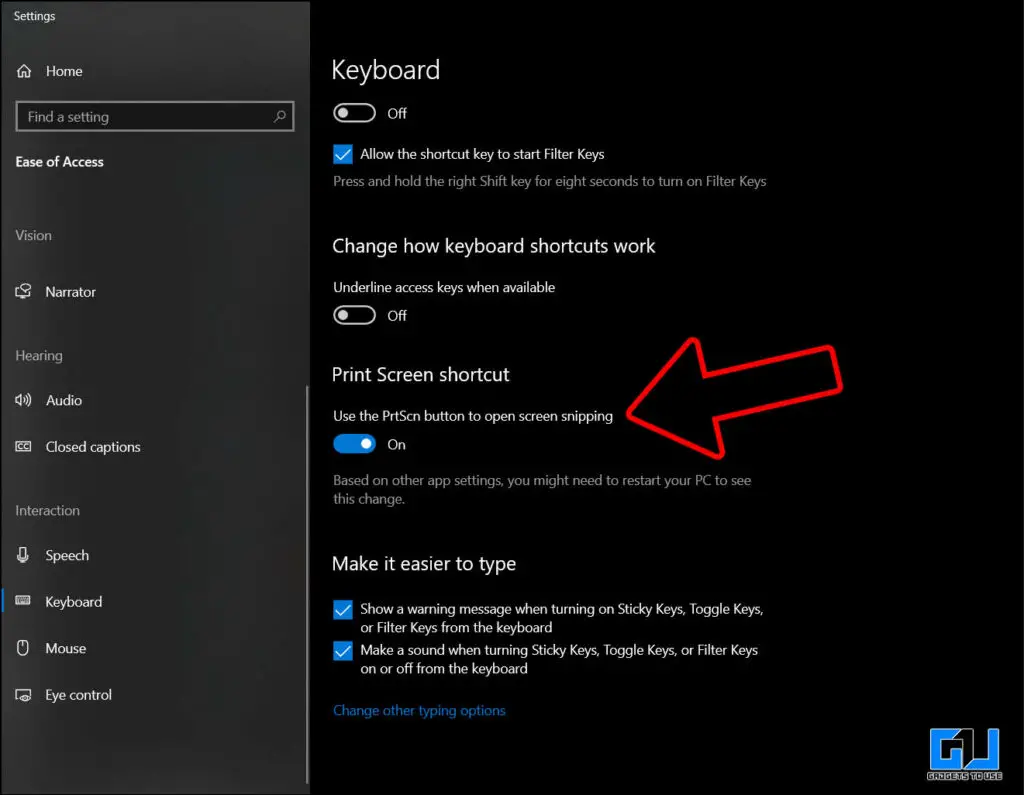
3. Scroll down and ensure the toggle of “Use PrtScn button to open screen snipping” is enabled. If not, enable it.
Also, Read | Top 12 Ways to Clear Cache Files in Windows 11
Method 5- Check Where the Screenshot is Getting Saved Locally
If you can see the screenshot under Recent Files in the File Explorer, the screenshot is getting saved somewhere on your Windows computer. You need to check where Windows is storing it. To do so, do the following:
1. Open File Explorer on your Windows PC. Go to Quick Access from the left pane.
2. Under Recent Files, right-click on the screenshot and tap Open file location.
That’s it. You now know where Windows is saving the screenshots you have captured so far.
Also, Read | 5 Ways to Fix Dark Screenshots Issue on iPhone- iOS 14
Method 6- Fix the Registry
Whenever you press the key combination, the screen gets dim, i.e., the Windows captures screenshots but they are not getting saved? In such a situation, you need to check the Windows Registry. Here’s how to do it:
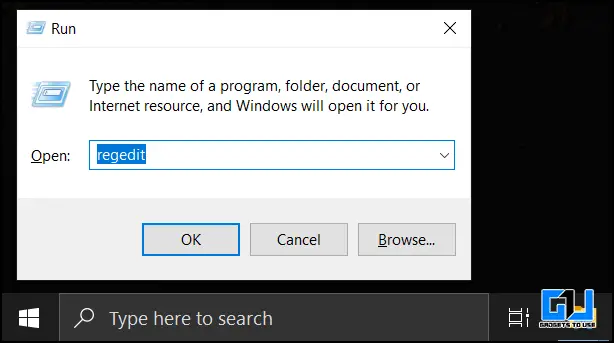
1. Launch Run by pressing Windows + R. Type and enter Regedit.
2. From the left pane, go to HKEY_CURRENT_USER\Software\Microsoft\Windows\CurrentVersion\Explorer (click on explorer).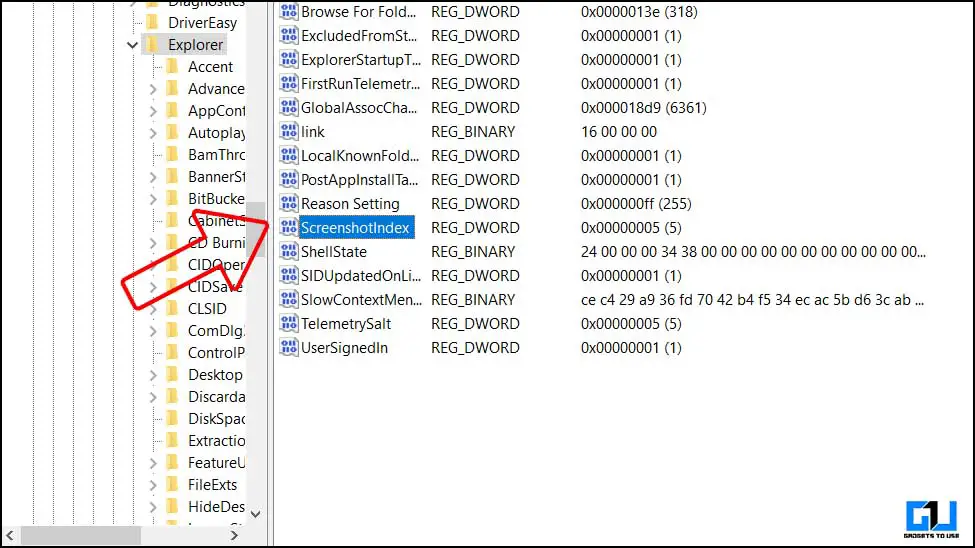
3. Look for ScreenshotIndex with registry REG_DWORD in the window towards the right.
If it doesn’t exist, you need to create it by right-clicking in the empty area > New > DWORD value and renaming it.
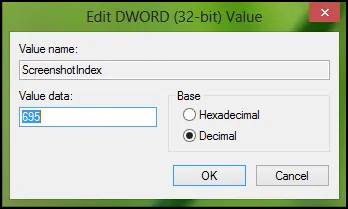
4. Double click on the new DWORD to modify it. Set the base to Decimal, and change the value to 695. Click OK.
5. Now go to this registry:
HKEY_CURRENT_USER\Software\Microsoft\Windows\CurrentVersion\Explorer\User Shell Folders
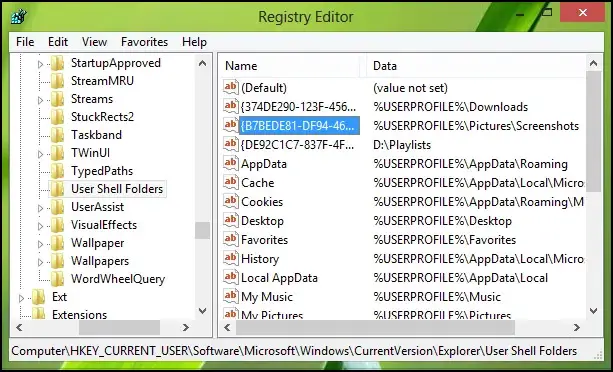
6. Look for {B7BEDE81-DF94-4682-A7D8-57A52620B86F}, which is an expandable string (REG_EXPAND_SZ).
7. Make sure the data value is %USERPROFILE%\Pictures\Screenshots.
8. Close the registry editor, reboot your Windows PC, and take a screenshot. It should now get saved to the screenshots folder.
Also, Read | 3 Ways to Use Focus Assist on Windows 11 to Block Apps and Sites
(Resolved) Windows Not Saving Screenshots
The above methods will likely fix the problem wherein screenshots you take on your Windows PC are not getting saved to the Screenshots folder. If still the issue is not solved, you need to run the Windows Repair program to fix any corrupted or accidentally deleted internal files of the operating system. Stay tuned for more such tech tips and tricks.
You can also follow us for instant tech news at Google News or for tips and tricks, smartphones & gadgets reviews, join GadgetsToUse Telegram Group or for the latest review videos subscribe GadgetsToUse Youtube Channel.
