Quick Answer
- To access iMessage on Windows, you first need to set up the Chrome Remote Desktop extension to your browser on Macbook to cast your screen remotely to the Windows screen.
- The idea is to create a virtual macOS machine using virtualization software such as VMware or VirtualBox and sign in to your iCloud account to use the iMessage service.
- Having said that, if you prefer to interact and use iMessage on a laptop instead of using it on your iPhone, for ease of access while working, then you’ve come to the right place.
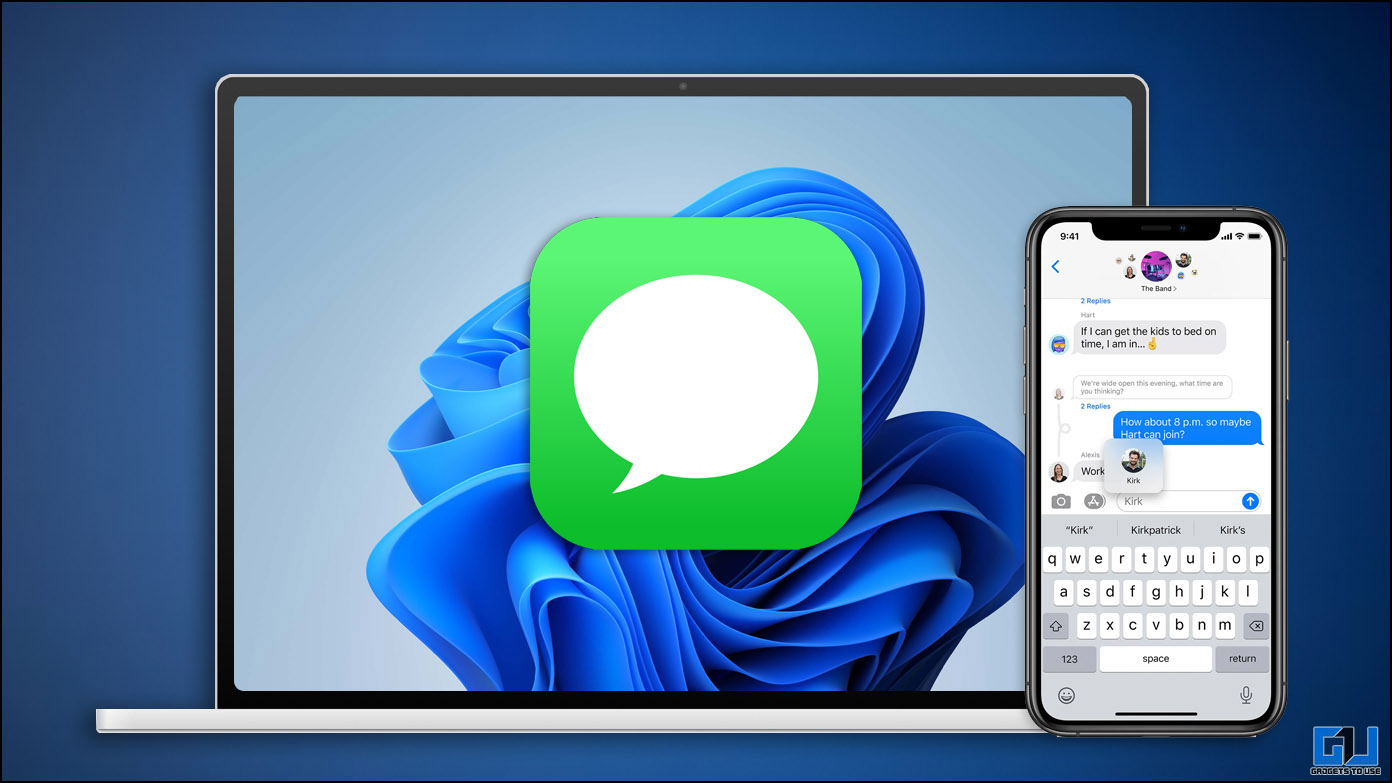
iMessage is a major deal breaker for iOS users, to ditch an iPhone or iPad, because of its helpful features, such as location sharing, sending animated stickers, and paying money via text. Having said that, if you prefer to interact and use iMessage on a laptop instead of using it on your iPhone, for ease of access while working, then you’ve come to the right place. As in this explainer, we demonstrate several ways to use iMessage on Windows 11/10 conveniently.
How to Use iMessage on a Windows 11/10 PC
Unlike macOS, Windows doesn’t have a dedicated messaging app from Apple to access the iMessage of your iPhone/iPad. However, if you are determined to use the same, we have researched effective solutions to fix the problem and use iMessage on Windows. So without any further ado, let’s get started.
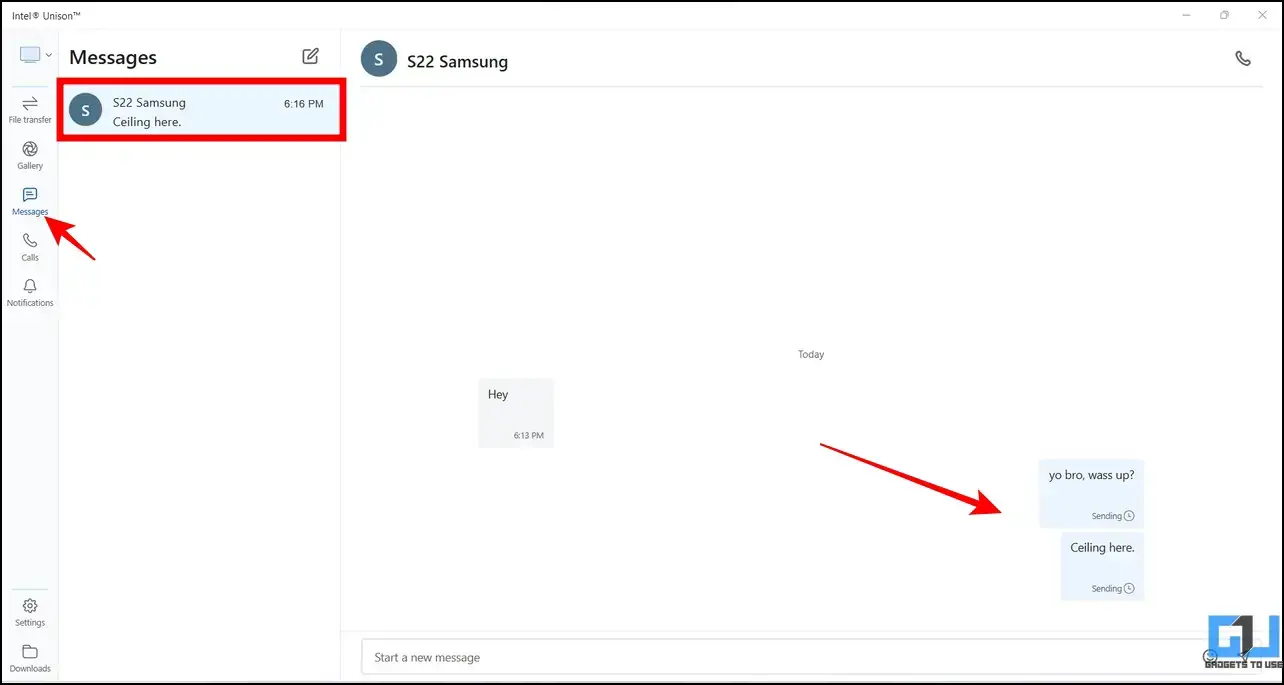
Install Intel Unison to Use iMessage on Windows
Intel has recently introduced its Unison app for Windows, which is designed to work with both Android and iOS devices. Consequently, you can connect your iOS device to Windows for using iMessage and other useful features such as transferring files, checking notifications, etc. Once connected, you can browse and reply to your existing iMessages or create a new conversation with your friend from the comfort of your Windows machine. Follow our quick guide to install Intel Unison on Windows for using iMessage.
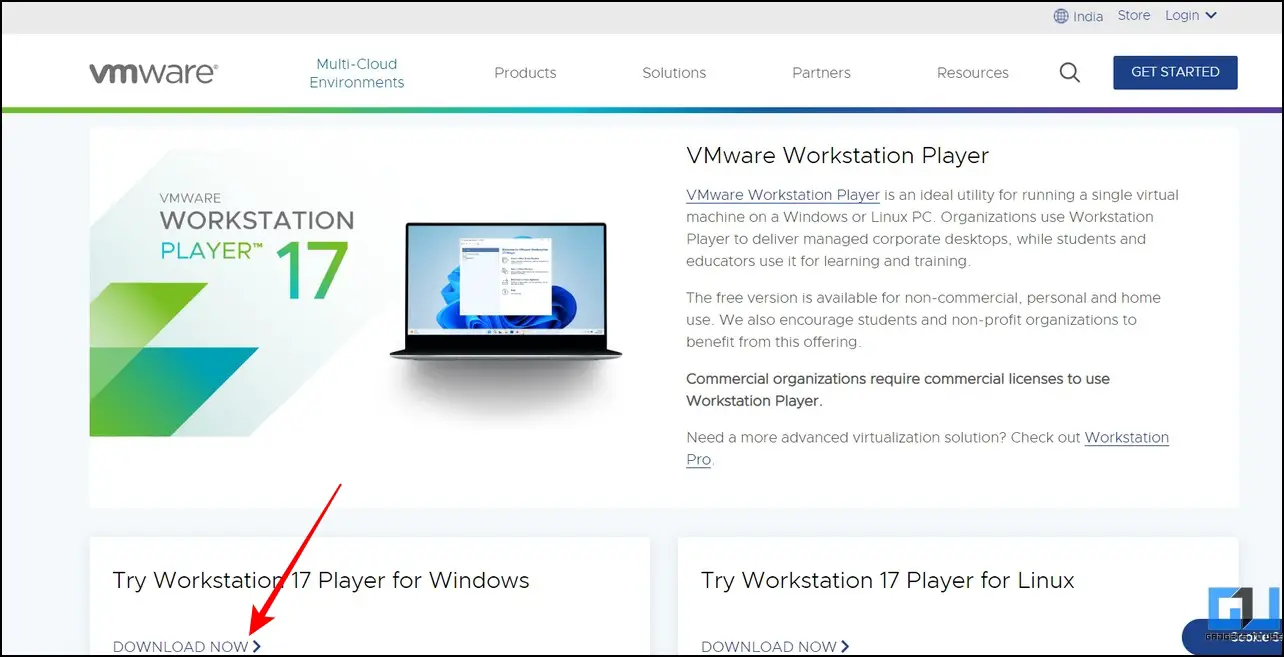
Create a ‘Virtual Mac’ to use iMessage on Windows
Another working alternative to using iMessage on Windows is to create a Virtual macOS Image. The idea is to create a virtual macOS machine using virtualization software such as VMware or VirtualBox and sign in to your iCloud account to use the iMessage service. Follow these steps to achieve the same:
1. Install VMware Workstation Player on your system from the official website.
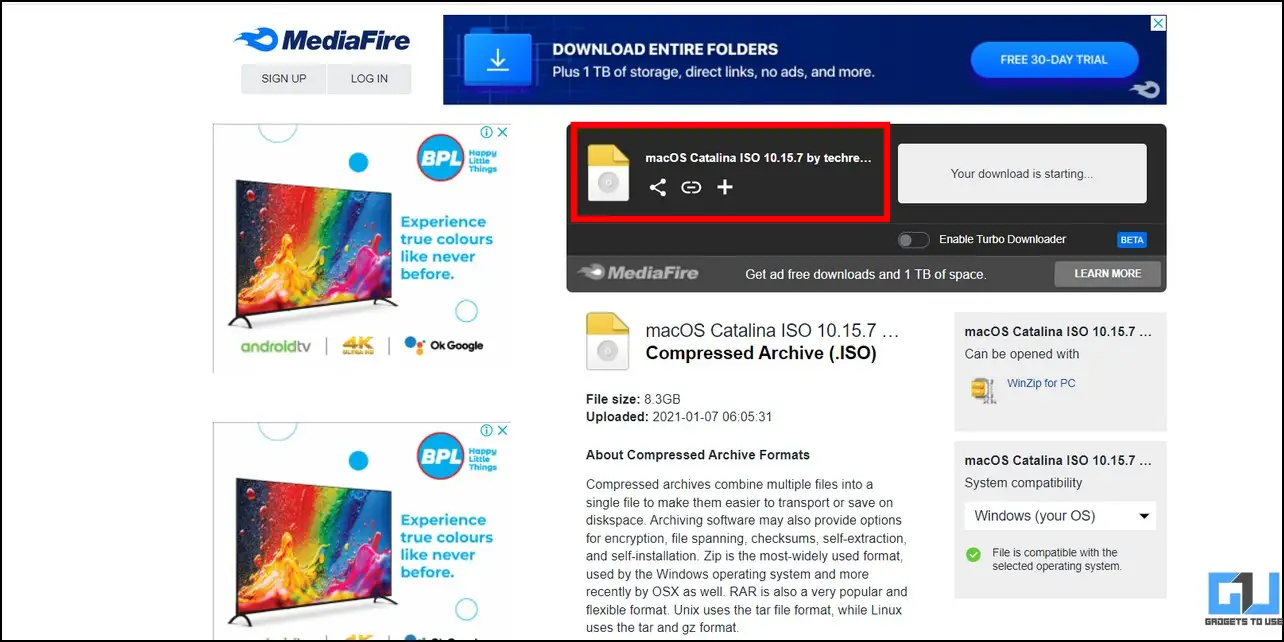
2. Next, download the latest macOS ISO file to your system.
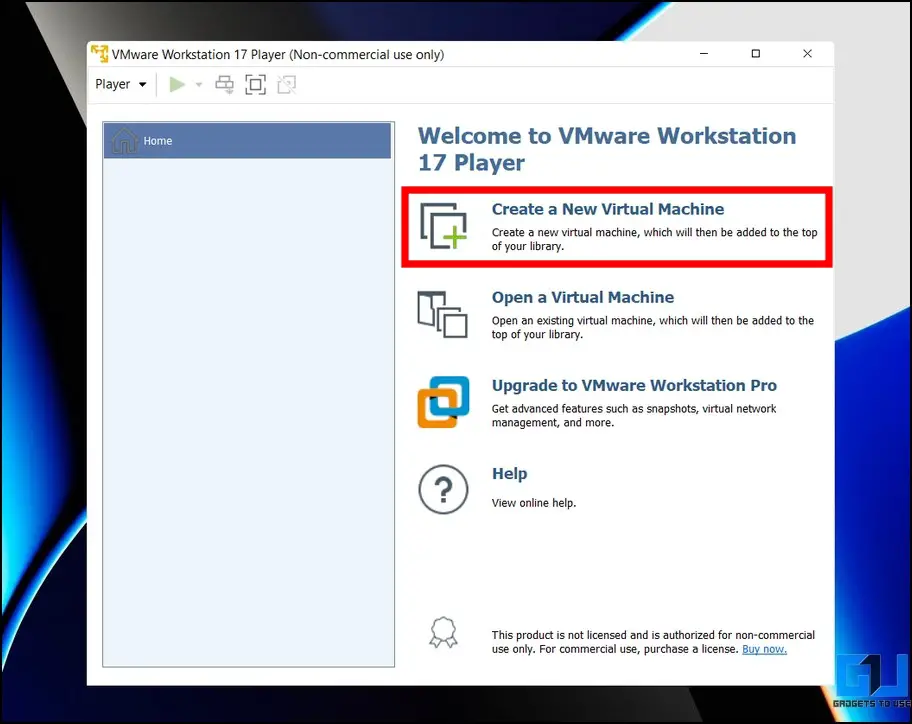
3. Open the VMware Player and press the Create a New Virtual Machine option.
4. Next, pick the downloaded image file using the Installer Disc image option.

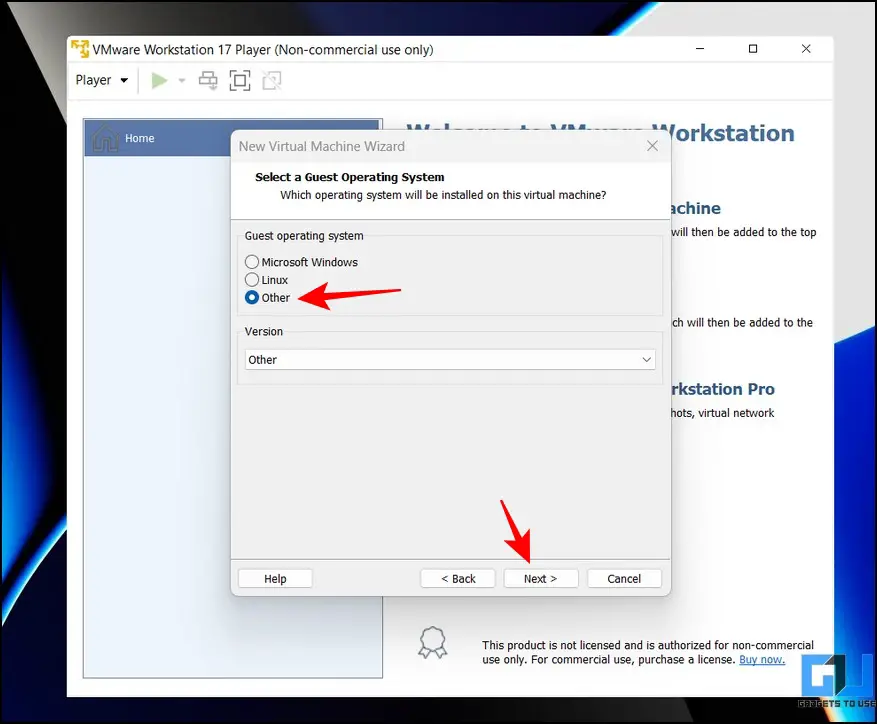
5. Select the Guest Operating system as Other and then click the Next button.
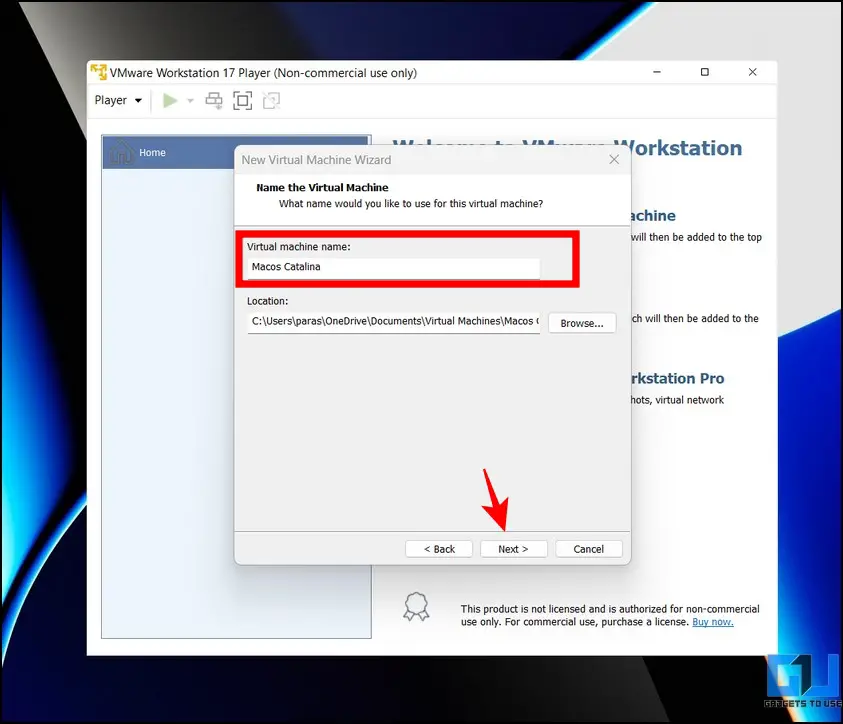
6. Further, provide a name to your virtual machine and proceed using the Next button.
7. Allocate at least 80 GB of storage capacity to the created machine.

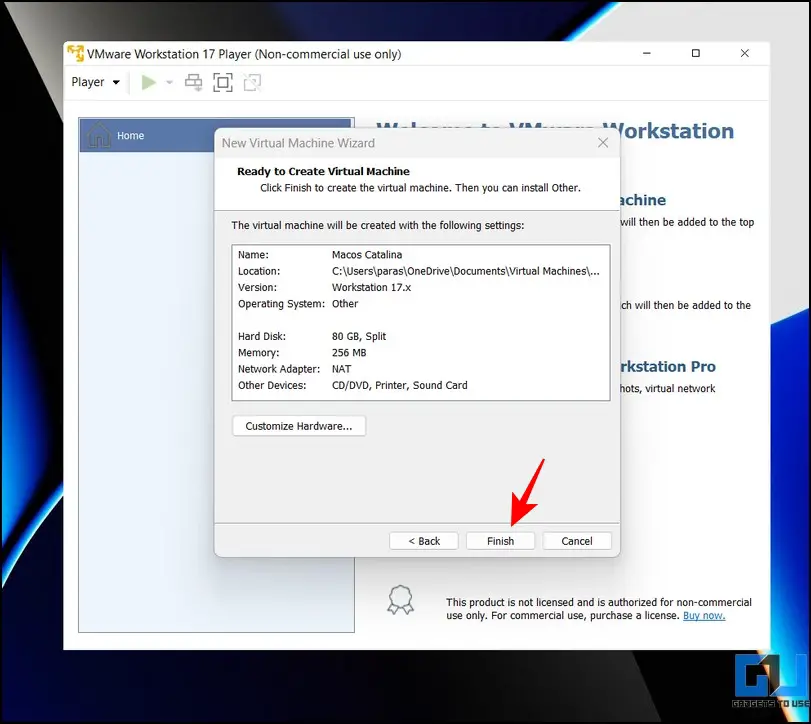
8. Finalize creating your virtual macOS by clicking the Finish button.
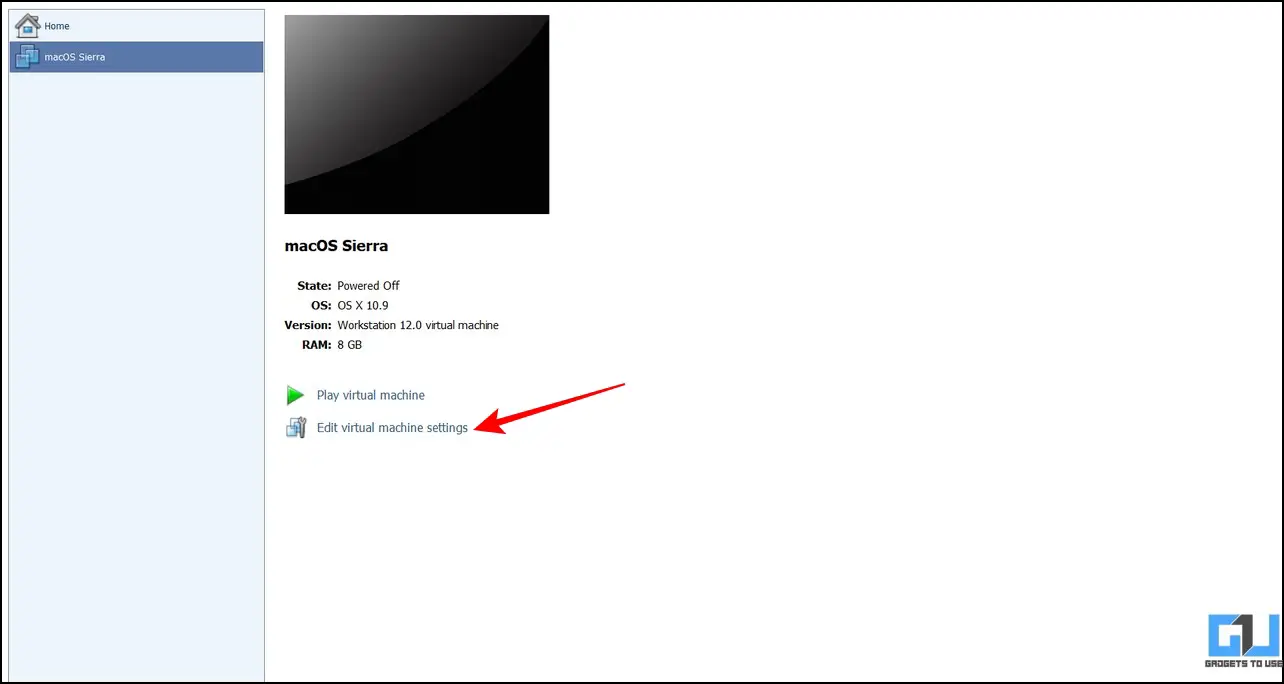
9. Now, head over to the created virtual machine and click the Edit Virtual machine settings to configure it.
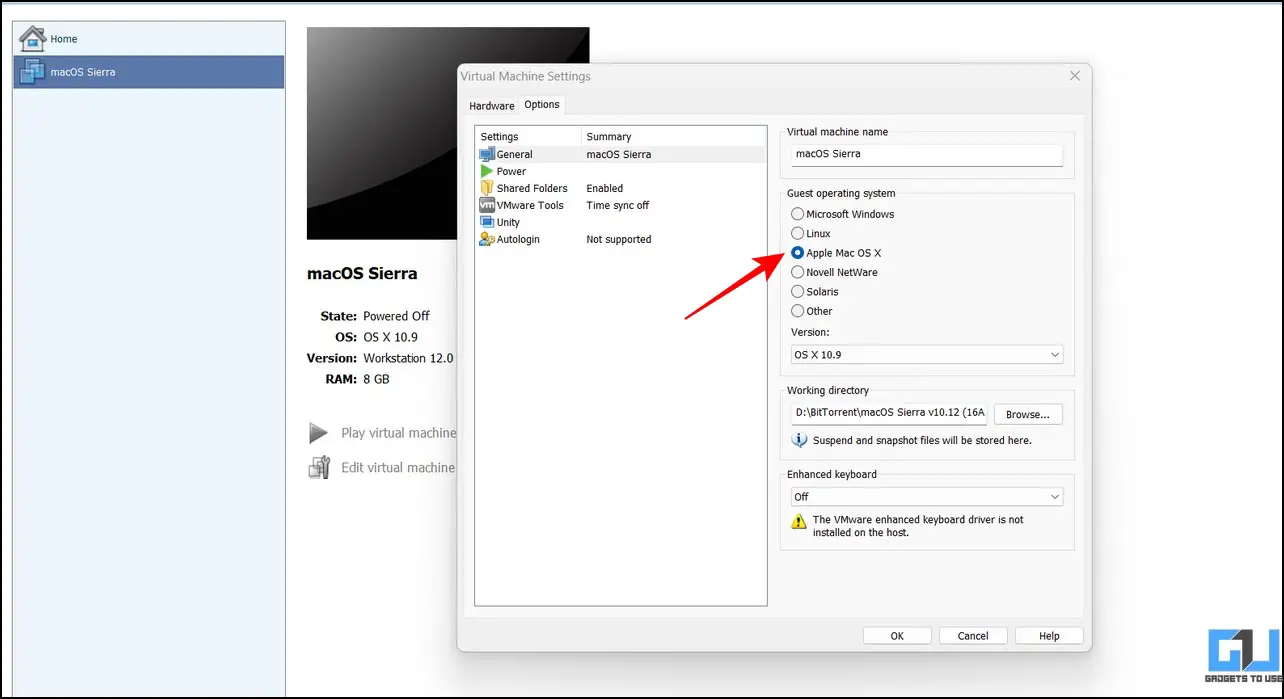
10. Switch to the Options tab and set the Guest OS as Apple Mac OS X. Once configured, play the Virtual machine to boot into macOS.
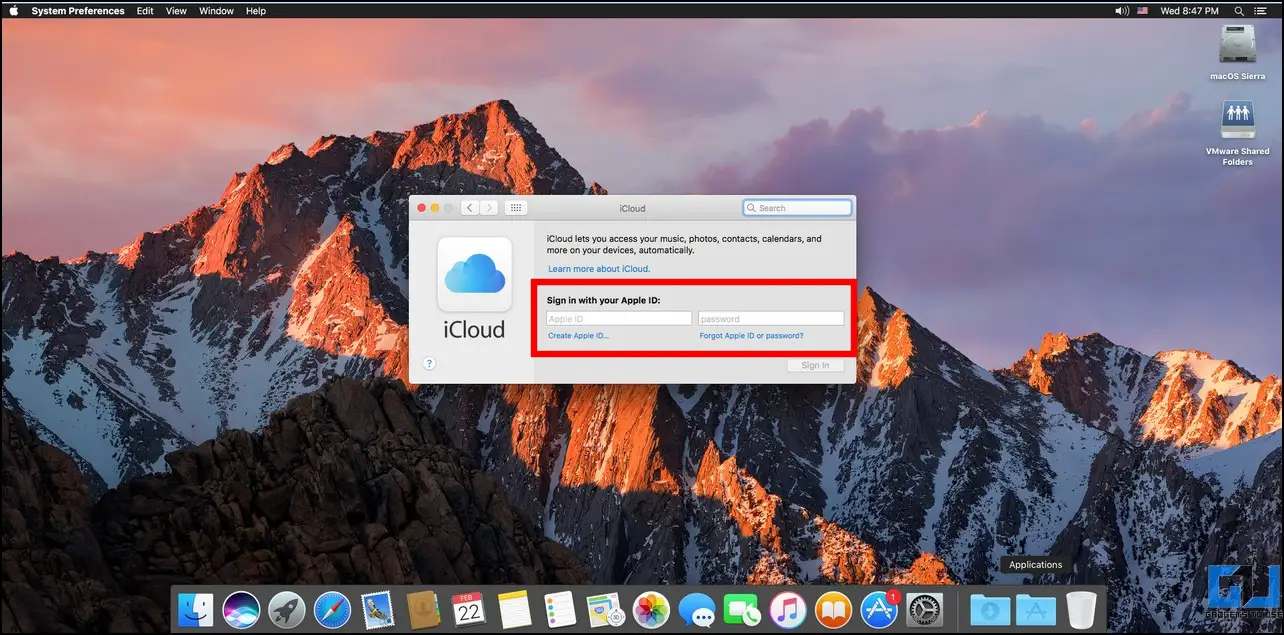
11. After the first boot, click the Settings button in the Dock to access iCloud.

12. Sign in with your iCloud account (that you’re using on your iPhone/iPad) to access all iMessages.
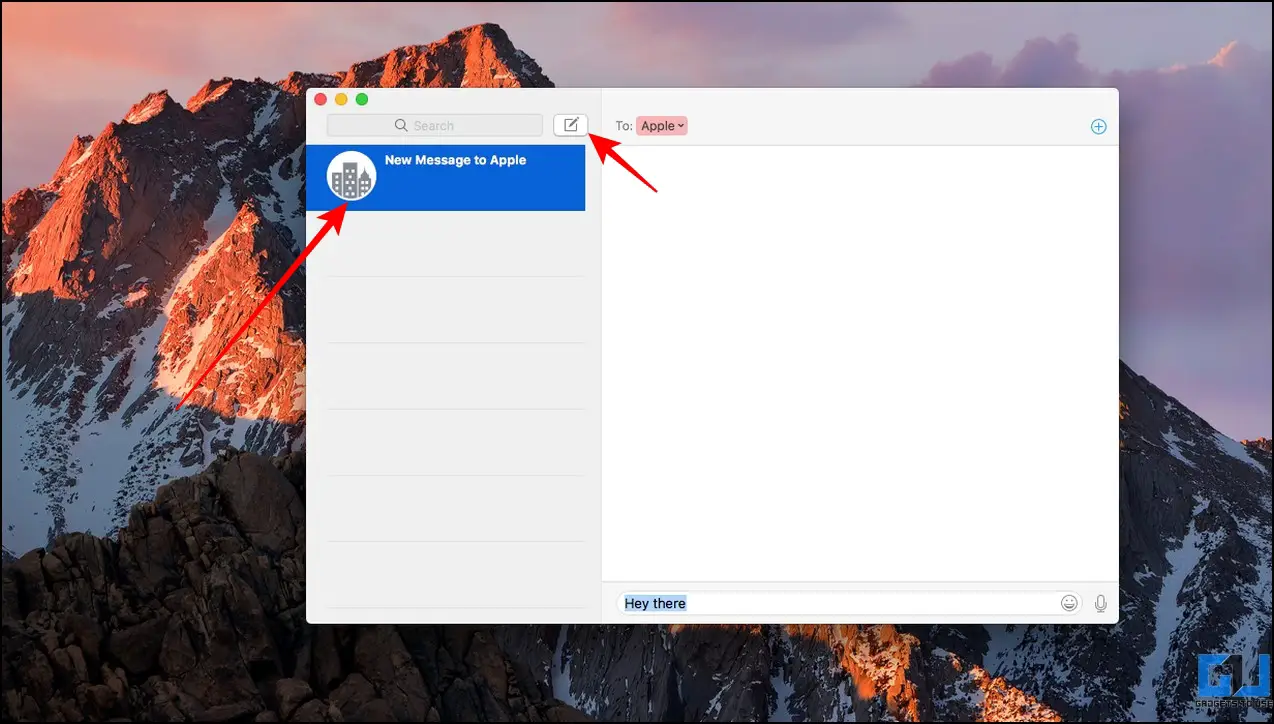
13. You can also compose and send one directly using the Compose button in the iMessage app.
You can also check out our dedicated guide to Installing macOS on Windows 11/10.
Try Chrome Remote Desktop to use iMessage on Windows 11/10
If your system is incompatible with running Intel Unison or VMware, you can try the Chrome Remote Desktop feature to use iMessage on Windows 11/10 computer. Using this feature, you can share and operate your macOS screen straight from your Windows PC to access the iMessage service in the browser app. Here’s what you need to perform the same:
Note: For this method to work, you must have a Macbook, as it will be used to access iMessage remotely using the Chrome RDP extension.
On Macbook
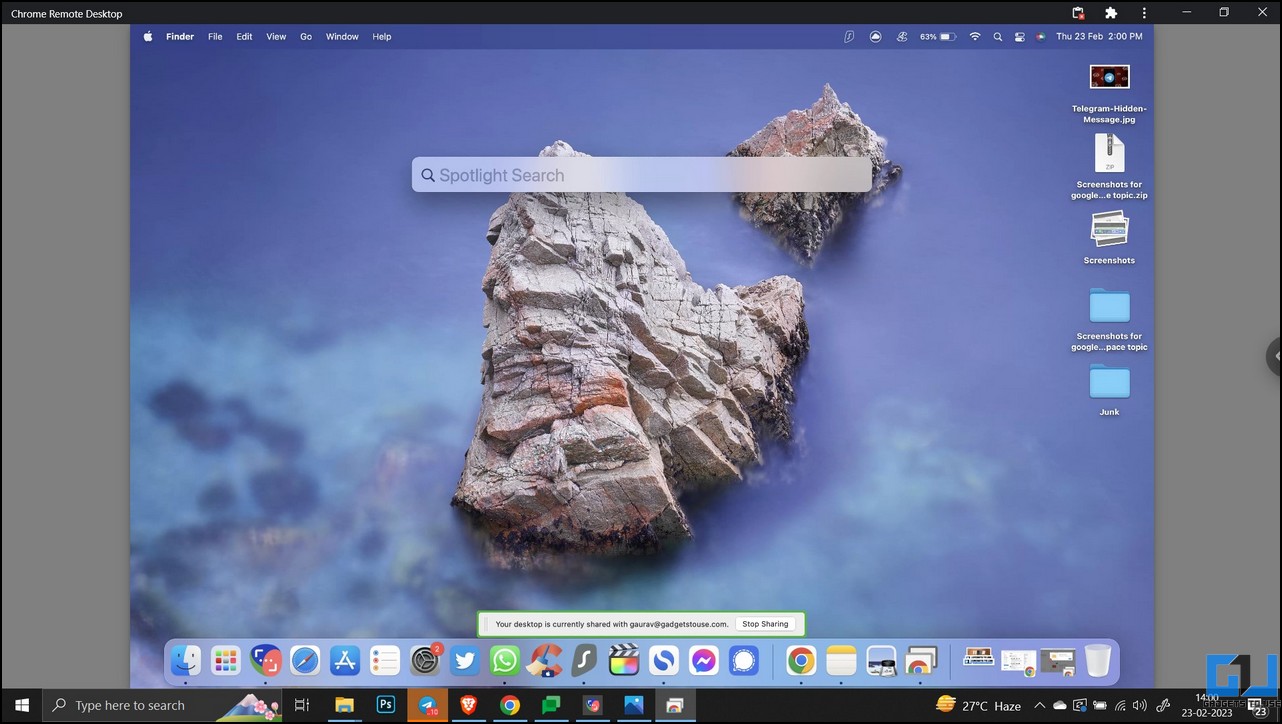
To access iMessage on Windows, you first need to set up the Chrome Remote Desktop extension to your browser on Macbook to cast your screen remotely to the Windows screen. Here’s what you need to follow:
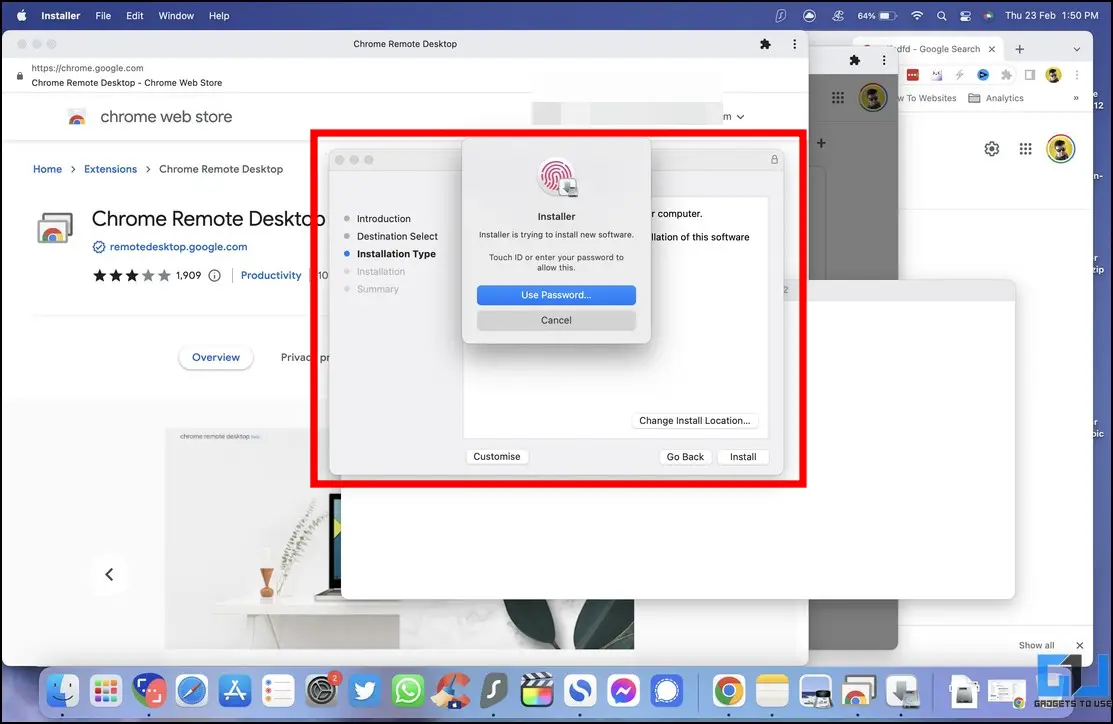
1. Access the Chrome Remote Desktop webpage to install its extension to your browser.
2. Next, click the Install button to install the Chrome Remote Desktop extension to your Macbook.
3. Follow the on-screen instructions to complete the installation.
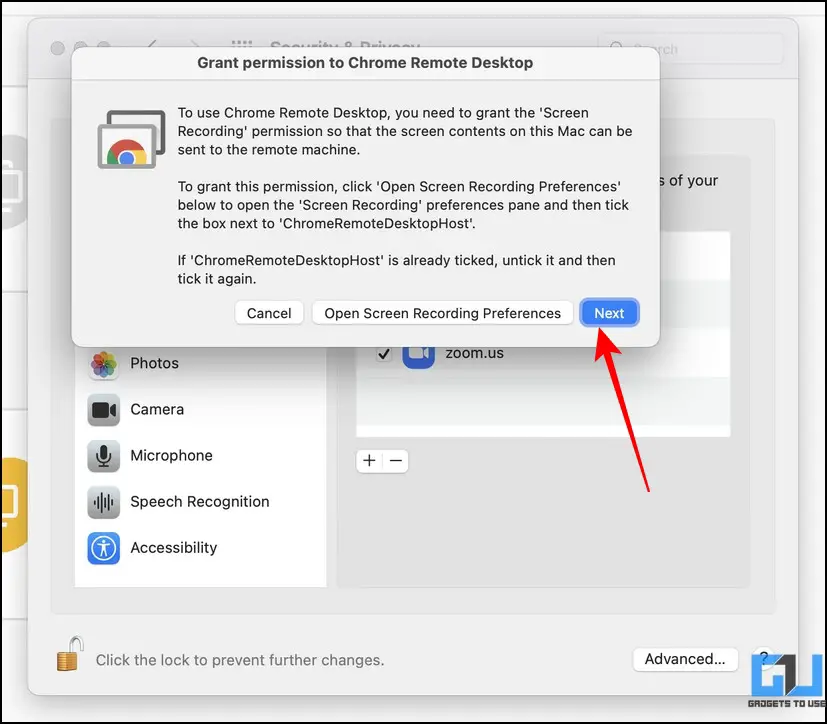
4. On the next page, grant the necessary permissions for the extension to work.
5. Once set up, click the Generate Code button to remotely share your mac’s screen with a different device.
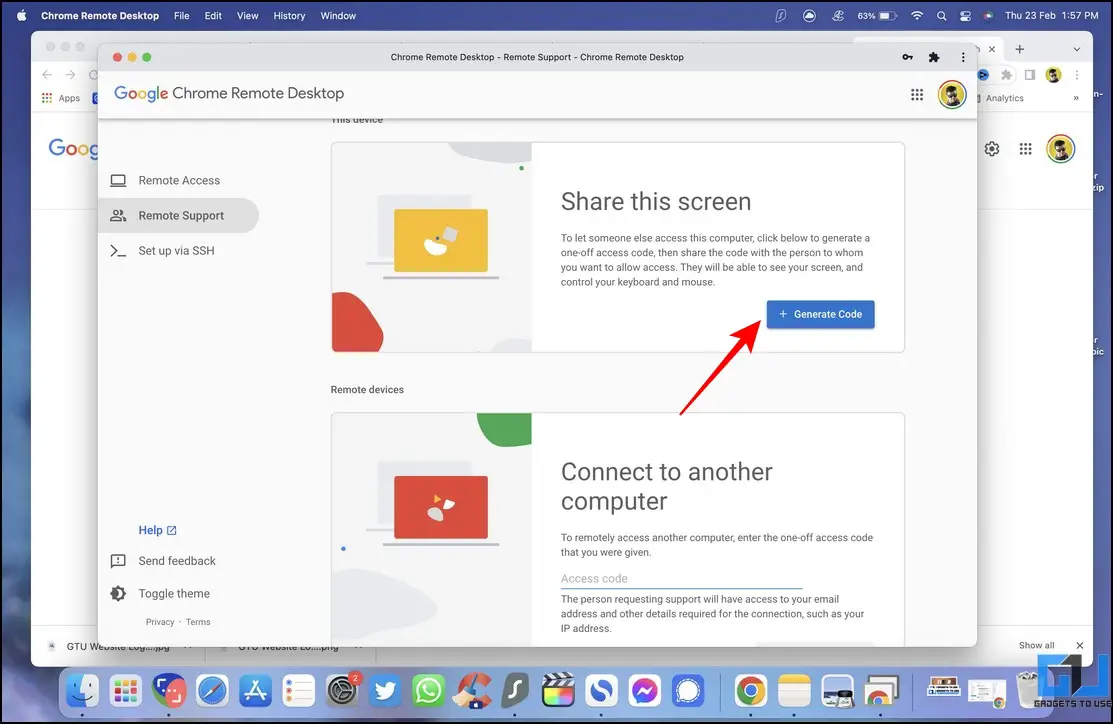
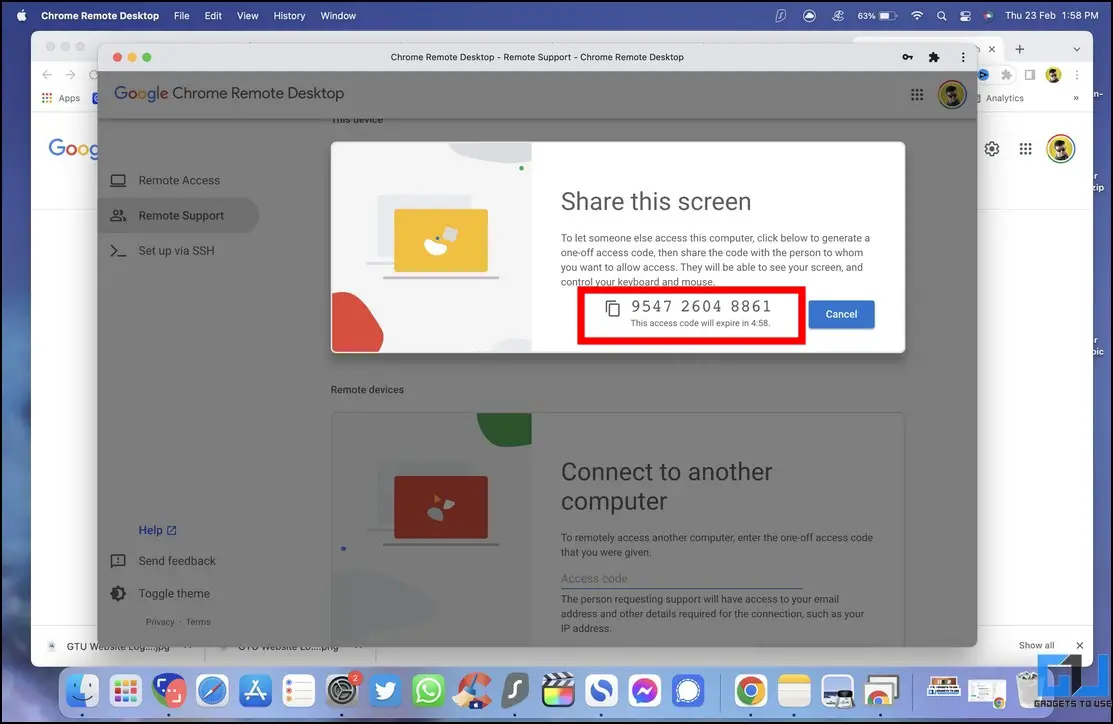
6. Note down or copy the code to enter it in the Chrome RDP extension on your Windows PC.
On Windows PC
Now that you have set up the Chrome Remote Desktop on your Macbook, follow these easy steps to access iMessage from your Windows PC.
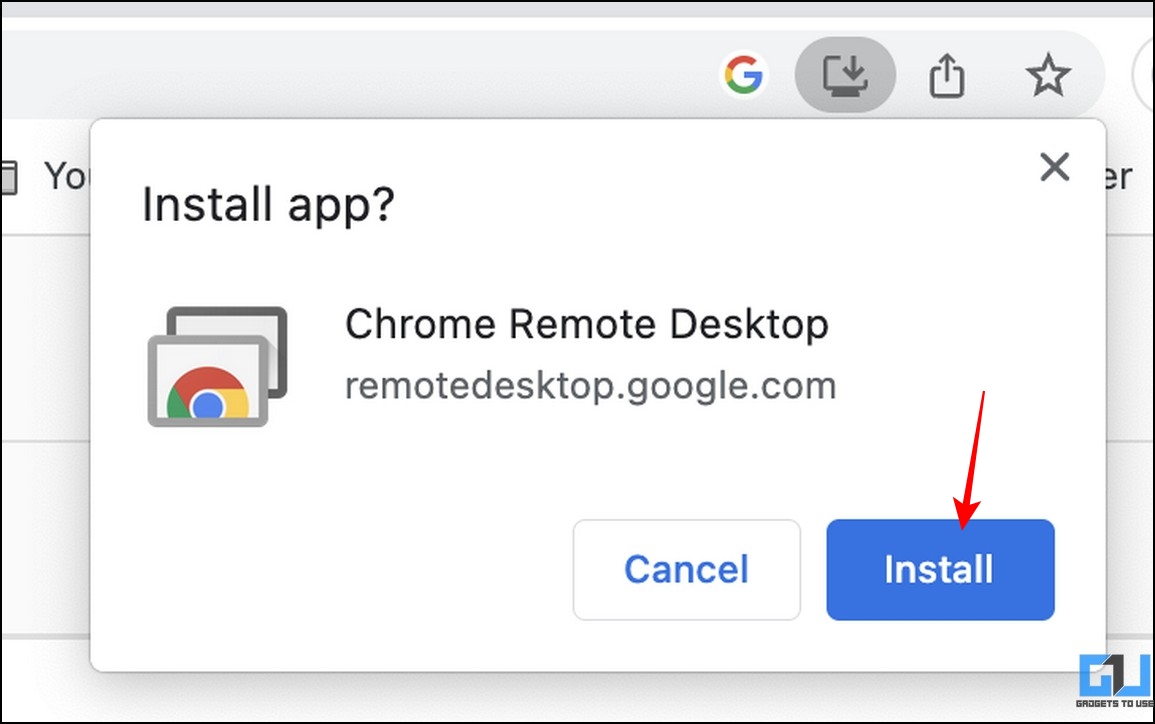
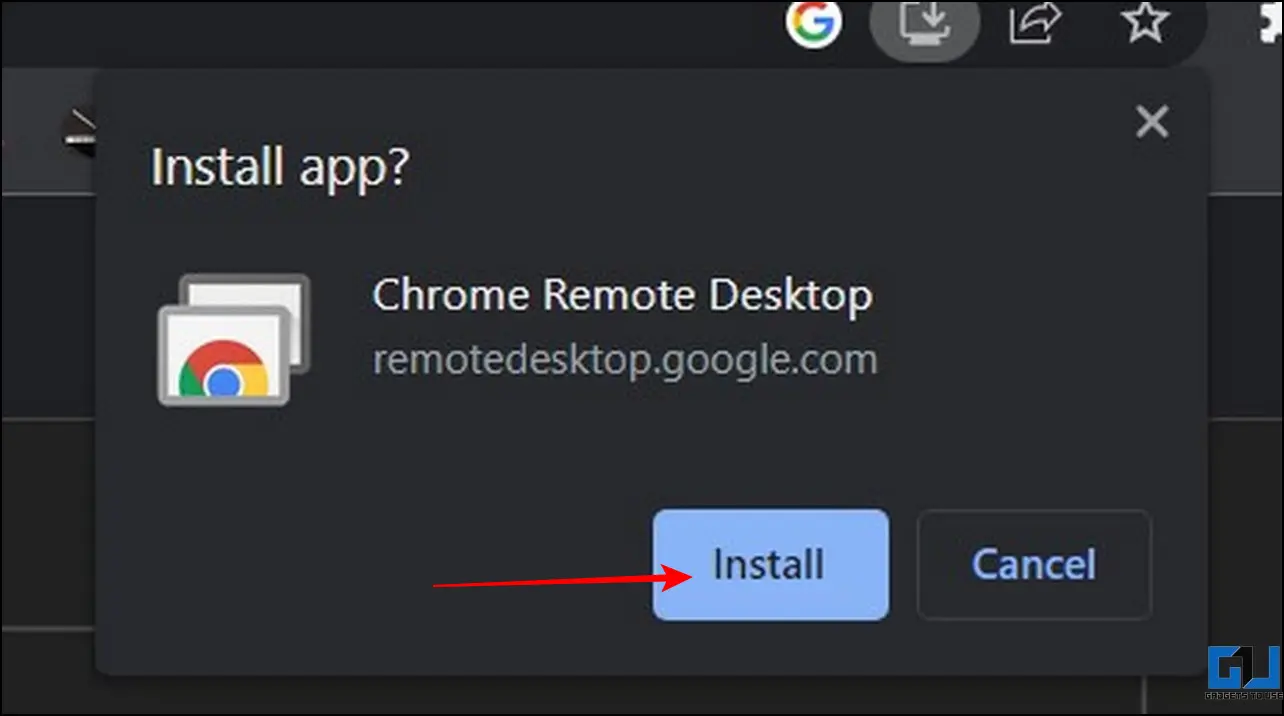
1. Install the Chrome Remote Desktop app from the Chrome RDP webpage on your Windows PC.
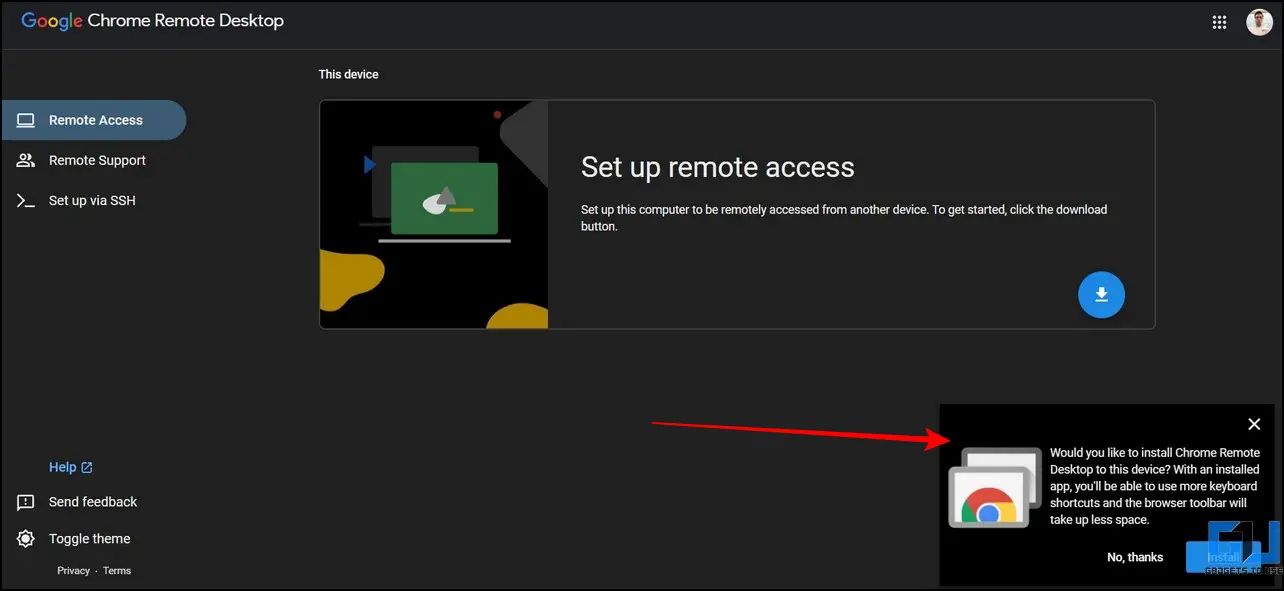
2. Click the Install button when prompted and follow the on-screen instructions to install the application.
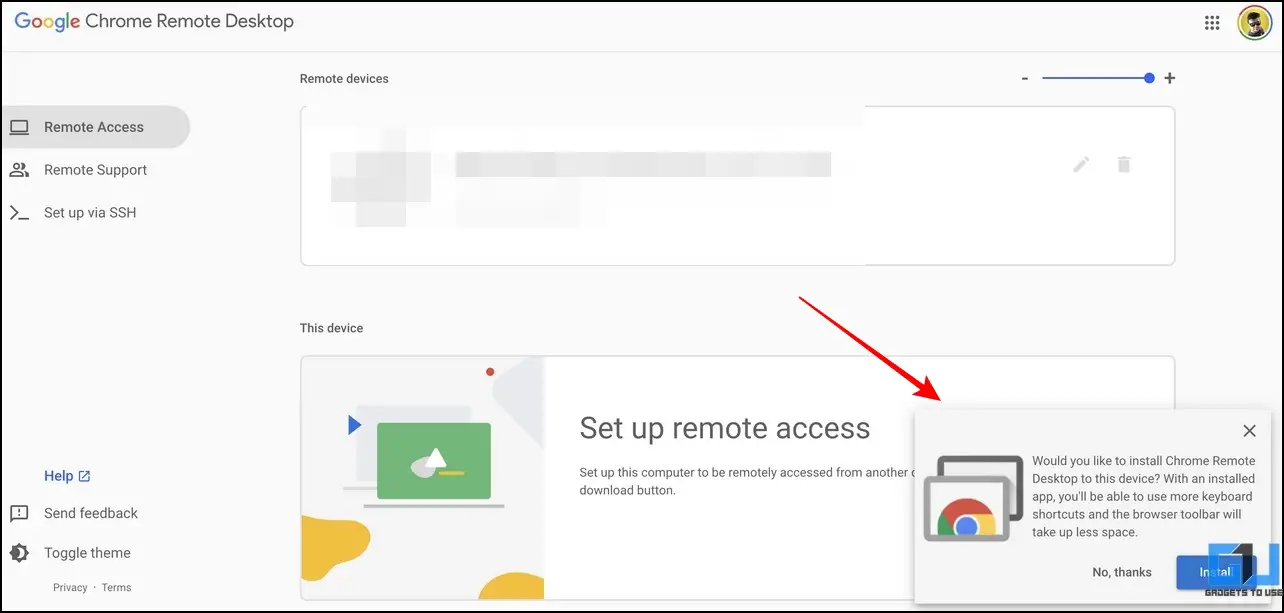
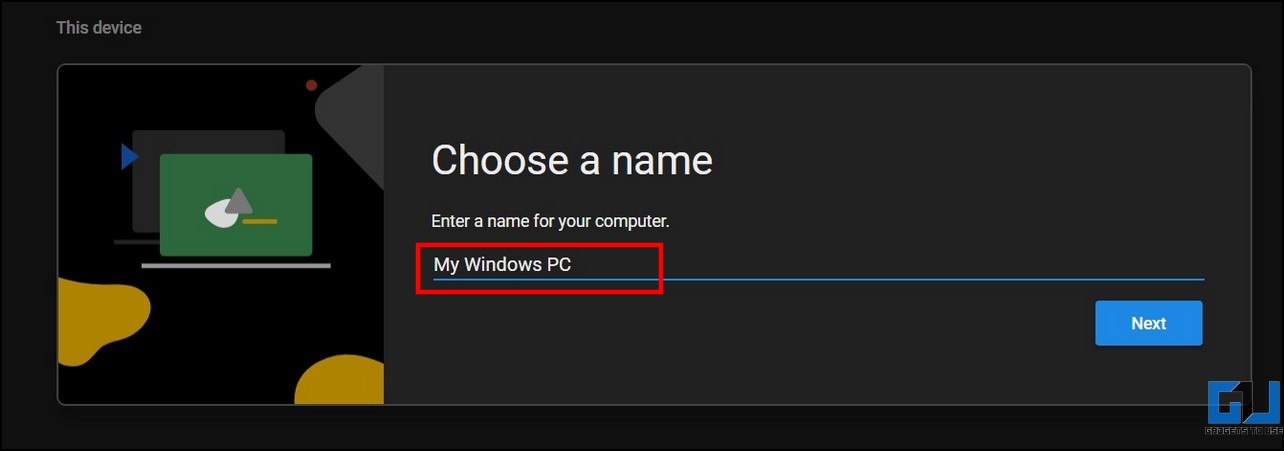
3. Select your system’s name and press the Next button to proceed.
4. Once set up, click the Remote Support option in the left sidebar to locate the Remote Devices section.
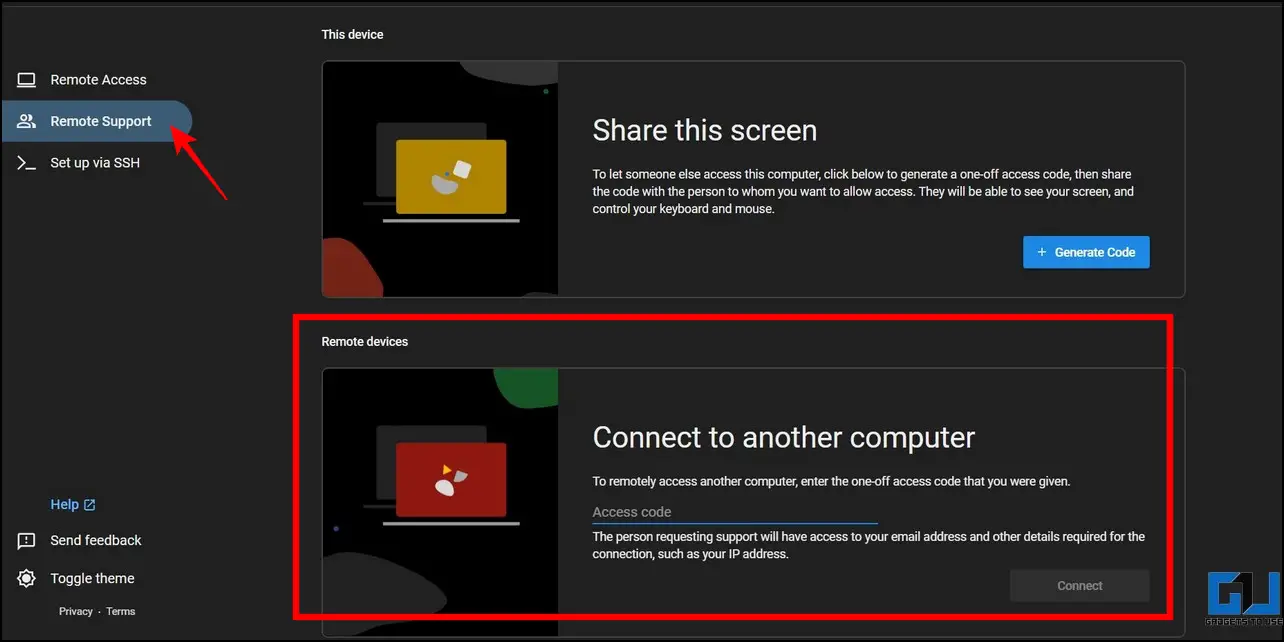
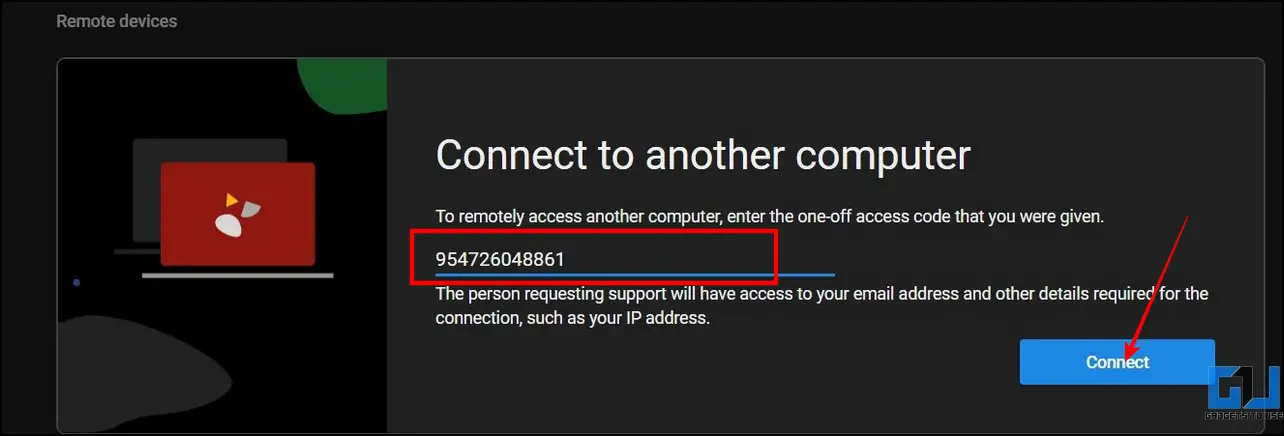
5. Here, enter the MacBook’s CRD code copied earlier and click the Connect button.
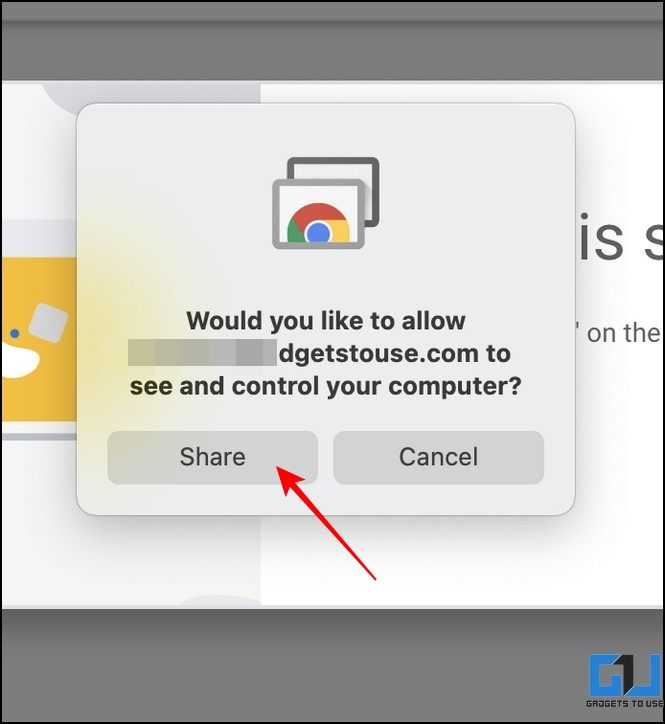
6. You will receive the prompt on your Macbook to approve the connection. Click the Share button to approve the incoming remote request.
7. That’s it! You can now access your Macbook screen remotely on your Windows PC.
8. Finally, open the Messaging app from the Dock to access your iMessage.
View iMessage on Windows by Screen Mirroring
Besides controlling and using iMessage on Windows 11, you can always watch and monitor them by mirroring your iOS device’s screen on Windows. Follow these steps to learn how it works:
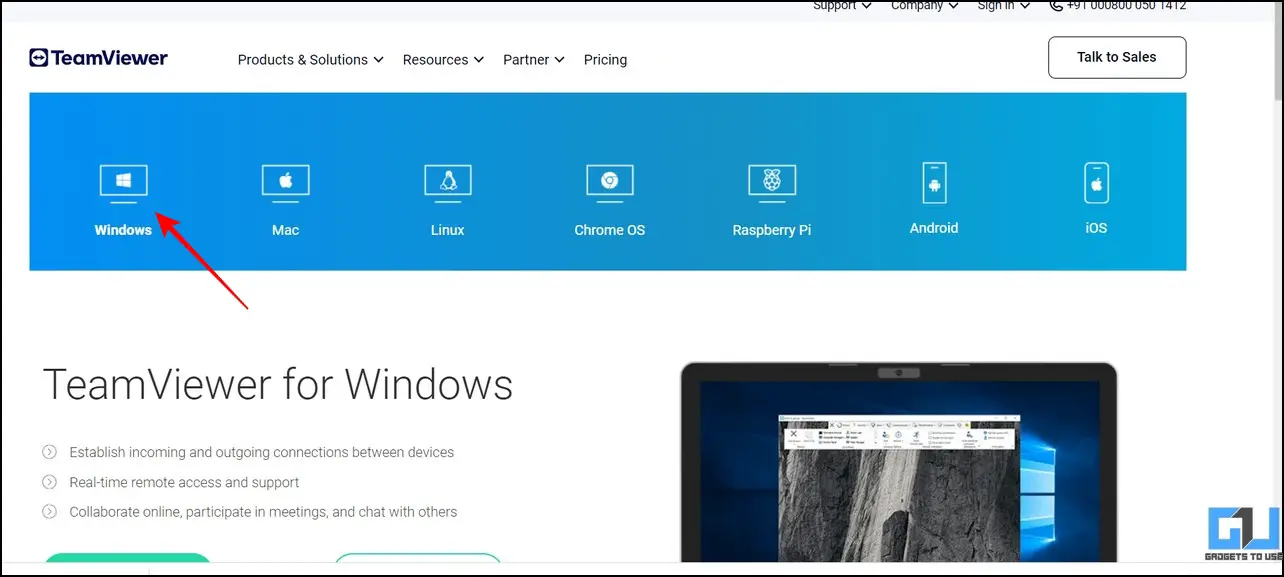
1. Install the Teamviewer app on your Windows 11/10 system.
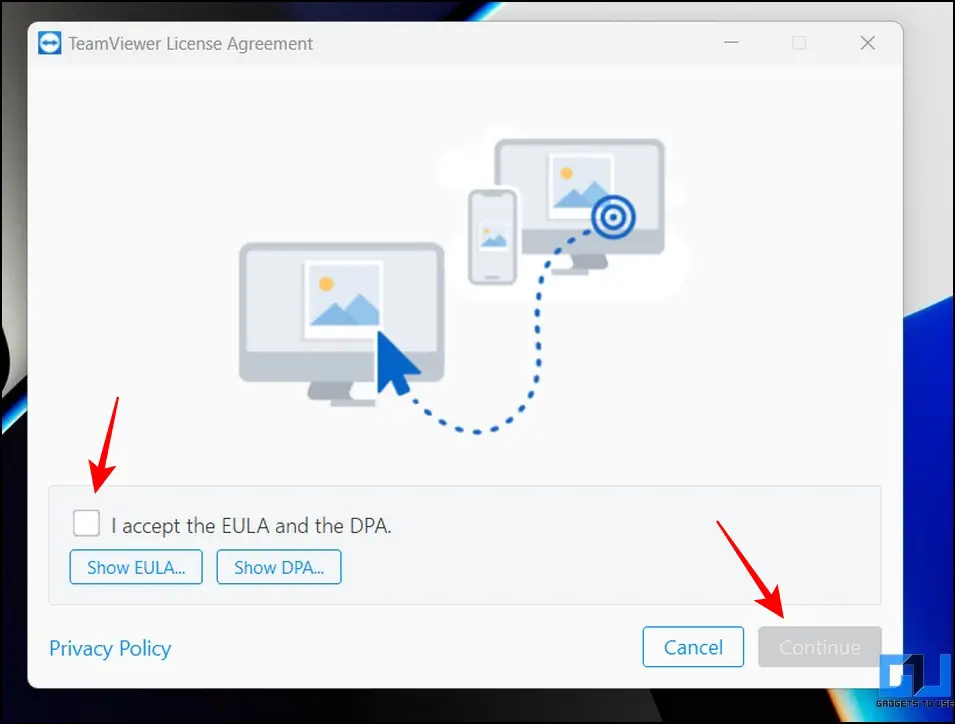
2. Next, accept the app’s terms and conditions and click the Continue button to proceed.
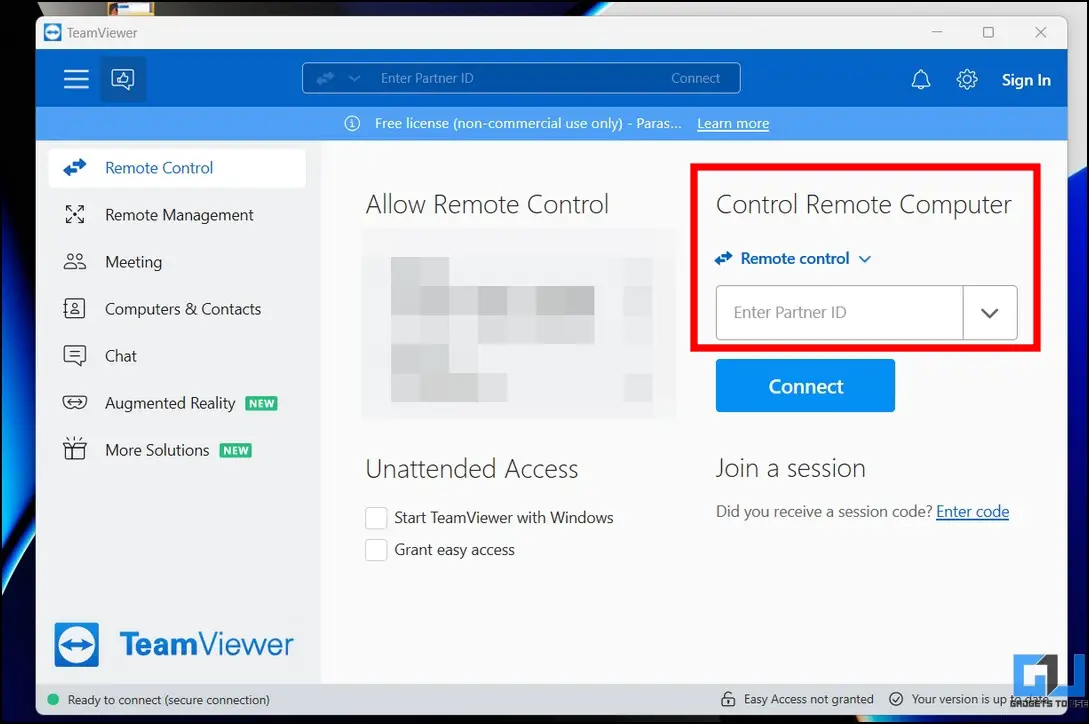
3. You will now be navigated to the app’s home screen, where you will see the option to control the remote computer.
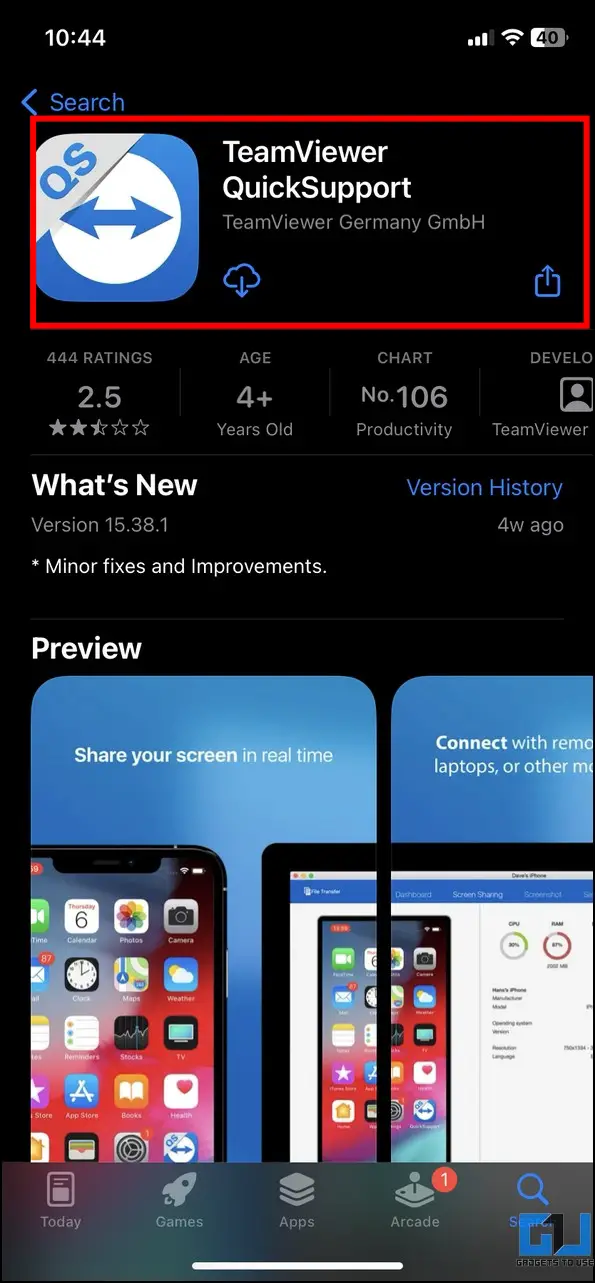
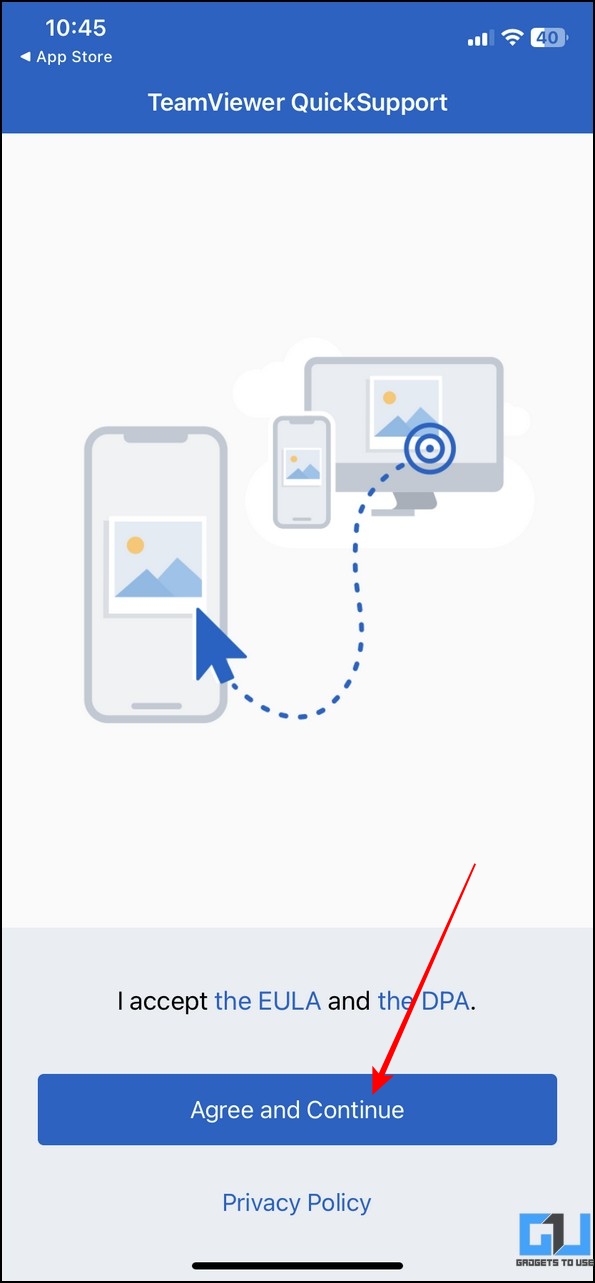
4. Now, install the Teamviewer QuickSupport app on your iOS device from the Apple App Store and tap the Agree and Continue button to configure the app.
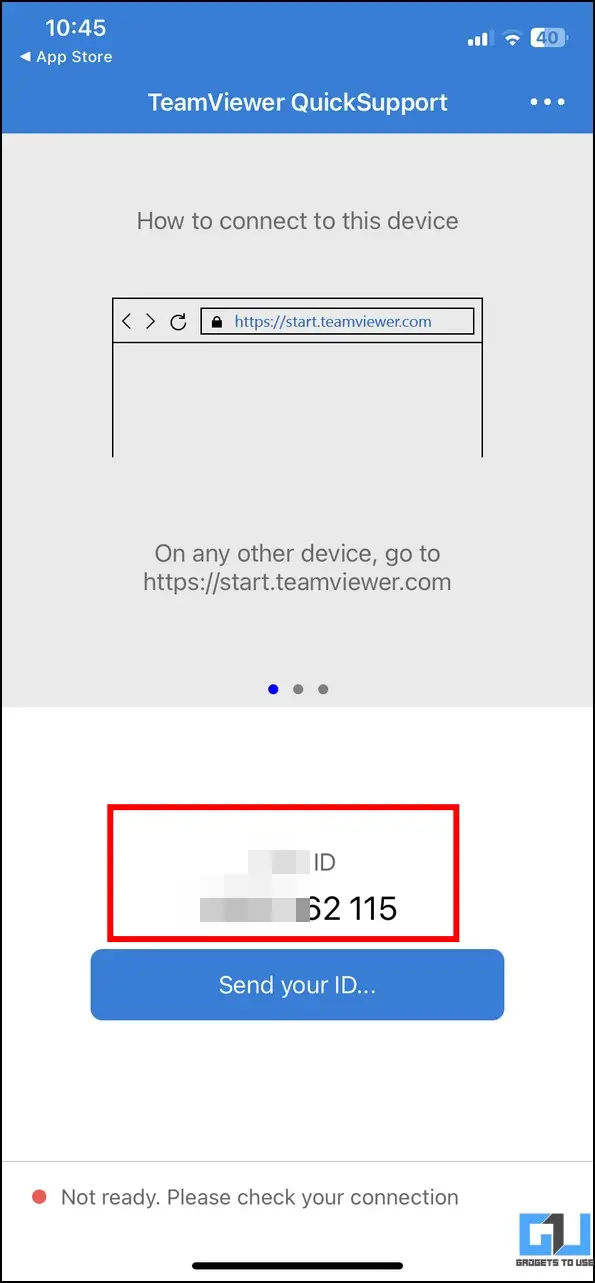
5. Wait a few seconds to let the app generate your device ID and note it down for the connection.
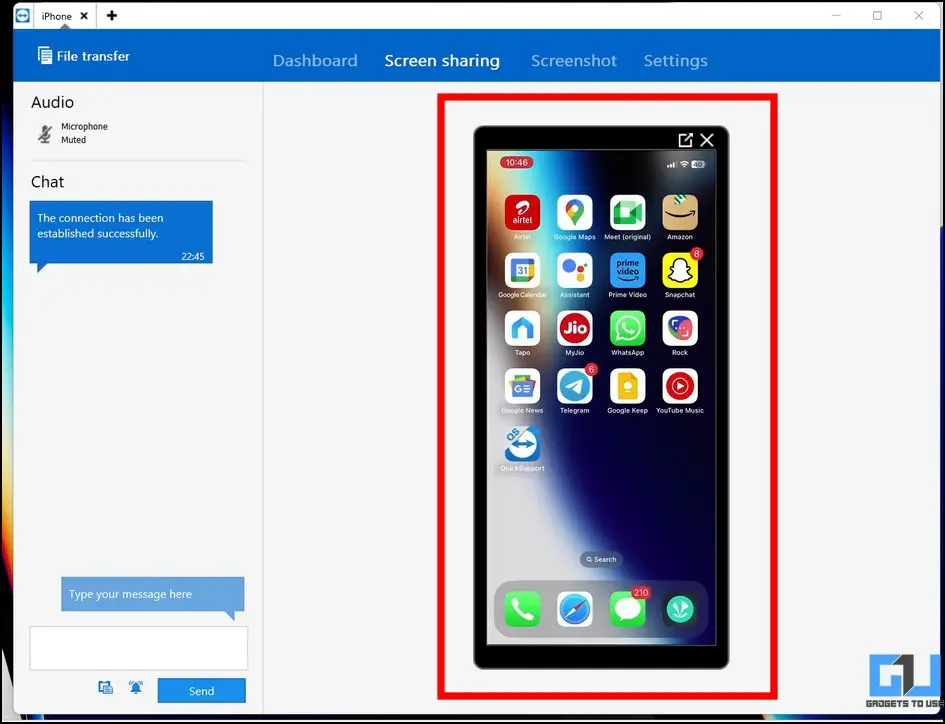
6. Enter the device ID on your PC and click the Connect button to establish a screen-mirroring connection with your iOS device.
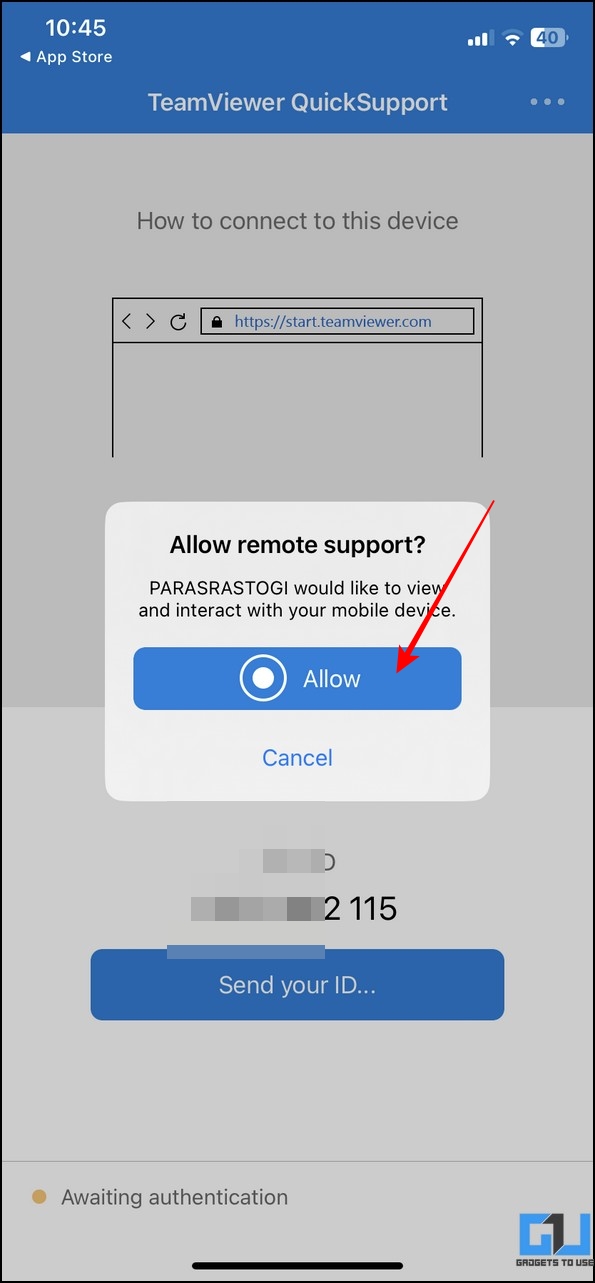
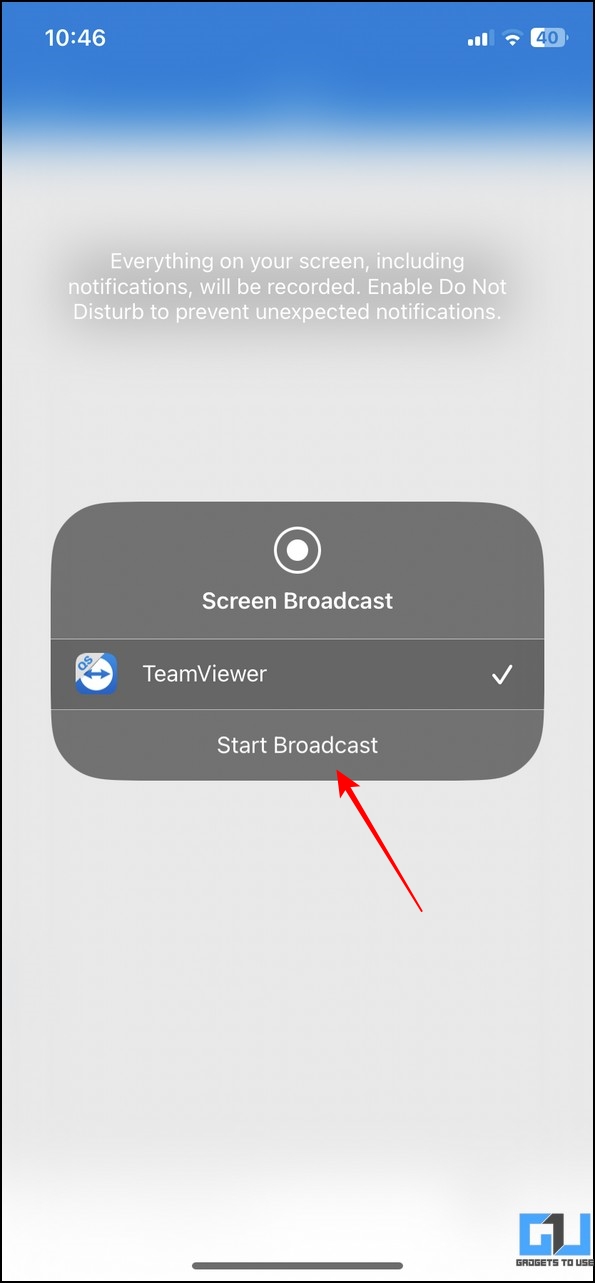
7. Tap the Allow and then Start Broadcast on your iPhone/iPad to approve the mirroring request.
8. That’s it! You can now view the entire device screen on your Windows 11 PC.
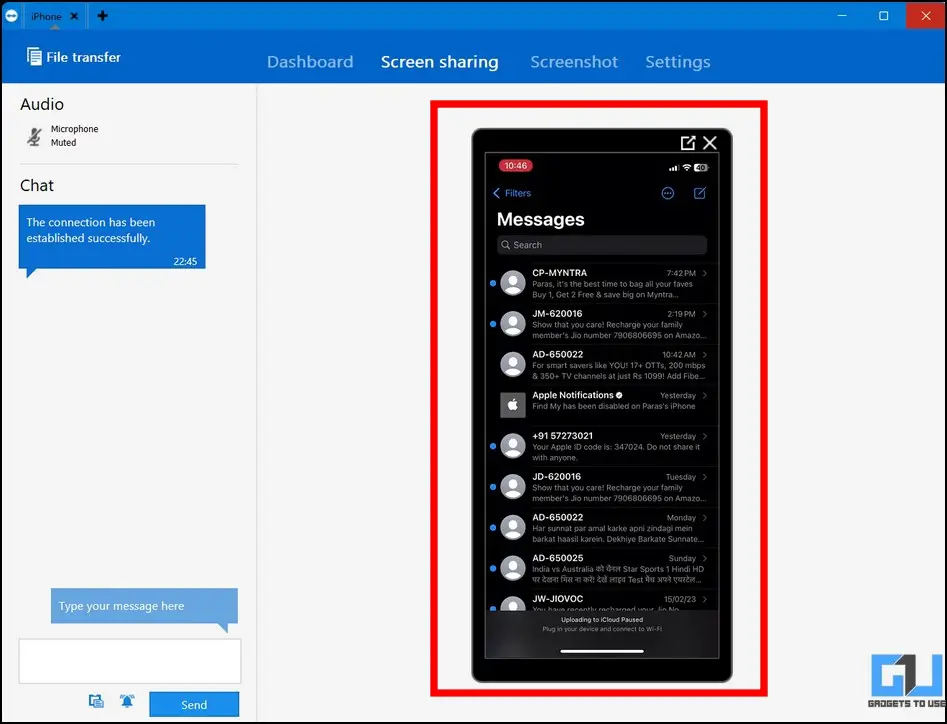
9. Finally, open the Messaging app on your phone to keep an eye on all existing and incoming messages from your Windows machine.
Bonus: Lock Text Messages on iPhone and iPad
Do you wish to protect the messages on your iOS device from snooping eyes using your phone? Check out our comprehensive guide on locking messages on iPhone or iPad to secure the same.
FAQs
Q: How to use iMessage on Windows 10 or 11?
A: We have mentioned four ways to use iMessage on your Windows PC in this explainer. Intel Unison being the best among all, check out the other three methods to use iMessage on Windows 11 conveniently.
Q: Can you use iMessage on Windows 10 without Mac?
A: Yes, you need to create a virtual Mac image on your Windows 10 system to use iMessage. For more details, refer to the steps mentioned above.
Wrapping Up: Use iMessage on Windows like a Pro!
We hope this guide has assisted you in accessing iMessage on Windows PCs. If you find it useful, share it with your geek buddies who might be looking for a solution to run iMessage on Windows. Check the below links for more informative articles, and stay tuned to GadgetsToUse for more such reads.
Also, Read the following:
- Windows Phone Link vs. Intel Unison: Which One is Better?
- Top 3 Ways to Turn Off Flash Messages on iPhone
- 6 Best Ways to Hide your Text and Other Messages on iPhone
- 8 Ways to Fix iPhone Keeps Asking for Apple ID Password
You can also follow us for instant tech news at Google News or for tips and tricks, smartphones & gadgets reviews, join GadgetsToUse Telegram Group, or for the latest review videos subscribe GadgetsToUse Youtube Channel.